Host an Holiday Adopt-a-Family Campaign with GiveWP
Connect with your community using GiveWP to create a Holiday Adopt-a-Family campaign!

The holiday season is an opportunity for connection and celebration and giving. During the holidays, people feel more compelled than ever to perform acts of kindness and generosity.
One such popular activity is an Adopt-a-Family campaign! Make it easy for your supporters and donors to participate without needing to pick a physical angel off of a physical tree at a physical location.
Meet them where they are: online.
Planning Your Adopt-a-Family Campaign
You’ll need to make some decisions about your campaign before you get started. Take some time to answer the following questions (which will help you as you go through this tutorial):
- How will you connect with families in need? How will you get their information?
- Is it your expectation that the donor is responsible for collecting/purchasing all items for your families in need?
- Do you want to give your donors an option to donate monetary donations only vs. purchasing/providing gifts?
- Do you have volunteers that will collect/shop on behalf of your donors (if they choose not to)?
It’s important to decide up front if you’re going to require your donors to be responsible for the family’s gifts or if you’ll shop on behalf of your donors. For the purpose of this tutorial, and for making this campaign more accessible to all donors (from around the world) we’ll cover both scenarios.
Allowing your donors to donate a larger amount towards a family’s wishlist, so that you can then shop/collect items on their behalf is a great way to create an inclusive and accessible campaign for all to join in on.
There are a lot of folks out there that would love to participate in a campaign like this but don’t have the time, energy, or resources to follow-through. By doing the collecting/shopping for your donors, you can help them to make an impact and do more for your families in need.
Steps to Creating an Adopt-a-Family Campaign
Creating an Adopt-a-Family campaign with GiveWP is pretty simple! In short, there are only seven steps to getting this holiday campaign up and running!
- Collect family information (on your website or elsewhere).
- Create your GiveWP forms for each of your families.
- Create the family landing page for each of your families, using the information you collected at step #1.
- Create an Adopt-a-Family page and add the Donation Form Grid shortcode displaying your Adopt-a-Family donation forms.
- Customize your donation receipts, and admin notifications.
- Connect your forms to MailChimp or another email tool to keep your donors up to date with your campaign.
- Start spreading the word!
Let’s dive into the nitty gritty of creating your campaign!
Collect Family Information
First, you’ll need to collect the information for your families in need. You might already have a mechanism in place for this through your organization, but if this is a brand new campaign you can collect this information directly on your website.
- Create a submission form on your website using Ninja Forms (for example) where folks can submit a family for approval.
- Once you review the family’s submission, review, approve, and email a confirmation to the person who submitted the family (you might need to clarify some information or collect any missing info).
- Use this information to create your GiveWP form and donation landing page (we’ll cover that next).
The goal with an Adopt-a-Family campaign is to match up a donor and a family in need and this campaign will do just that. By defining a donation goal based on the number of donors (to be just one) you’ll encourage donors to adopt a single family and to be responsible for that family, whether they decide to donate the full amount upfront or shop for the family themselves.
Creating Your GiveWP Forms
When using GiveWP to accept online donations, a monetary donation is required. To simplify your campaign, the best way to accept donors who a) want to shop for their adopted family and b) who want to donate the full amount online is to offer two different donation options on your form:
- Option One: Registration fee for Adopt a Family, donor shops
- Option Two: Sponsor a Family, donor donates & volunteers shop
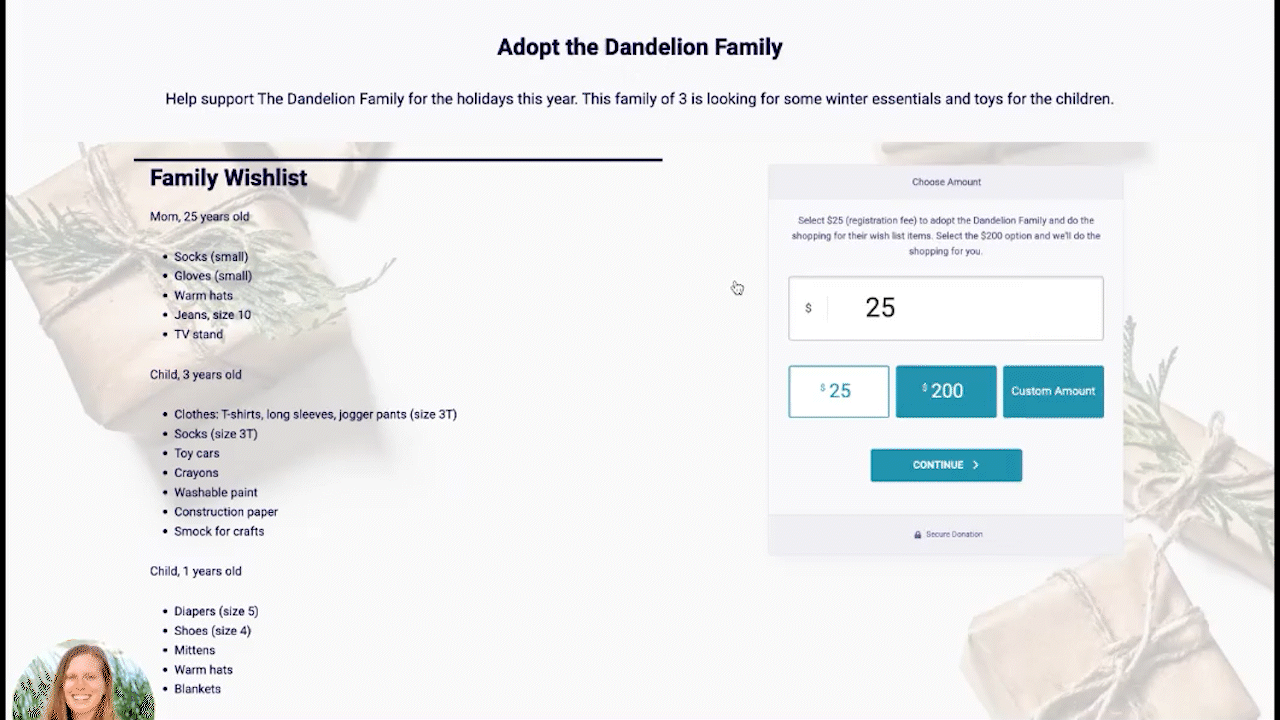
- Create a new GiveWP form, name the form the family’s name (“The Dandelion Family”).
- Select the Multi-Step template and continue to configure your settings on the “Form Template” screen: headline, description, image, colors, etc.
- Navigate to Donation Options and select “Multi-level Donation”.
- Scroll down to enable a custom amount.
- Scroll down further to define your donation levels:
- Set the first option to $25 (for example) and add a description: “Registration Fee for Adopt a Family, you shop”.
- Set the second option to $200 (for example) and add a description: “Sponsor a Family, we do the shopping”.
- Click “Donation Goal” and define your goal to “# of donors” to be one donor.
- Select Enabled under the “Close Form” section so that your donation form won’t accept new donors/donations after the family is adopted.
- On the right-hand side of your screen, look for the Categories/Tags section and add a new tag to your form: “Adopt-a-Family”.
*If you don’t see the categories/tags section under your form options, you’ll need to turn this setting on under Donations > Settings > Default Options > Taxonomies > Tags > Enabled. - Publish your form.
- Navigate to Donations > All Forms > scroll over (don’t click) your new form and click “Duplicate” to create a new form for your next family and repeat steps 1-6 for each family.
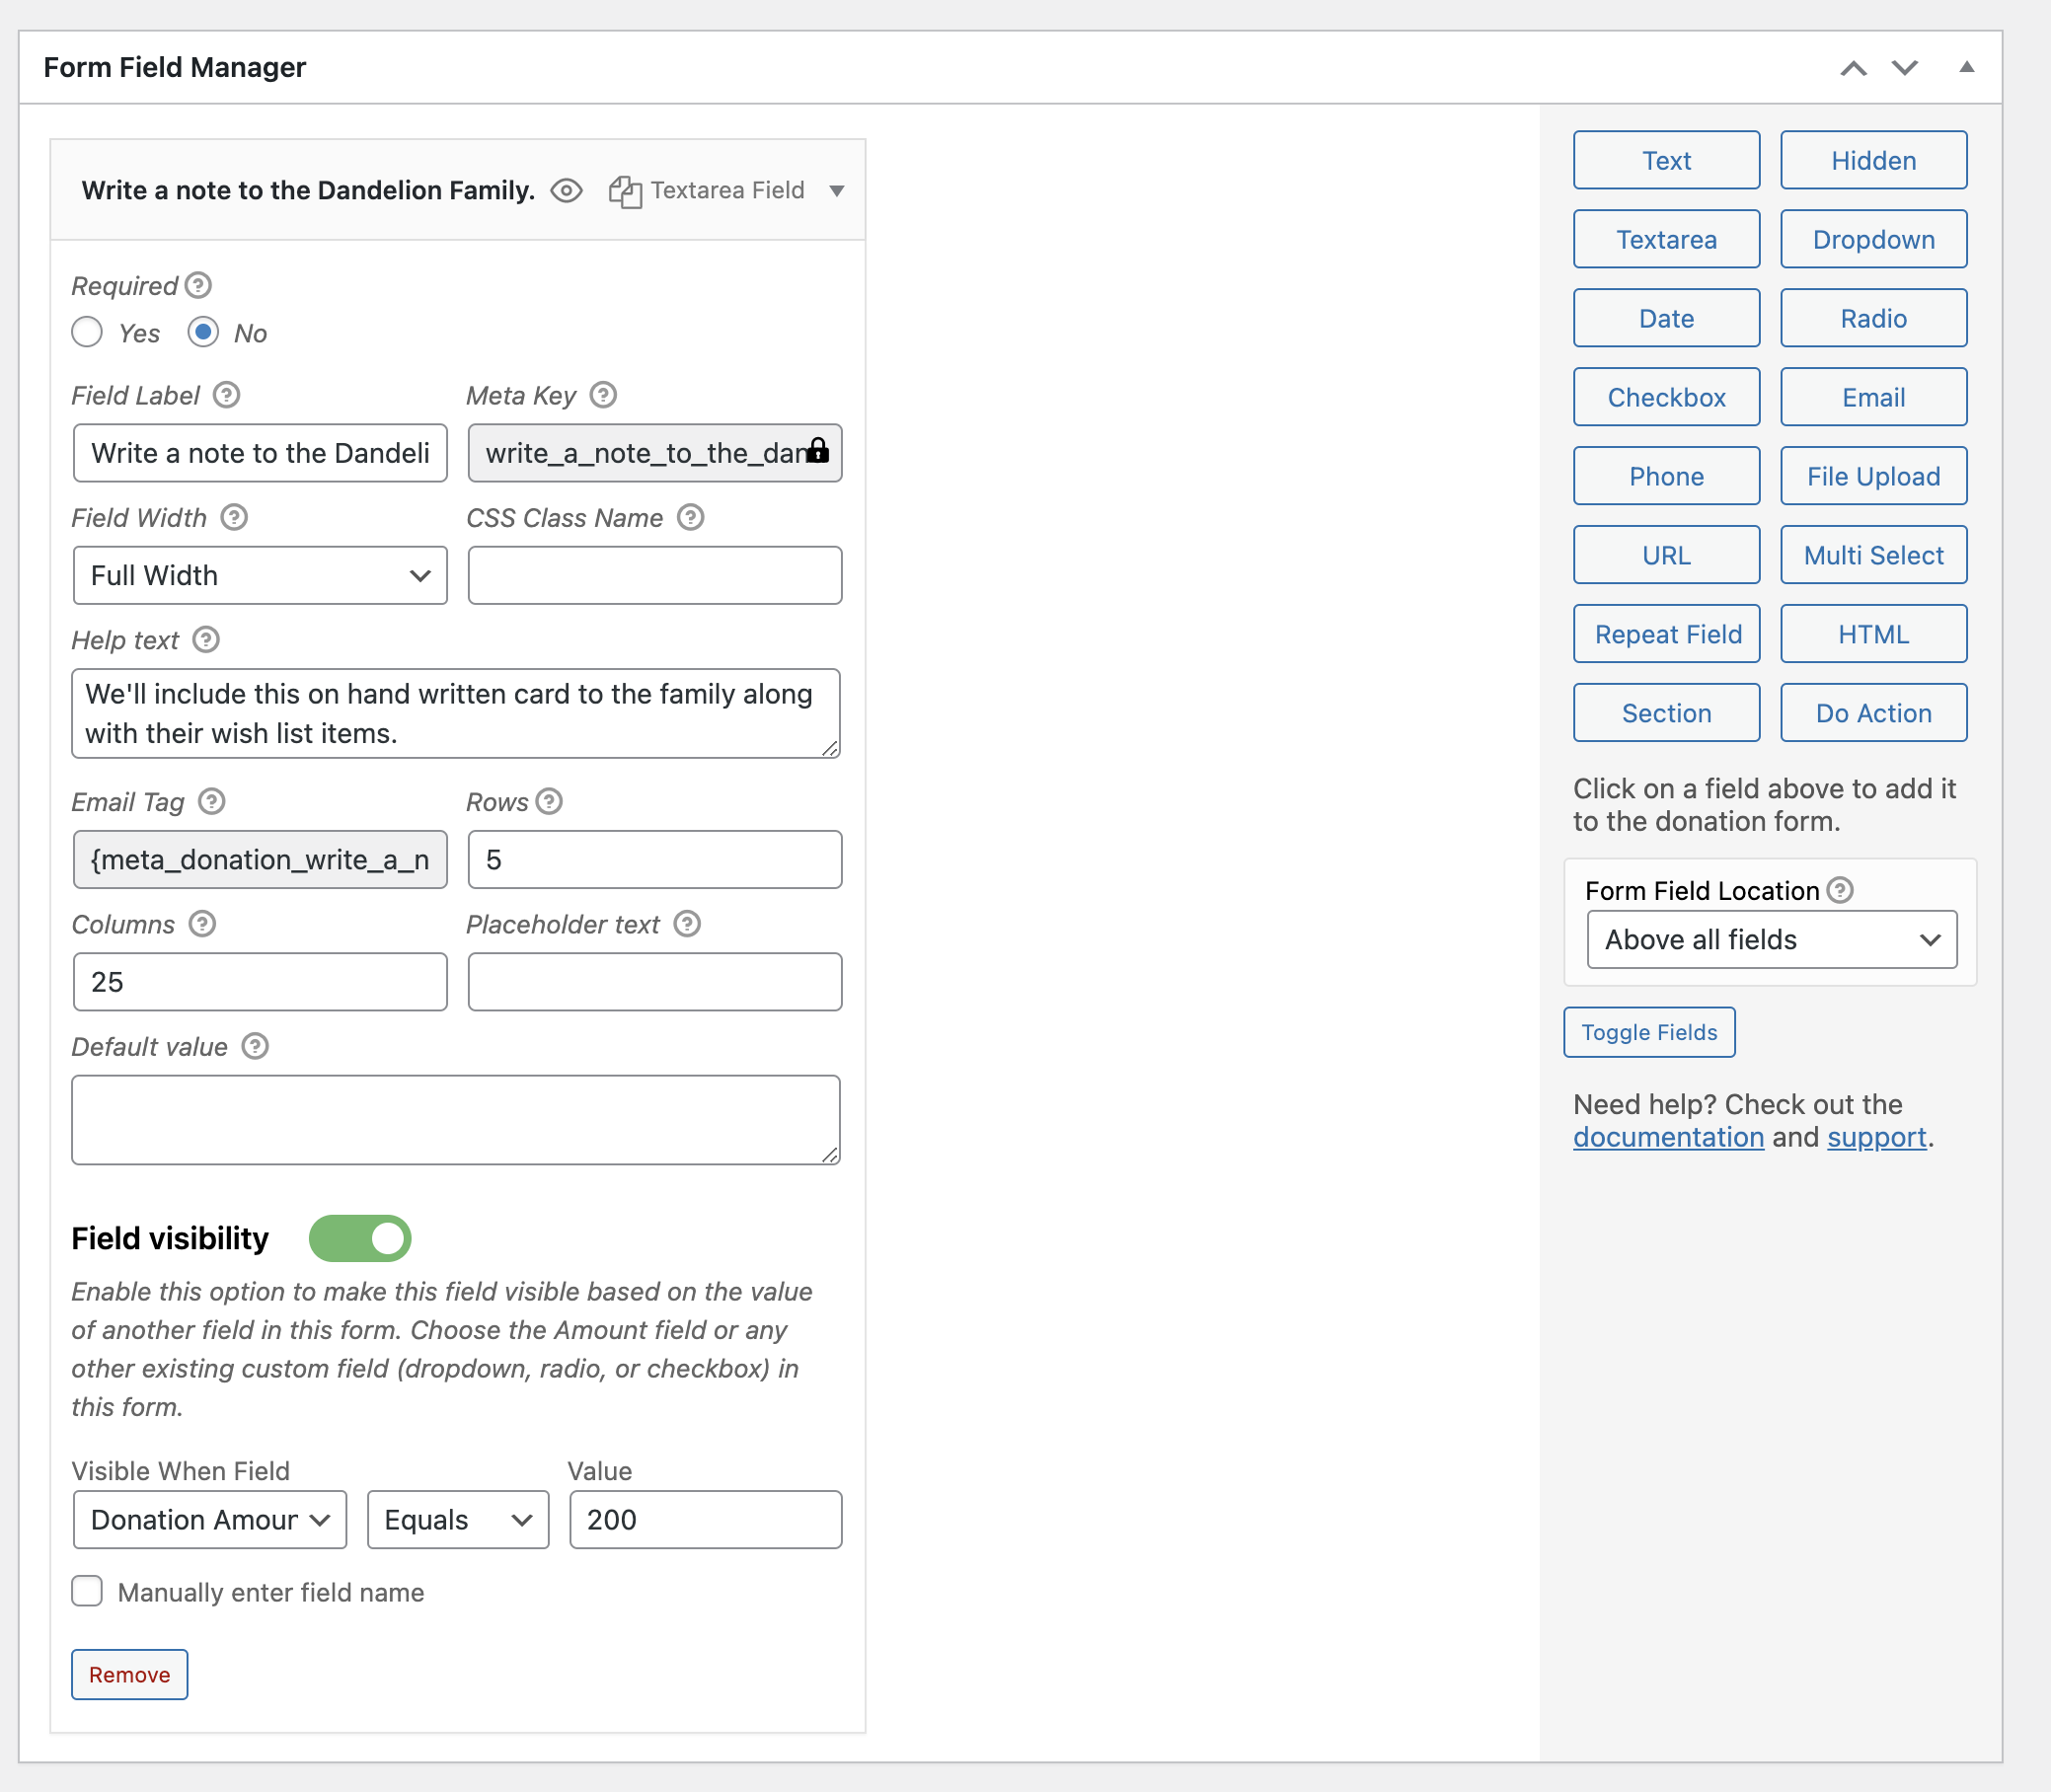
Add a little something extra special for the folks who opt to sponsor the family by donating the full amount. By adding a conditional field asking for the donor to write a note to the family, you can create a special moment when delivering the gifts to their adopted family.
Adding a Conditional Field for Sponsor a Family option:
- Download, install and activate the Form Field Manager add-on if you haven’t already.
- Create a new field to add to your form using Form Field Manager, a text area.
- Toggle “Field Visibility” to enable it, select Visible When Field is Donation Amount, Equals, $200.
Creating Family Landing Pages
Creating a felt sense of connection between your donors and the families you’re supporting is important to consider. By creating individual pages for each of your families, you’ll have more flexibility in sharing their information, wish lists, and needs.
- Add a new page under your WordPress dashboard > Pages > Add New
*This first page will become your template for all the others. - Design your page with your favorite page builder (we love KadenceWP’s page building tools)
Your page should have a two-column section where:
On the left-hand side you’ll include the family’s name (or a faux name if not given), family members (mom, dad, teenager, child, toddler, etc), and their wishlist/needs.
On the right-hand side you’ll place your GiveWP form (via shortcode, block, or widget).
- Save your page.
- Create your next page by duplicating your first page (Yoast has a free page/post duplicator plugin if you need it!)
- Repeat steps 1-3 for each family, replacing the content from your first page each time.
Create the Adopt-a-Family Page (Using the Donation Form Grid)
Now that you have your GiveWP forms and pages set up for each of your families, it’s time to start putting it all together.
You’ll need to create one more page 🙂 Let’s call this one your “Adopt a Family 2022” or something more aligned with your organization. Design the page as you like.
Now, to display all of your families in need, you’ll use the Donation From Grid with GiveWP to display the family donation forms you created already.
To display the Donation Form Grid, use the below shortcode (or use the Elementor widget or WordPress block if you prefer).
Shortcode: [give_form_grid columns=”1″ show_goal=”true” show_excerpt=”true” show_featured_image=”true” display_style=”redirect” tags=”adopt-a-family”]
You’ll need to make sure that either the block or shortcode is set up to only display the donation forms with the tag “Adopt-a-Family”.
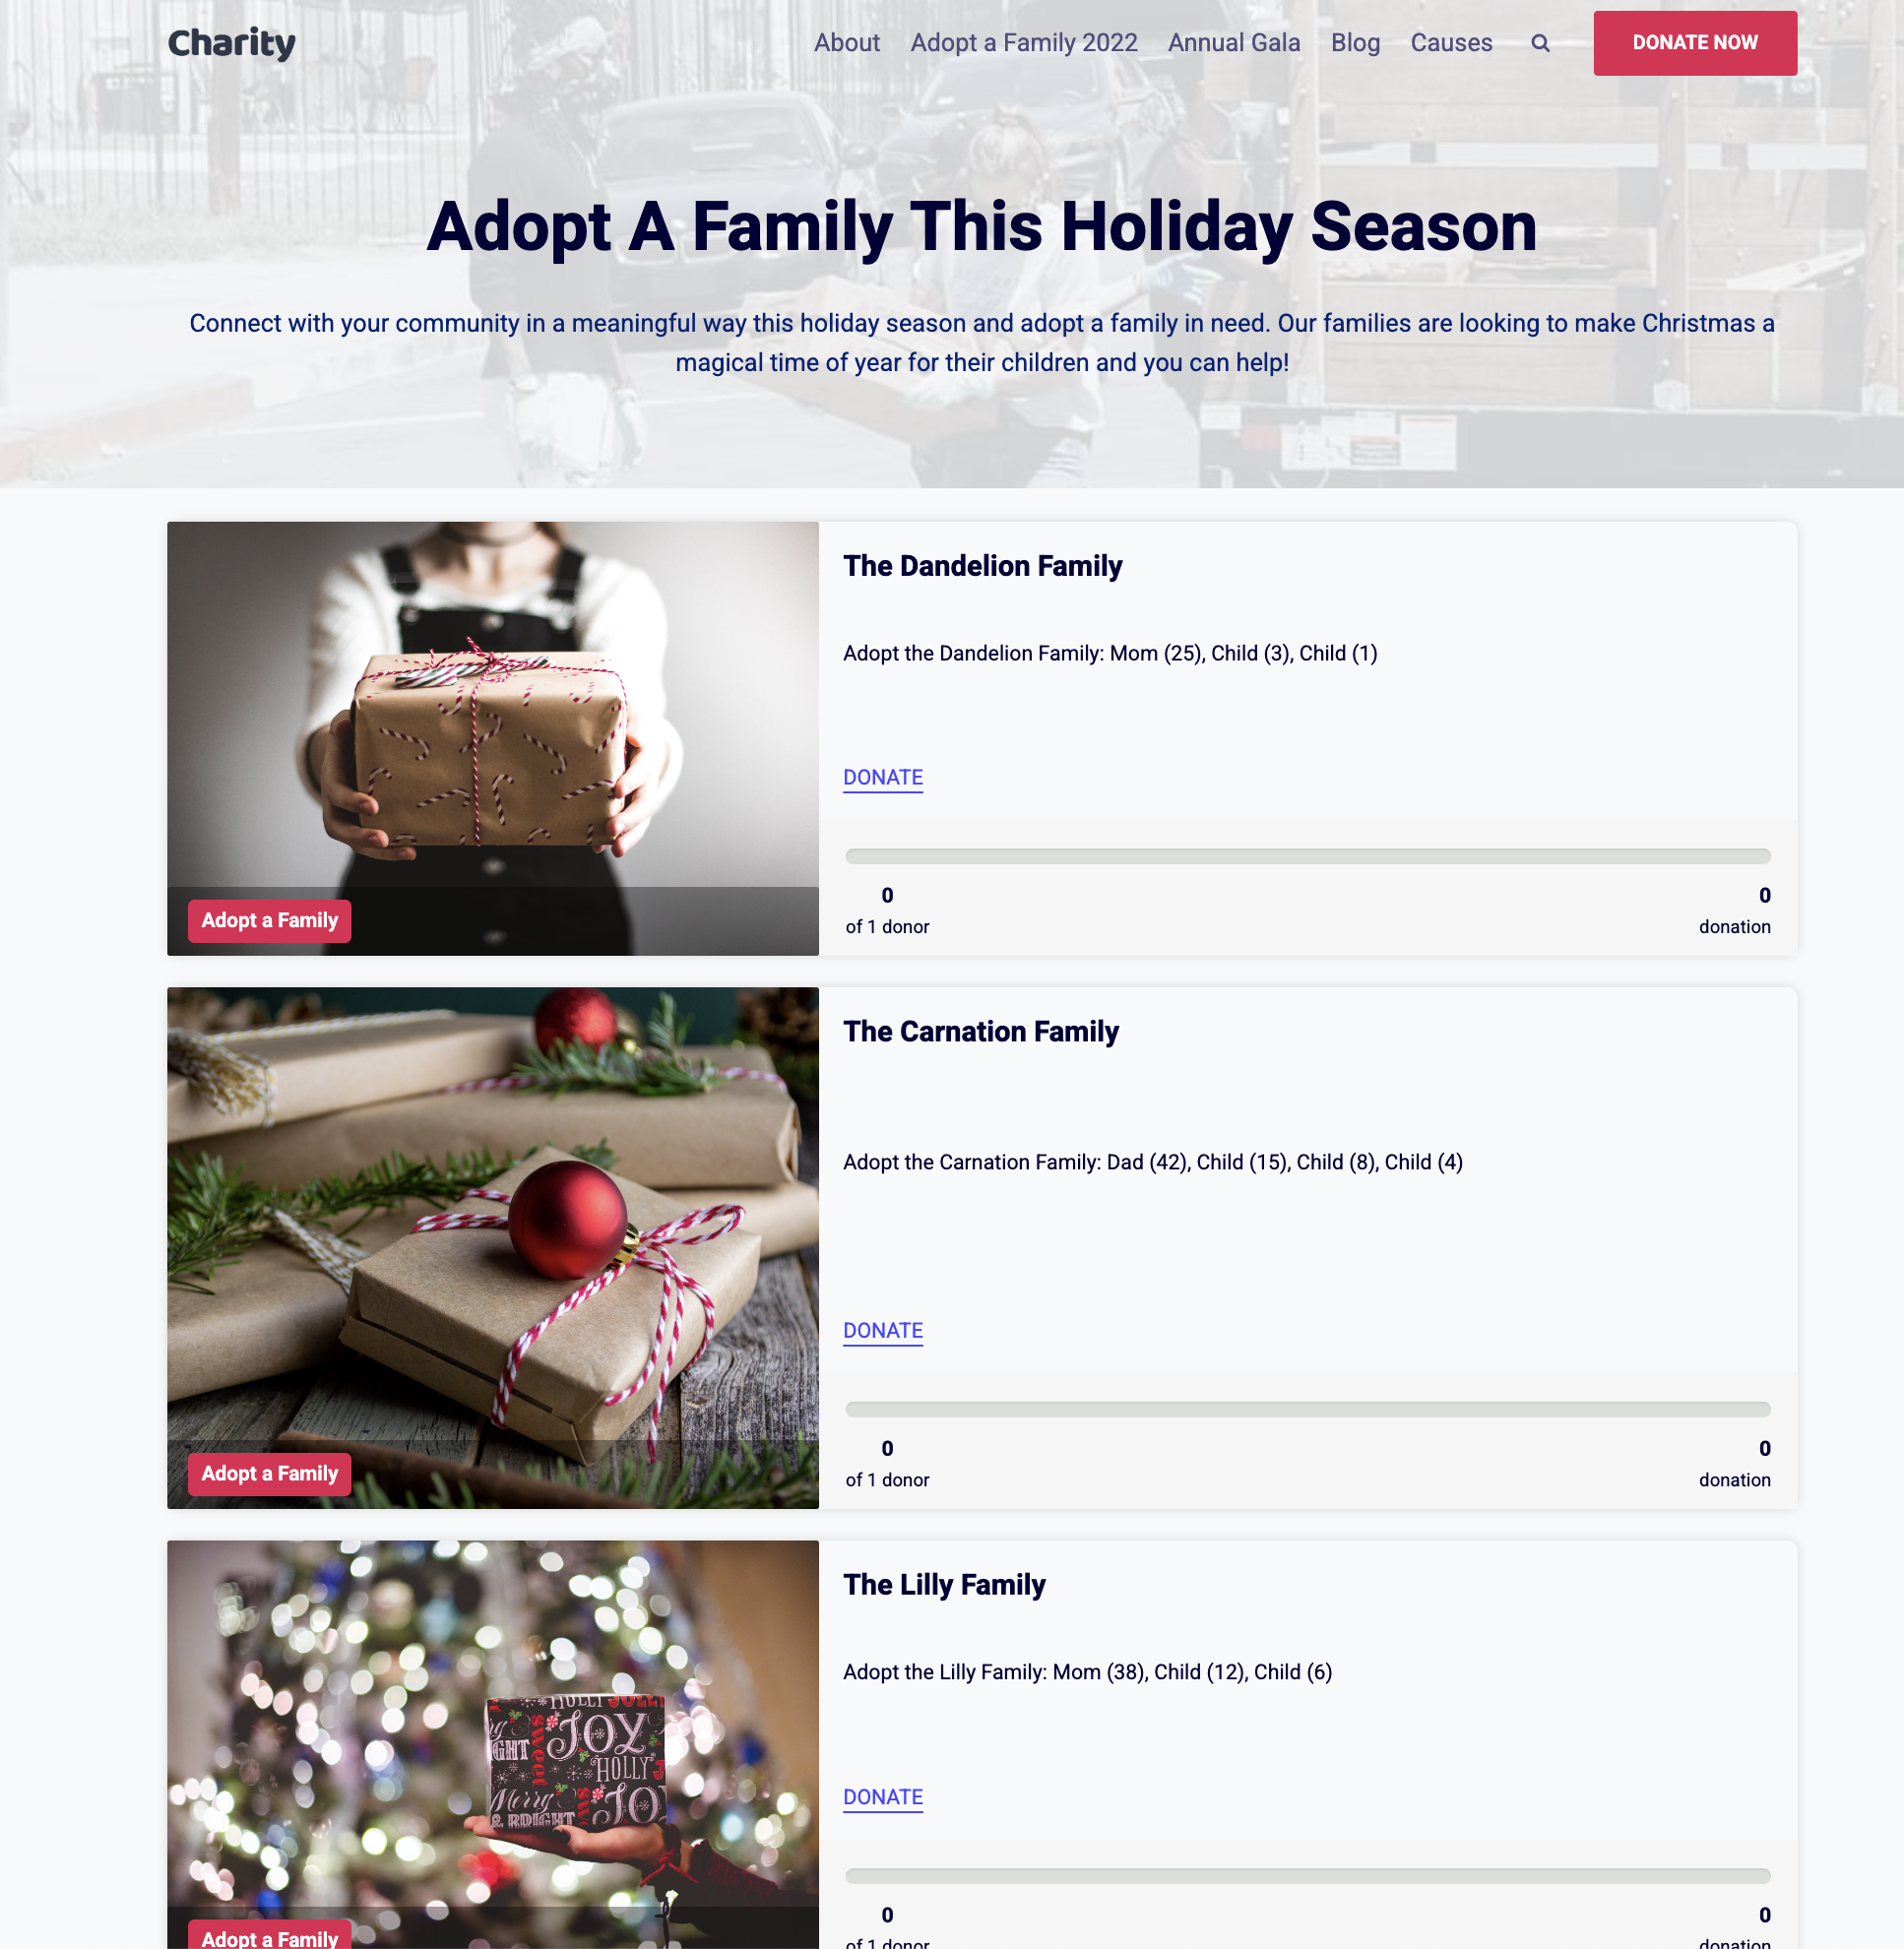
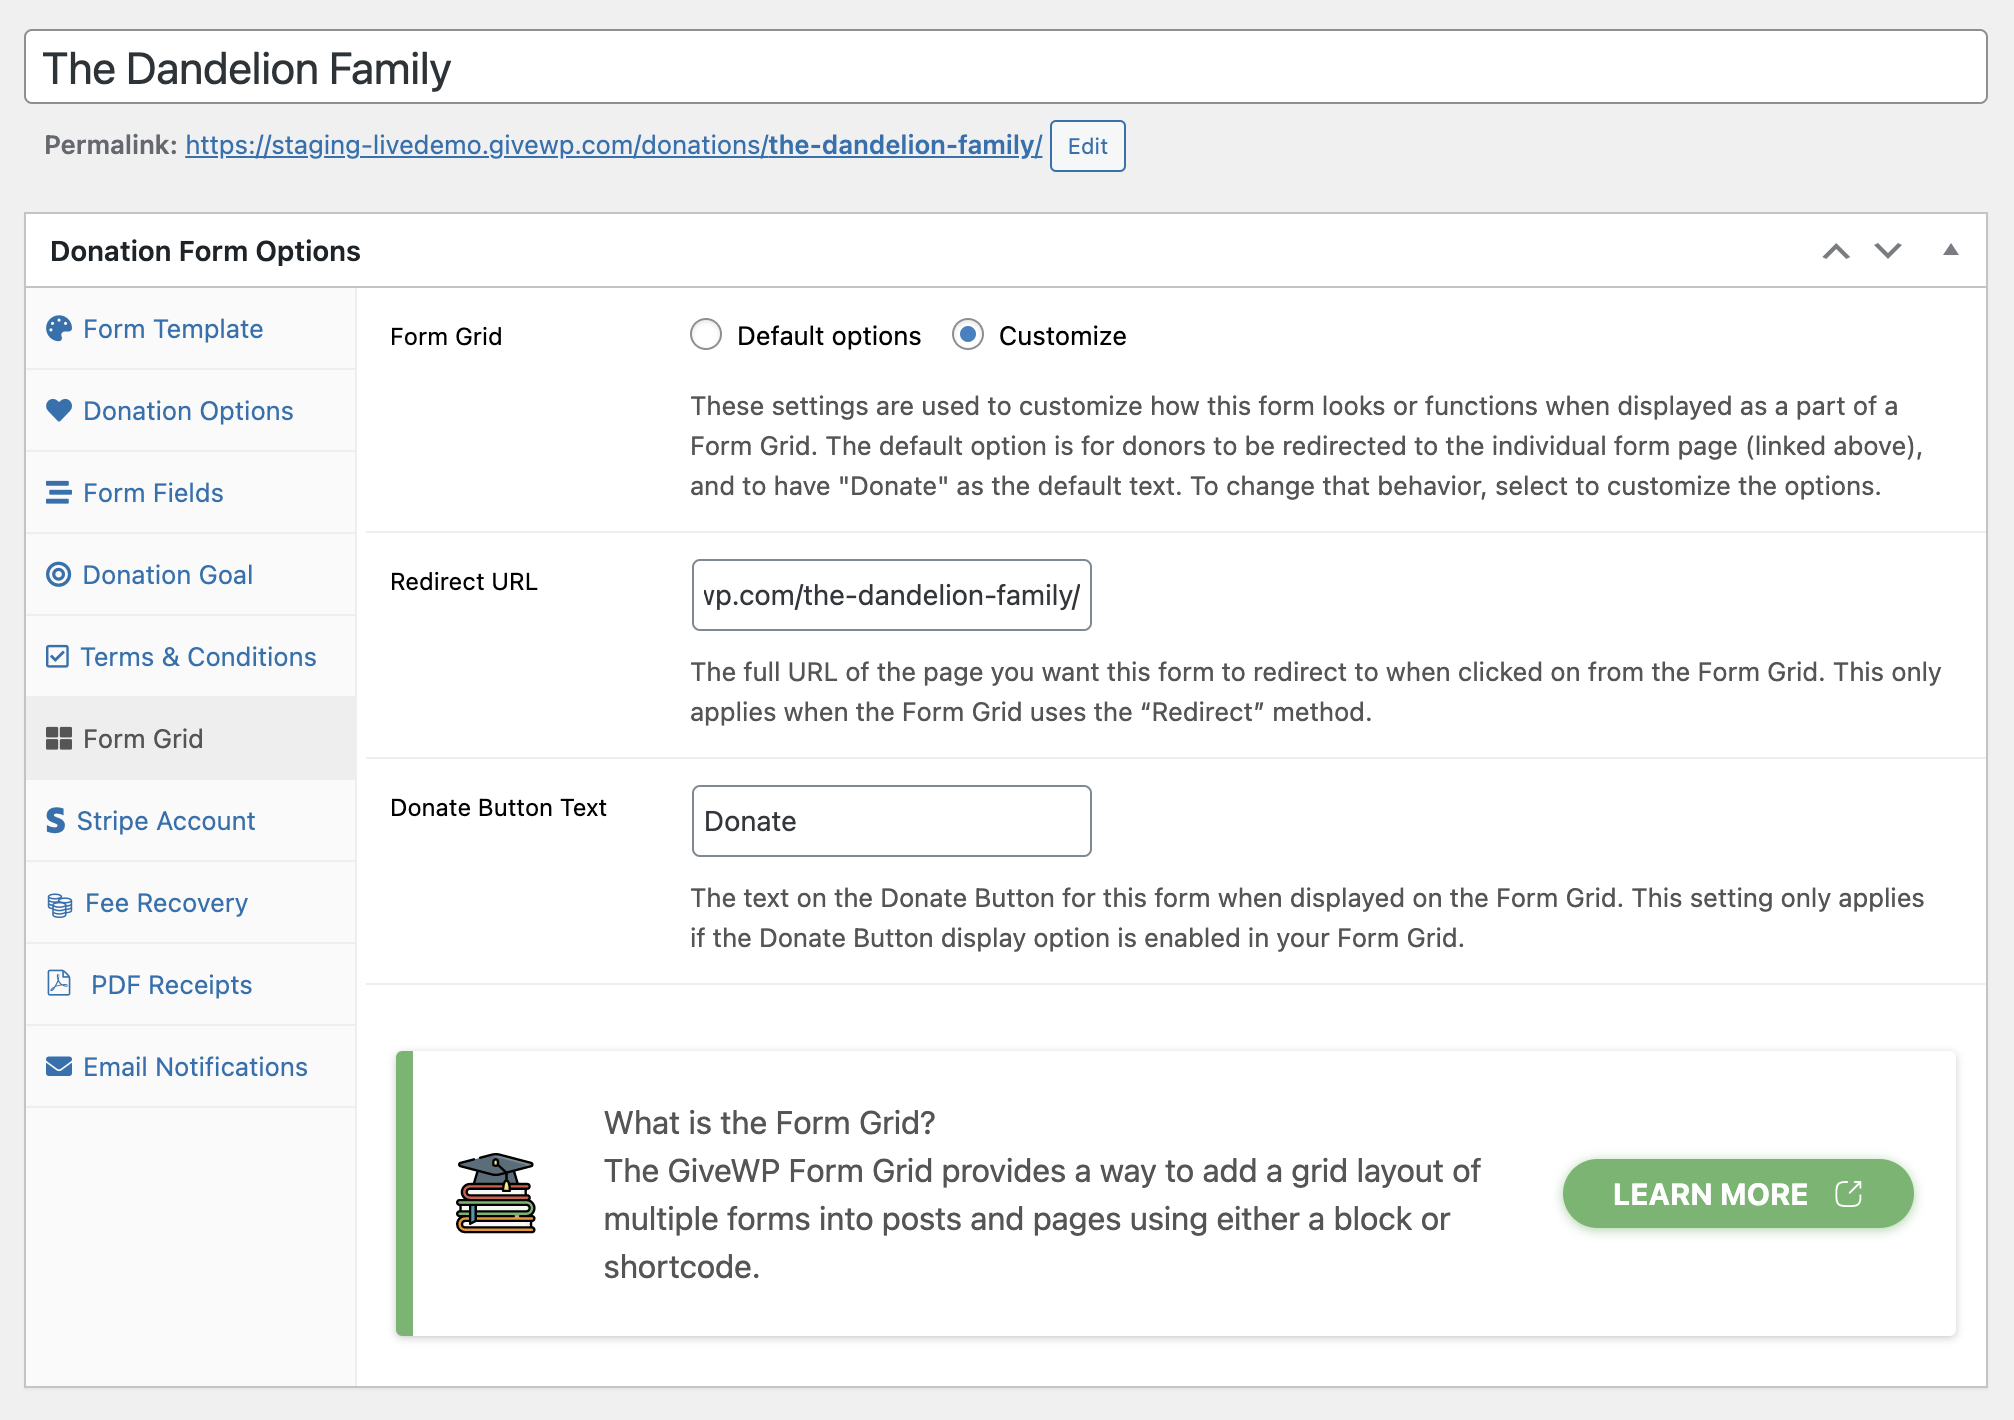
Your last step involves connecting the individual family landing pages to your Donation Form Grid, so when a donor clicks on a family in your grid, they are redirected to that family’s landing page to donate.
- Navigate to Donations > All Forms > edit each of your Adopt a Family forms
- Find “Form Grid” in the Donation Form Options
- Click “Customize”
- Add your landing page for that family in the “Redirect URL” box and customize the donate button text if you like.
Customizing Your Receipts
Each of the GiveWP forms you create for each family has an option to customize the donation receipt email donors will receive. Let’s take a moment to go over how you can customize the donation receipt email to include some personality and specifics about the family your donor’s will be supporting.
- Navigate to your WordPress Dashboard > Donations > All forms.
- Edit one of your forms.
- Look for the “Email Notifications” menu item on the left-hand side within your donation form options.
- Click “Donation Receipt” and then “Customize”. This will override the global email settings you configured for all of your donation forms.
- Add an image (if you like), the family’s name (or given name), include the wish list items for each family member, and anything else that would be relevant to the donor of this particular family.
- Save your changes and be sure to test!
Note that you can also configure your admin email preferences on a per form basis. Maybe you have a specific volunteer helping with specific families (organizing drop offs, answering questions). Add your volunteers to the admin email recipient section so they’ll know when a new donor has adopted one of the families they are responsible for.
Create a Newsletter Funnel
Consider creating a newsletter for your Adopt-a-Family campaign! If you’re using one of our email marketing add-ons to opt your donors into your mailing list, you might consider doing a specialized campaign for your Adopt-a-Family donors.
Each GiveWP form will allow you to select a specific list or add a tag to donors as they opt in on the donation form. With this information you could create a campaign specific to the Adopt-a-Family donors, on a per family basis, to give donors an update on how the family is doing and share any important information about drop off dates, instructions, and more.
Start Spreading the Word!
You’ve created your GiveWP forms, your Donation Form Grid, customized your emails, connected to your newsletter, and now it’s time to spread the word for your campaign!
Here’s a few tried and true ways to get to promoting your Adopt-a-Family campaign:
- Ask volunteers to share your Adopt-a-Family campaign page on social media.
- Create a promotional newsletter campaign and send out to all past and current donors, with an ask for them to forward it to others as well.
- Consider running a Facebook ad to promote your campaign.
- Write up a press release and reach out to local media outlets to let them know about your campaign for a potential to be featured on the news or on their website.
- Collaborate with local influencers who may be interested in sharing your posts/creating a post on their own channels to encourage their followers to join in on the campaign.
At GiveWP, we are always trying to think of new and innovative ways our Donation Forms can be used across a variety of campaign types. We hope you’ll give the Adopt-a-Family campaign a try! If you do, let us know!
About the Author
Amanda Gorman
Amanda Gorman is Director of Customer Success at GiveWP where she uses her nonprofit expertise and WordPress superpowers to help folks around the world make a bigger difference in their communities. Amanda treasures spending time with her family, time in nature, studying and teaching yoga, and is possibly obsessed with Beyoncé.