How to Recover Your Pending Donations
Are you getting a lot of PayPal donations setting to “Pending” and never completing? What if you could automate an email reminder to all those donors? This tutorial will walk you through using Zapier to automatically email those pending donors with a prompt to complete their donations. E-commerce platforms often have “cart abandonment” functionality to…

Are you getting a lot of PayPal donations setting to “Pending” and never completing? What if you could automate an email reminder to all those donors? This tutorial will walk you through using Zapier to automatically email those pending donors with a prompt to complete their donations.
E-commerce platforms often have “cart abandonment” functionality to remind those who started checking out to continue. Give doesn’t have (or need) a cart, but that shouldn’t keep you from finding and reminding folks who were interested enough to click “Donate now” in the same way that a cart abandonment feature would. This power-user tutorial will walk you through a code-free way to send a reminder to donors who forgot to finish their transaction using Zapier.
Donation Friction
Days after a large charitable foundation launched a highly publicized campaign to raise money for thousands of wildfire victims displaced from their homes, Give Support got a panicked email from their webmaster. Some of their donations were not going through.
“There’s a ton of Pending Donations!” they said.
In reality, what was going on is a natural byproduct of what internet marketers call “friction.” Any time a donor has to do something else or click somewhere else during the donation process, that adds friction to the transaction. This lessens the number of people who actually follow through on the donation.
In this foundation’s case, the issue was amplified by the sheer number of donations pouring in. Any payment gateway that takes donors away to a third party website, like PayPal Standard does, adds friction. When this happens, a certain percentage of the donors fail to follow through on their donation.
In addition to creating friction, every donation using an offsite gateway is also creating an unknown element for Give. The software can’t track what happens after a donor leaves to go to the gateway, so Give creates a donation and sets its status to “pending.” Meanwhile, it waits for confirmation from the gateway that the transaction was completed.
When the donation is complete and the donor is redirected back to the Donation Confirmation page, the status is updated to “complete.” At this point, all of the after-donation logic is completed. Like sending confirmation emails and updating goal progress, for example.
Donations that are left in “pending” mean that either (a) Give did not receive confirmation from the payment gateway that a donation completed once the donor left for the gateway or (b) they actually never completed the donation while on the third-party site for any number of reasons. This tutorial is planning for option (b) but keep in mind that the issue could be option (a).
So how do you reach out to those oh-so-close-to-donors to follow up?Automate and individualize the process of following up with donors using our Zapier add-on and a bit of creative zapping.
Requirements
Before we get into the nitty gritty of configuring your “Zap” (the fun name for Zapier workflows), please note a few things:
- You’ll need the Zapier add-on for Give (included in our bundles!).
- You’ll need a paid Zapier account—we’re going to be setting up a multi-step Zap that requires one of their paid plans. This is charged separately (and by Zapier) from our add-on licensing. The great news is that the procedure shown here will pay for itself very quickly.
- This process, while relatively code-free, will require some learning if you are not already familiar with Zapier or APIs in general. Grab as much coffee as necessary and don’t hesitate to comment with questions. If you get really stuck, submit a Priority Support ticket.
What is a “Zap”?
If you are not yet familiar with Zapier, it’s essentially an online service that allows you to make an action happen based on triggers from other services. For example, Zapier can help you create new Google Calendar events whenever there’s new activity on your Facebook Page. Or you can automatically save all photo attachments you get in your Gmail inbox to a Dropbox folder.
In order to automate these processes, you create what Zapier calls a “zap”. Zapier has a good introduction to Zapier “zaps” here.
Setting up Give and Zapier
Before we create our “zap”, we need to configure your Give-powered website to work with Zapier. As with all our add-ons, we have detailed documentation in the “Give on Zapier” section.
Create Your Pending Donation Saving “Zap”
Now that you’re all set up, let’s create our “zap.”
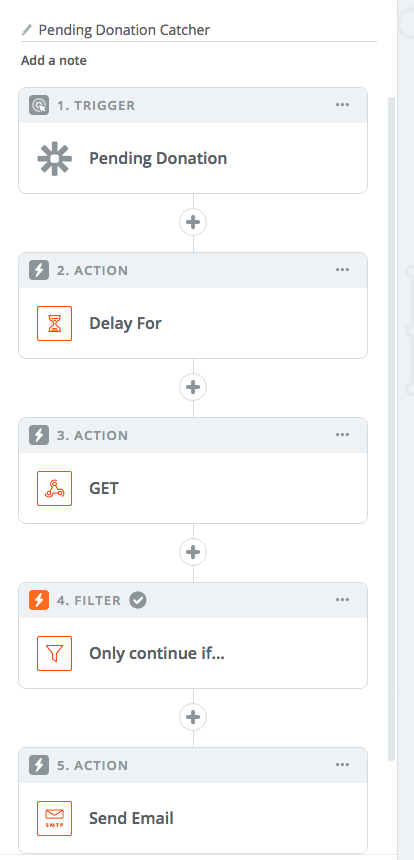
We’ll be creating a Zap to check for Pending Donations from your website, and then based on a time delay, we’ll have Zapier send a follow-up email to that donor. All of that is accomplished with a 5-step Zap:
- Trigger — Start with your Give Zapier Add-on.
- Action — Set a time delay.
- Action — Get the donation again.
- Filter — Filter out the donation if it’s no longer “Pending.”
- Action — Send the email.
Step 1: Trigger
In Zapier, right after you create a new Zap, it will ask for the action. In this case, it’s your Give integration.
The “Pending Donation” trigger is fired any time a donation is set to “Pending” on the back end of the site. Note that it also fires any time a donation is manually set to “Pending” on the back end of the site.
Step 2: Action — Delay
Next, use Zapier’s “Delay for” action to delay for a time period. We recommend making this delay as long as anywhere between 3-6 hours or up to three days.

Step 3: Action — Get
After the delay, we’ll use Zapier’s “Webhooks” action with GET to re-check whether the Pending donation has been completed yet or not.
Whereas the Zapier add-on for Give pushes data to Zapier from your website, this step grabs your existing donation information from your website and checks the donation status.
In order to get Zapier to grab that donation, you need to access the Give API. We have detailed docs on how to build Give API URLs here.
In this case, your donations endpoint should look like this: https://example.com/give-api/donations/ (where example.com is your WordPress home URL).
Next, add three Query String Parameters of “token, id, and key” in three separate inputs. Put the Give API token and keys into those two, and in the id parameter, add the transaction (or Donation) ID from step one.
Lastly, select “no” for the “Send as JSON” and the “Unflatten” options. The remaining fields can be left empty.

Step 4: Filter whether the donation is “Complete”
At this point, Zapier has two sets of data stored: one from the initial Give-Zapier trigger, and another from a specified time period later.
Set a filter to check whether the status has changed from “Pending” to “Complete” in the interim between collecting the two datasets.
Use Zapier’s “Filter” action to check the second dataset. Make sure it will only continue if the Donation status is still set to “Pending.”

Step 5: Action — Send the Email
Now you’ve got a Zap set up to only send you donations that were pending and remained pending after a certain timeframe.
Armed with that, you can set up the remainder of your workflow to do whatever you’d like with that info.
You could use a MailChimp or Gmail action to send the donor the email. In our case, we’ll use the Zapier SMTP action, which allows Zapier to send an email directly through your email account. This means that once the Zap has determined whether or not a donation is still pending, it will send an email from you directly to that potential donor to remind them to complete their donation.
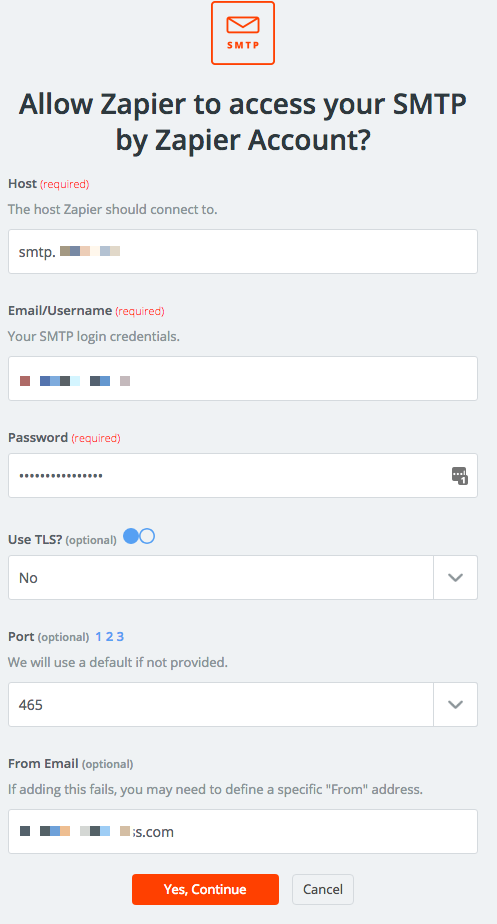
Search for “SMTP” and select SMTP by Zapier.

The next screen asks for your connection credentials to connect to your SMTP account. Your email provider will be able to provide those for you.
One it’s connected, on the next screen, you set the content of the email. Keep in mind that while the vast majority of cases of pending donations will be abandoned donations, it’s distinctly possible that the donor created a pending donation and then later came back and submitted a new donation.
So, use a friendly tone of “Did you complete your donation?” instead of “Hey, you forgot!” We find it’s also completely acceptable to blame “the system” here:
“Sometimes our systems flag donations as pending that aren’t, so we wanted to make sure you were able to complete things. Let us know if we can help at all.”
Also, note that you can use any of the data that this has collected along the way to populate in this email. You can use their first name, the name of the donation form, the URL they were on when they clicked “donate now” and a number of other fields as “merge fields” in the email.
Once you click to finish and test the Zap, you’re all set! To test your zap, create a donation by clicking to go away to PayPal, and then don’t complete the donation. After the elapsed time from your delay, you should see the Zap complete.
Note: You can view the Zap success within the Zapier Dashboard.
Now that you’ve seen how easy it is to remind a potential donor to finish making their donation, try it out. We’d love to hear how your zaps worked for your organization in the comments below.
Get Zapier for Give Now
If you don’t have the add-on yet, you should. Get Zapier for Give now and watch it pay for itself after all your forgetful potential donors are finally reminded. You’ll get even more value out of the Plus Bundle, which provides access to many of Give’s other amazing add-ons including Recurring Donations and Fee Recovery.
About the Author
Ben Meredith
Ben Meredith is our Head of Support at GiveWP. He’s also the founder of The WP Steward and the author of the popular Better Click To Tweet Plugin.