Nonprofit End-Of-Year Reporting with MailChimp and Give
Every nonprofit needs to master end-of-year reporting in order to provide personalized donation reports to their donor base. Whether this is at the end of the year, the end of a fiscal year, or even each month, using MailChimp with Give is the key. How do I start end-of-year reporting with Give? Your nonprofit needs…
Every nonprofit needs to master end-of-year reporting in order to provide personalized donation reports to their donor base. Whether this is at the end of the year, the end of a fiscal year, or even each month, using MailChimp with Give is the key.
How do I start end-of-year reporting with Give?
Your nonprofit needs end-of-year reporting for your donors. But that kind of documentation can be tedious at best. It’s true that mail merging contacts from an Excel sheet and double-checking amounts can be a pain. So what’s a better solution?
The Core of Give is robust and our Give reporting tools allow you to export all donor data to a CSV. This allows your nonprofit organization to import it into a tool better-suited for email marketing such as MailChimp.
While Give cannot replace a full-featured CRM or donor management solution like Salesforce, it nevertheless has built-in abilities to work alongside other nonprofit management tools that greatly increase the efficiency of those tasks.
Today, let’s talk about creating customized end-of-year reports for donors.
If you prefer to read instead of watching, you’ll find the text following the video below.
Getting Personalized Data from Your Give Site
First, from the back end of your Give-powered site, navigate to Donations > Tools > Export (tab) and use the bottom selection to Export Donors to CSV. Since you have no need for Address, User ID, or First Donation date, uncheck those boxes before generating the CSV file.
Use the date fields to select only the donations for the period you need.
That will generate a CSV file for you to import into your nonprofit’s MailChimp account.
Importing Donation Data into MailChimp
In your MailChimp dashboard, navigate to your list (or if you want, create a new one just for this mailing!), and click “Import Subscribers.”

Select “CSV or tab-delimited file” from the options. That will bring up a page where you can drag and drop the CSV file generated by Give into the box or you can use the “Browse” button to locate the file on your computer. Click “Next” at the bottom of the screen.
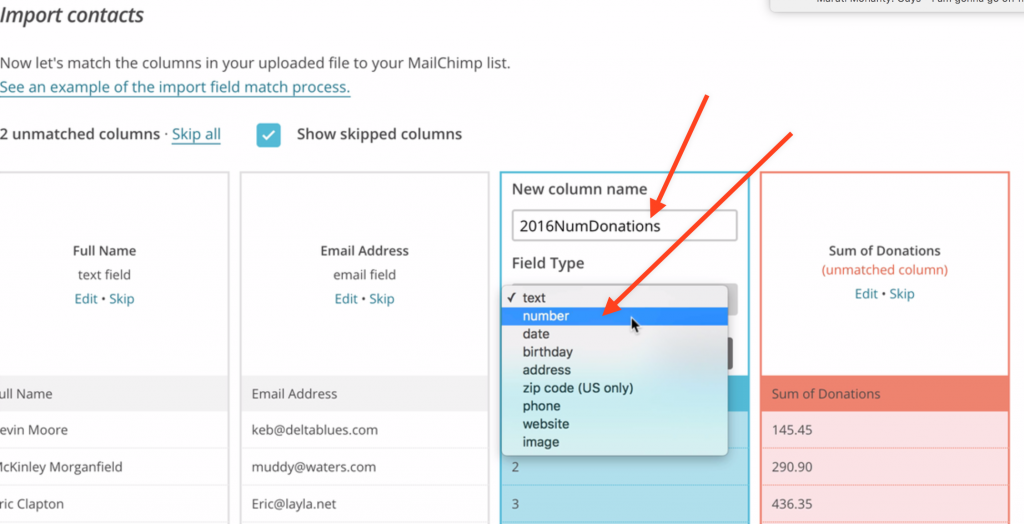
On the next page, you’ll have the opportunity to match the fields with the existing fields on your list. Map the Give email field to the Mailchimp *|EMAIL|* field, for starters.
I’d recommend making a new field for both the “Sum of Donations” and “Number of Donations” fields from your Give CSV, so that the data is accessible in it’s own merge tag. For example, if you’ve exported all of 2016’s donations, mapping the “Sum of Donations” data to a *|MMERGE3|* merge tag would mean that you can send a report this year with how much they gave, and then repeat the process next year with a comparison of Year-over-year changes.
I’ll give you a minute to process how much beneficial analysis and reporting you can do with this data.
Once all the fields are matched, you’ll be taken to a screen where you need to select that the new donors being added are subscribers.
One thing to note at this point is that if you are using an existing list, MailChimp will automatically update the fields that are not unique, so be certain that nothing is being overwritten. (This is another reason to create new fields for as much data as you can!)
Once the CSV file is imported, you’ll have new fields to select from in the mail merge section of a new campaign!
The Payoff: Creating a Custom End-of-Year Giving Email
Create a new campaign from the list you just imported to. Filter the recipients by whichever field you mapped “Number of Donations” to and set MailChimp to only send to those subscribers.
Then, set up your campaign to highlight that this is a personal update, or a professional receipt, whichever fits your organization best.
Here’s an example:
Hi *|FNAME|*,
Thanks so much for giving to our organization this year. For your records, you gave *|MMERGE3|* gifts this year, for a total of *|MMERGE4|*.
Thanks!
Naturally, the exact merge tags will vary depending on how many fields you’re importing, so watch for that. But other than that, you’re done. Using Give and MailChimp, your end-of-year accounting just got so much simpler.
Let us know in the comments how you’ll be putting this to use. We’d love to feature you as a Give Story!
About the Author
Ben Meredith
Ben Meredith is our Head of Support at GiveWP. He’s also the founder of The WP Steward and the author of the popular Better Click To Tweet Plugin.