BitPay
Introduction to BitPay
The GiveWP BitPay add-on allows you to connect your WordPress Donation site to a leading cryptocurrency solution, so that donors can donate cryptocurrency toward your cause. This document will walk you through getting set up with BitPay as well as the intricacies of testing this blockchain-based payment gateway.
Wallets, Keys, Invoices!
To understand what’s happening during a BitPay-powered donation, you’ll need a basic understanding of Cryptocurrency starting with these three concepts:
- Keys
- Wallets
- Invoices
This section is not intended to be exhaustive at all, but a primer to get you started.
Keys
In cryptocurrency, the actual coin/currency lives on the associated blockchain, and in order to access the currency or add and remove from your balance, you need keys—private keys to take money out, public keys to put money in.
Wallets
The wallet is what stores those keys. Unlike physical wallets, there’s not actually any cash in your wallet, but like physical wallets, if you lose access to your crypto wallet, you lose access to the cash in any meaningful way.
Wallets can be physical (keys written on a slip of paper), hardware (a USB stick or similar) or software (where the keys are stored by some software on your machine or in a cloud).
Invoices
Invoices are a way to request money be transferred into your wallet. Invoices are usually time-bound (the donor has a certain amount of time to complete the transaction).
What BitPay does is create an invoice that donors can then use to securely transfer from their wallet to yours.
Setting up your BitPay Account
In order to connect GiveWP to BitPay, you’ll need a BitPay account. Sign up for an account, and then head back to GiveWP, being sure to install and activate the BitPay gateway add-on.
Following the link above takes you directly to the option to create a business account with BitPay. If you are given an option during signup to select business or personal, be sure to select business. Personal accounts do not allow you to connect to the API (which is what GiveWP uses to connect to BitPay).
There are 3 steps to go through to ensure that your BitPay account is ready to connect to GiveWP. Immediately upon registering, you’ll be led through those steps:
- Confirm your email address.
- Get verified.
- Add settlement information.
Once you’ve followed all of the steps there, the final step is to create an API token that can be used to connect GiveWP to your BitPay account. Navigate in the BitPay dashboard to your manage tokens page to see the test portal (Dashboard > Payment Tools > API Tokens).
Create a new token by selecting the “Add New Token” link.
Give the new token a name that you will recognize (it’s never shared with donors), and do not require authentication. On the next screen, copy the resulting token, and paste it into the settings on the back end of the GiveWP-powered site at Donations > Settings > Payment Gateways > BitPay.
Once you save those settings, that’s it! Your site is ready to accept donations in cryptocurrency.
Accepting Crypto donations with Bitpay
Donor Experience
There are two options for how users are redirected to BitPay to complete transactions. The BitPay Modal option, if enabled, loads the interface in a modal, which then loads a popped-out invoice in a different browser window. This has the benefit of leaving the original window open, which keeps donors on that page.
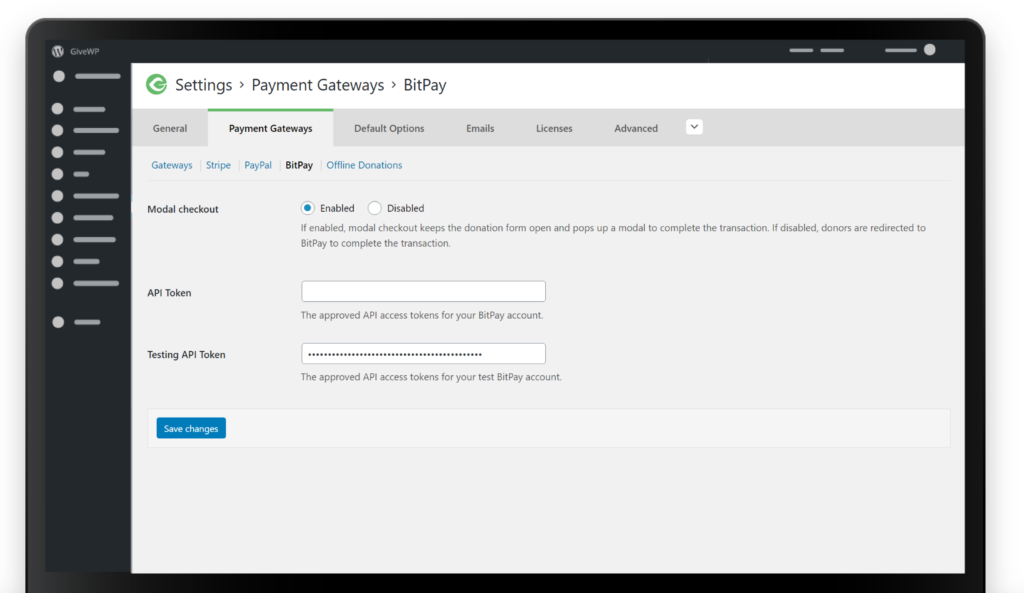
The other option is to disable the modal, which redirects the donor way to BitPay to finish the transaction, and then delivers them back to the site once it’s done.
Donors most likely will not get an immediate email confirmation for BitPay-driven donations, because cryptocurrency donations require a bit of time to fully be marked as “complete.” That process is driven by a (behind-the-scenes) method of BitPay notifying the site over a webhook endpoint.
The donation automatically goes through a few stages based on whether or not the donation is completed and fully processed at BitPay. In most cases on popular coins like BTC, BCH, ETH, and DOGE when the donor gets to the confirmation page, the donation will still list as “Processing” even though they’ve successfully completed the transaction.
What’s going on there is that BitPay has built-in security to confirm that transactions are not fraudulent, and there are several transaction statuses that correspond to donation statuses on the GiveWP side.
On the BitPay side the order goes Invoice Created > Paid in Full > Confirmed > Completed.
“Invoice Created” is the same as “Pending” on the GiveWP side. GiveWP is essentially waiting to see if the donor completes the transaction. Pending donations will automatically switch to abandoned after 7 days.
“Paid In Full” is the same as “Processing” on the GiveWP side. This is the status where the transaction has gone through, but not been confirmed. This mostly will happen on the larger and more popular coins mentioned above, but what’s happening behind the scenes is that BitPay is checking for “block confirmations” to make sure that the transaction went through irreversibly.
Once it’s confirmed, the status switches to “Confirmed” on BitPay’s side, and “Complete” on GiveWP’s side. That’s the point at which emails are triggered from GiveWP like the donation receipt and the New Donation notification.
The length of time between “Paid in Full” and “Confirmed” varies based on the wallets in use and the type of currency selected. If donors aren’t getting their receipt, it either means that the transaction is not confirmed on BitPay’s side, or that something is blocking communication between your bitpay account and your site.
Admin Experience
When a BitPay-powered donation comes in, it follows the status journey outlined above. Admin New Donation notifications are not sent until the donation is marked as “complete.”
When a donation is complete, the exchange rate that BitPay uses is recorded on the individual donation as a note, so that site administrators can see the exchange rate at the time of donation. You can set the currency that BitPay converts donations to (fiat and other crypto currencies are supported) and the number recorded as a note is the conversion from the currency they donated in and the currency you withdraw in.
Testing BitPay
Testing BitPay is a more involved process than testing other gateways, since in order to test a blockchain-based gateway, you have to use real (but worthless) cryptocurrency.
First, sign up for test.bitpay.com, which is a fully-functional mirror of a live BitPay account (so you follow the same instructions as above, but instead of having to go through the approval process of a business account, they are auto-approved.
Once you’re entered the test API token into the settings at Donations > Settings > Payment Gateways > BitPay, ensure that you’ve enabled GiveWP test mode, and that sets you up to test BitPay.
In order to do that, you’ll need a wallet with Test Bitcoin (tBTC) and the process to getting ahold of that is outlined in BitPay’s testing docs.
The important part is that you need a wallet that supports Testnet coins, and then to mine some testnet coins. That process is a bit cumbersome, but once you get a wallet with testnet coins in it, you can test making donations with it. Two tips:
- Use very small test donation amounts, since you can’t mine more than a very small amount of testnet coins at a time, and they are a finite resource (and an actual coin, creating an actual carbon footprint when you transact with them!
- Refunds take a while, (see below) so make sure to test carefully and don’t assume that you’ll be able to undo things quickly. It’s a real transaction on a real blockchain, even though the coin is worth nothing.


