Braintree Gateway
Braintree is credit card processor that doesn’t charge any fees for your first $50k of donations. This article will help you install and configure this Add-on so you can accept donations with the Braintree Gateway quickly and easily.
Having Trouble?
Review our Braintree FAQs here
Compatibility with Visual Donation Form Builder
The Braintree add-on is fully compatible with the Visual Donation Form Builder, meaning you can easily set it as a payment gateway for any forms you create. To enable Braintree for your forms, follow these steps:
- Navigate to GiveWP > Settings
- Scroll to the Visual Form Builder tab
- Enable Braintree: Look for Braintree in the list of payment gateways and check the box next to it under Enabled.
- Update the Label (Optional): You can customize the label that appears on your forms for Braintree.
- Save your settings.
Once activated, Braintree will be available as a payment option for all forms created with the Visual Donations Form Builder.
To learn more, click here.
Getting Started with Braintree
To accept payments with Braintree using GiveWP you will need an active Braintree account (sign up at their website.), the Braintree Add-on for GiveWP, and the Core GiveWP plugin installed and activated. See here for instructions on installing and activating GiveWP Add-ons.
Note: You can always access your add-on purchase, receipts, downloads and licenses from your account.
After your Braintree Add-on is activated, go to GiveWP > Settings and click on the Payment Gateways tab. You will see the default Payment Gateways (PayPal Standard, Test Payment, and Offline Donations). You should also see Braintree as an option as well. Click on that to enable Braintree as your payment gateway for your website.
Braintree Gateway Configuration
To start processing transactions with Braintree you must first have an account setup. Got that? Good! Next, let’s collect the following information to insert into the Payment Gateways settings:
- Merchant ID
- Merchant Account ID
- Public Key
- Private Key
To find this information, log in to your Braintree account and click Account > My User. Next, scroll down until you see an “API Keys” link. From this screen you will be able to get the Merchant ID, Public and Private Keys:

Copy this information to a safe place. Now let’s get your Merchant Account ID.
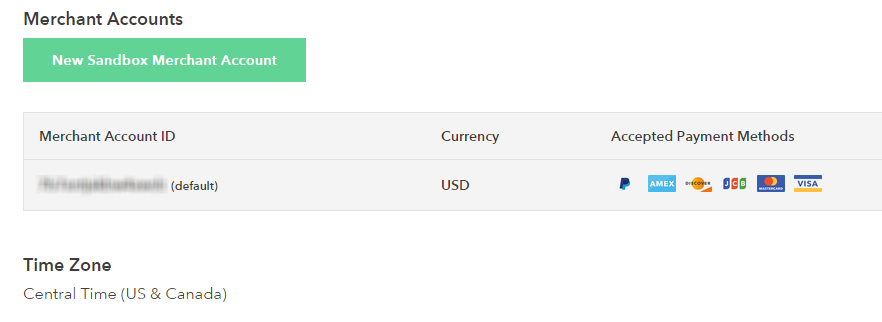
To obtain your Merchant Account ID click on Account > Merchant Account Info and scroll to the middle of the page:
Braintree Gateway Sandbox Configuration
If you are not ready to accept live payments or you just want to test the donations with test mode disabled, you can use sandbox credentials.
The first step you need to follow is to create a sandbox account here and then log into your account here. You’ll need 4 things:
- Merchant ID
- Merchant Account ID
- Public Key
- Private Key
To find this information, login to your Braintree sandbox account and click on the gear icon on the right top corner > API:
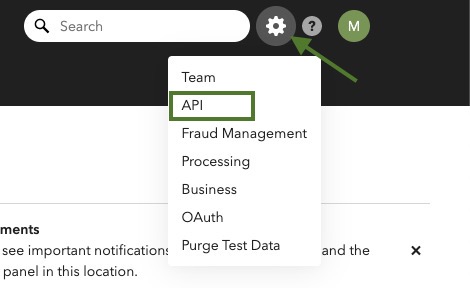
When you click on that, a new page will show up and if you don’t have an API key, then you will need to click on Generate New API Key:
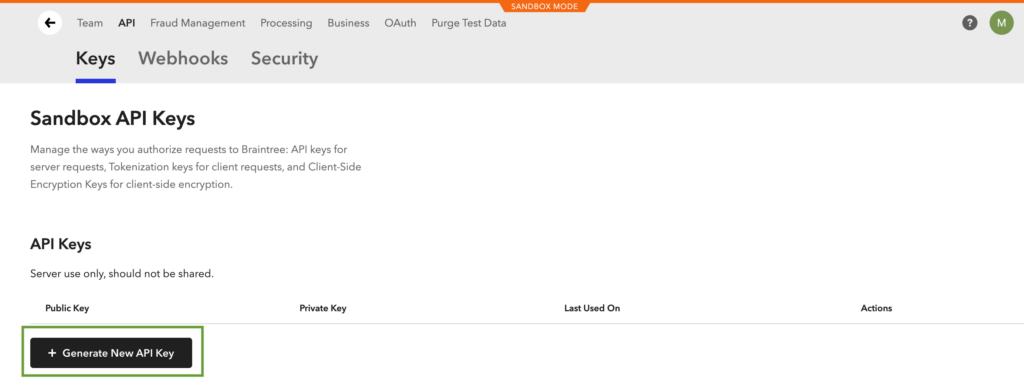
Now that you have the API Key, you will need to click on the View link under the Private Key column and a new page will open and will contain your API credentials. Make sure to copy the Public Key, the Private Key, and the Merchant ID.
Next, you will need to get your Merchant Account ID. To do so, navigate to the right top menu and click on the gear icon > Business:

If you do not have a Merchant Account, then click on New Sandbox Merchant Account and then create a Merchant Account ID and fill the required fields. Save it and now you will have all the necessary information to connect your Braintree sandbox account.
Configuring GiveWP and Braintree
Configuring Braintree in GiveWP
Now that we have collected the necessary information, you’re ready to integrate your Braintree account with GiveWP.
Copy each field from the previous steps into the appropriate fields within the Payment Gateway settings.
Note: Ensure there are no blank spaces when copy-and-pasting your keys into the gateway settings.
To enter your Braintree keys, go to your WordPress admin dashboard. Next, navigate to GiveWP > Settings and click on the Payment Gateways tab. Scroll until you see a section called Braintree Settings. Paste each key into its respective field, then hit save:

That’s all there is to it. Now when your donors come to your site, they’ll be able to use credit cards to donate to you directly in your country’s currency and not have to be redirected to another site.
Compatibility with Recurring Donations
The Braintree add-on is now fully compatible with our Recurring Donations add-on, to help you create a steady, predictable flow for your fundraising efforts. To use this feature, you’ll need to create your donation forms using the Visual Donation Form Builder.
Only forms built with the Visual Donation Form Builder can accept recurring donations through Braintree, ensuring a seamless and efficient donation process for your supporters.
An important step when integrating Braintree with GiveWP for recurring donations is configuring webhooks. Webhooks allow real-time transaction updates, ensuring your site is synced with Braintree for accurate donation tracking.
In order to configure webhooks, your user’s role must include the Manage Webhooks role permission on Braintree.
To create a webhook:
- Log into the Control Panel
- Click on the gear icon in the top right corner
- Click API from the drop-down menu
- Click on the Webhooks tab
- Click the Create New Webhook button
- Provide your destination URL
- Select all the events available
- Click the Create Webhook button
And that’s it! Once the webhook is configured, your transactions will automatically update whenever a subscription occurs.
Frequently Asked Questions
These are questions we often get about the GiveWP Braintree add-on which are more general or broader than the steps above.
FAQs
It’s a good idea to test out a gateway before placing it on a live site. This ensures no donations are lost due to unforeseen errors or issues. So, how do you test Braintree?
Testing Braintree is easy:
- First, ensure you’ve placed GiveWP in test mode (Settings > General > Test Mode)
- Double-check that you have properly inserted the Braintree credentials mentioned above under GiveWP > Settings > Payment Gateways
- Complete a donation using a test card from the Braintree documentation
- Confirm that the donation is reflected in the Braintree admin dashboard and within GiveWP’s transactions.
- Disable “Test Mode” when done
Braintree’s GiveWP add-on, unlike most other payment gateway add-ons, does not have a simple “out of the box” method for passing the donation form title to Braintree. This makes cross-referencing donations from the gateway interface with the GiveWP dashboard more difficult. This document walks you through a custom-code method for sending the form title to Braintree.
Please Note: These instructions need to be followed completely and in the correct order to prevent errors that can cause donations to fail. It is recommended to test these steps in a staging or development environment before doing it in a live site
Adding the custom field to Braintree
Before adding the custom PHP code to your WordPress website, you should add a custom field to your Braintree dashboard that can later be populated by the form Title.
First, click the gear icon in the top right of the Braintree dashboard and then click “Processing”

From there, scroll down to the “Transactions” section and click on the “Options” link in the “Custom Fields” section.
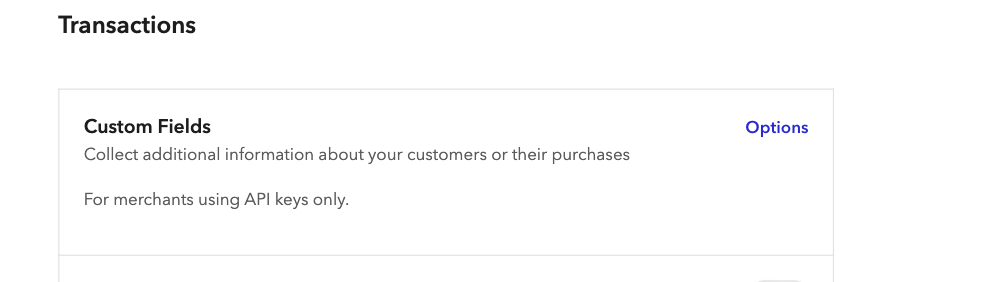
Add a new custom field with the API name “form_title” (all lowercase, no spaces) and Display Name “Form Title.”
Select “Store and Pass Back” so that the data is stored on Braintree’s side.
Sending the Data from GiveWP
Now that you’ve got a place for the data to go, you need to add some custom PHP to send that data from GiveWP to Braintree. This custom snippet from the GiveWP snippet library will do that for you.
Note that if you selected a different name for the custom field in the first step, things will need to be modified in that snippet.
If you need assistance implementing custom PHP code on your website refer to this guide.
Once you’ve got the custom snippet active, a new Custom Field shows up in the transaction history on Braintree’s side, displaying the Form Title.


