Fee Recovery
The Fee Recovery Add-on allows donation forms to include an option for donors to cover processing fees, helping nonprofits keep more of each donation. It can be applied globally or customized per form and per gateway.
Fee Recovery is a GiveWP Add-on which must be downloaded, installed and activated. Read here for instructions on downloading, installing, and activating GiveWP Add-ons.
Using Fee Recovery with the Visual Donation Form Builder
If using the Visual Donation Form Builder, Fee Recovery can be added directly to forms using the Fee Recovery block. All global settings apply by default unless overridden at the form level.
Note: The Stripe Payment Element gateway provides access to numerous payment methods such as Apple Pay, Google Pay, and ACH. It’s important to note that Fee Recovery applies not to the individual payment methods themselves, but to the Stripe Payment Element gateway as a whole.
Adding the Fee Recovery Block
To add Fee Recovery to a form:
- Go to the Build tab of the form.
- Click Add Block and choose Fee Recovery.
- The block will appear on the form and use the global settings by default.
Customizing Block Settings
Clicking the Fee Recovery block shows its settings in the right-hand panel:
- Global: Uses the default settings from Donations > Settings > Fee Recovery.
- Customize: Override global settings for just this form. All global options (like percentage, flat fees, opt-in behavior, and messages) are available here.
Changes made in the block apply only to that specific form.
Getting Started with Fee Recovery for Options-Based Forms
Once you activate the Fee Recovery Add-on, nothing changes at all. The settings for Fee Recovery are set to disabled and hence not added to any of your forms.
In order to add it, you’ll need to go to the Fee Recovery global settings page. You can click on the link in the activation banner at the top of the screen, or navigate there by going to GiveWP > Settings > Fee Recovery.
Once you set the “Fee Recovery” option to “Enabled” you’ll see the following screen:
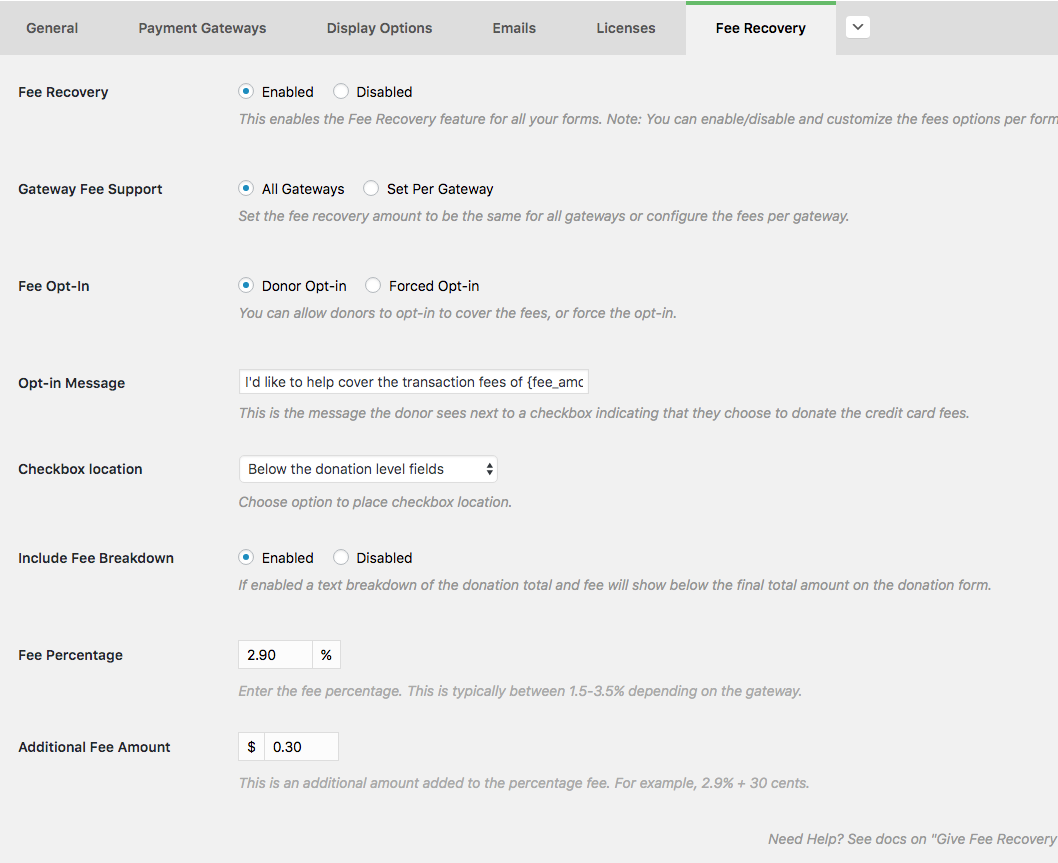
The Global Options
Fee Recovery can be set to have all forms inherit these global options. Keep in mind though that each form can independently over-ride the global options as well.
Here’s what’s available from the global options and what each means:
- Gateway Fee Support — this defines whether you want to set the fee percentage and the fee amount to be applied equally to all gateways, or whether you want to configure the percentage and fee per gateway. When you set it to “Set Per Gateway” you’ll see each gateway listed out individually at the bottom of the screen.
- Fee Opt-in — This is the global setting for whether you want to allow the donor to choose to donate the fee, or force the addition on all forms.
- Opt-in Message — If you choose “Donor Opt-in” for the “Fee Opt-in” option, then you’ll see this option. This sets the message that is displayed next to a checkbox to allow the donor to indicate they are donating the fee. Note that you can add the
{fee_amount}tag anywhere in your message to dynamically display the total fee amount directly in the message. Keep in mind that this sentence should be written in the donor’s voice as to indicate that they know they are opting to donate the additional funds. - Fee Message — If you choose “Forced Opt-in” for the “Fee Opt-in” option, then you’ll see this option. This allows you to provide a message to display to your donors indicating that the fee is added to their donation automatically. Note that you can add the
{fee_amount}tag anywhere in your message to dynamically display the total fee amount directly in the message. - Checkbox Location — Using this option you can choose where to display the Fee Recovery checkbox with the message.
- Include Fee Breakdown — If enabled a text breakdown of the donation total and fee will show below the final total amount on the donation form.
- Fee Percent — If you chose “All Gateways” for the “Gateway Fee Support” option, then you’ll see this option. Otherwise, this will appear within each gateway listed. This is the percent amount that is added. This will calculate the fee based on a percentage of the amount the donor has indicating they want to donate. You can choose “0” if you prefer not to add a percent.
- Additional Fee Amount — If you chose “All Gateways” for the “Gateway Fee Support” option, then you’ll see this option. Otherwise, this will appear within each gateway listed. This is a flat amount in your chosen currency that will be added to the donation. If you chose a percentage to be added, this will be in addition to that. You can choose “0” if you prefer not to add an additional amount.
- Maximum Fee Amount — You may want to limit the maximum fee amount, which may encourage large donations to cover a more reasonable fee amount. For instance, you can set the limit as $50 which is much more reasonable for a donor to opt-into when giving an amount that exceeds that with the base fee calculation. To enable this option simply customize the amount you preferred maximum. To disable, simply set the amount to 0.00 or the equivalent of zero depending on your decimal settings.
The “Set Per Gateway” Global Option
If you choose the “Set Per Gateway” option for the “Gateway Fee Support” setting, then each Gateway that you have enabled will be listed at the bottom of the page, like this:

Note that you can set whether Fee Recovery is applied to each gateway individually. For example, in the screenshot above the “Offline Donation” gateway has been set to “Disabled”.
Once a gateway is enabled, you’ll have the following options:
- Fee Percentage
- Additional Fee Amount
See above for descriptions of those two options. They will function exactly the same way for the individual gateway as they do for the “All Gateways” setting.
Global versus Per Form Options
Now that your Global settings are configured, you’re basically done. That is unless you want to change the percentage or additional amount set for any specific form. The main difference between Global settings, and per form settings, is that you have to have Global settings configured in order for Fee Recovery to work at all. But you don’t have to set anything per-form if you don’t want to. If you do, read on:
Per Form Options
As mentioned previously, you can set each individual form to handle fees differently. If that’s the case, go to your form edit screen, and click on the “Fee Recovery” tab and you’ll see these three options:
- Global Option (default) — this form will inherit the global Fee Recovery settings
- Customize — you want to configure different Fee Recovery settings for this form
- Disable — you want to disable Fee Recovery for this form completely
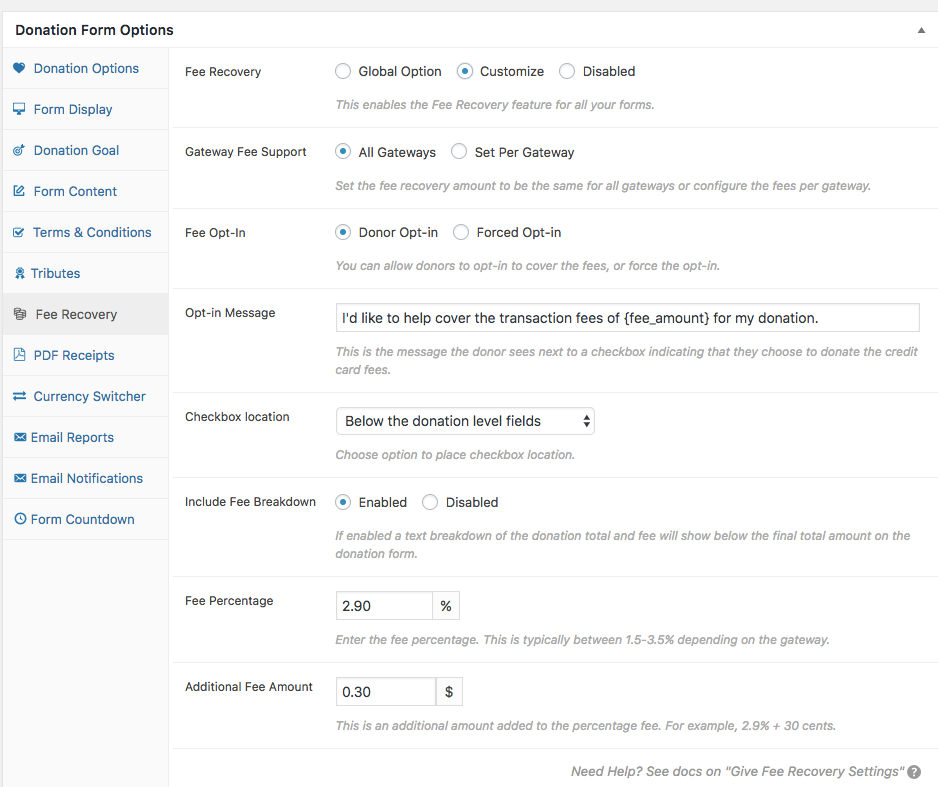
Once you select “Customize” you’ll be able to change the settings for this one form to be different than the global settings.
If you choose “Disable” then the Fee Recovery options will not appear on the form at all.
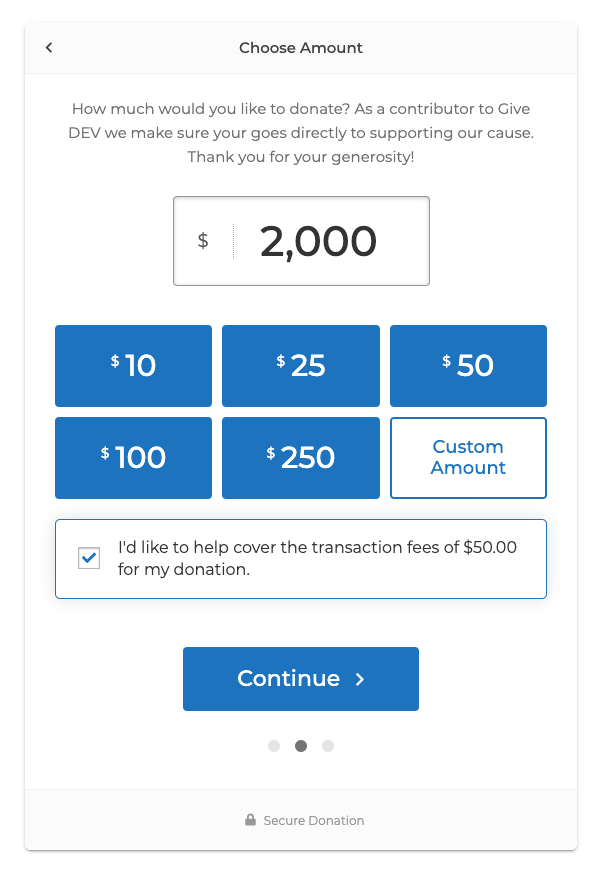
The Donor Experience
Let’s preview what Fee Recovery looks like using the Multi-step Form Template. If you select “Donor’s Opt-in” for the “Fee Opt-in” setting, the donor will see your message from the “Opt-in Message” setting with a checkbox. This configuration also has a $50 maximum amount set to encourage large donations to opt-in to a more reasonable fee amount.
If instead you choose “Forced Opt-in” for the “Fee Opt-in” option, then they’ll simply see a message below the amount they choose:
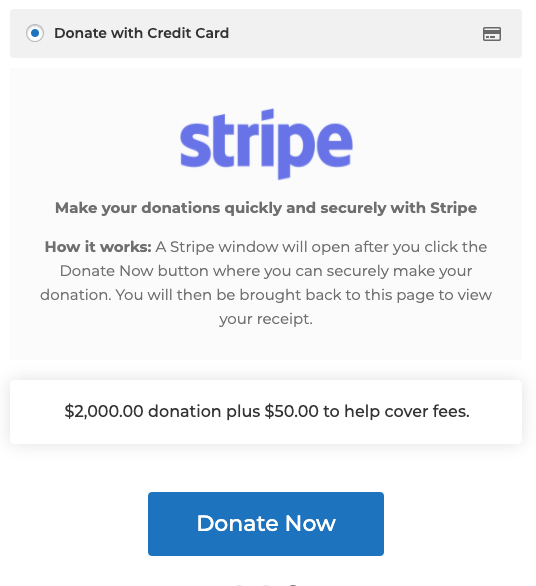
Note also that the amount shown in the message will update automatically when the donation amount changes and when the payment gateway changes (if there’s a difference between the fees applied).
Lastly, the final donation amount at the bottom of the donation form is also updated dynamically.
How are Fees Handled?
It’s important to note that the gateway fees are not removed; all your payment gateway fees will still be applied. Instead, you are asking the donor to donate a small additional amount in order to lessen the impact of the credit card processing fees. The best way to understand this is via a clear and obvious example.
For example, you’ve set your Fee Recovery settings to add 3% plus $0.30 to every donation. A donor wants to give $100 to your organization and donate the fee additionally. It might seem that the total should be $103.30 — but that would be incorrect. The fee amount is going to be subtracted from the total amount the donor gives; so the fee on $103.30 would be $3.10 + $0.30 = $3.40. That would mean that you would lose $0.10 on every $100 donation.
Instead, the calculation is set to ensure that the net donation amount after your fees are applied equals $100. If you are interested in a more technical and mathematical explanation of how this works, here’s the equation used in making that calculation:
T = Amount of donation the donor selected.

B = Base per-transaction fee (default $0.30)

P = Percentage fee (default 2.9%)

G = Gross amount (total with the fee included that is sent to the gateway)

( T + B ) / ( 1 - ( P / 100 ) ) = G
Different Cards Have Different Fees
Some payment gateways apply different fees to different types of credit cards. Fee Recovery doesn’t currently support customizing the fee amount per credit card type. What we recommend instead is to get a report of your previous three months and find exactly how much you paid in fees during that time. Then set your Fee Recovery settings to that average.
For example, payment gateways often apply higher rates to MasterCard. But your donors might not use MasterCard much. If, on the whole, you find that you are accruing roughly 3.2% in fees over a 3 month period, you can set Fee Recovery to just add 3.2% with “0” as the flat fee.
You might want to revisit that number every 6 or 12 months to ensure that you are getting a number that is closest to your actual fee amount.
Frequently Asked Questions
Rejected means the donor chose not to cover the additional Fee Recovery amount during the donation process.


