Understanding the Various Form Fields
The Form Field Manager includes a number of field types. A field type can be as simple as a text input or as advanced as a multi-file upload field. The following will provide you an overview of each field type and its options.
Form Field Manager Blocks for the Visual Donation Form Builder
The following field blocks are included within the form builder when the Form Field Manager add-on is active.

Text Field

The Text Field block adds a plain text input to your form. This can be used for many reasons and is typically the most common field you see used within forms.
Checkbox

The Checkbox block is useful for creating a multiple choice list of options for donors to complete. When you require this field they have to choose at least one selection. If you want to limit the user to only one selection, consider using a select or radio list.
Consent

The Consent block adds a required checkbox and customizable disclaimer text that donors must check in order to make a donation. This is a great option for adding terms and conditions or some other type of agreement-type message.
Date

The Date block is a powerful field for capturing dates. You can select from three predefined date formats.
Dropdown

The Dropdown block adds a dropdown or select field to your form.

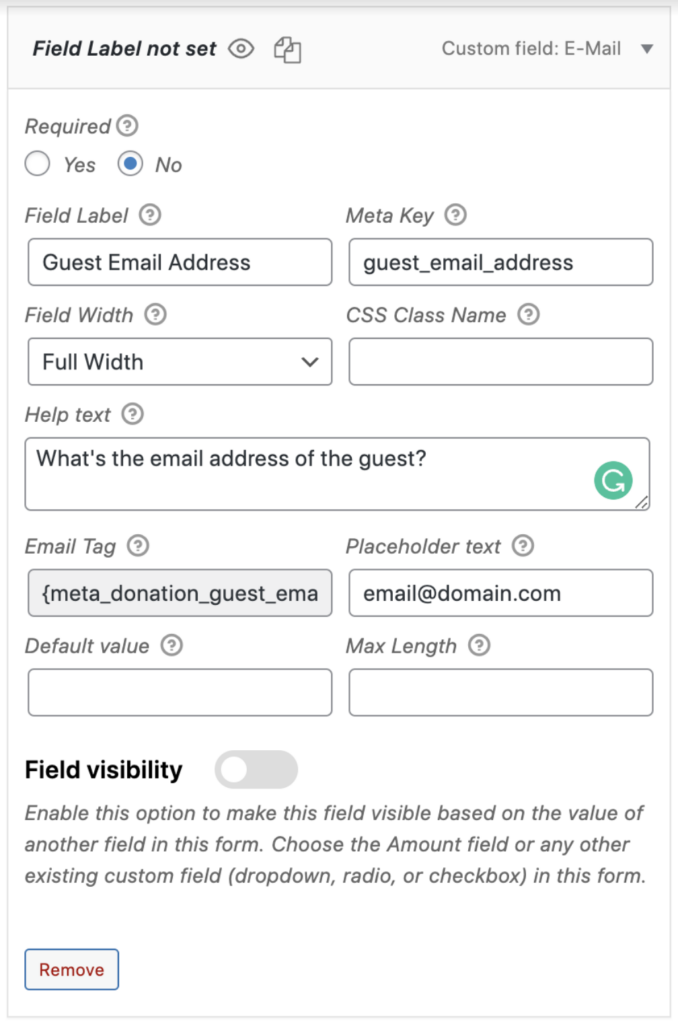
The Email block helps collect more than just the donor’s email address. This field will only accept a valid email address.
File Upload

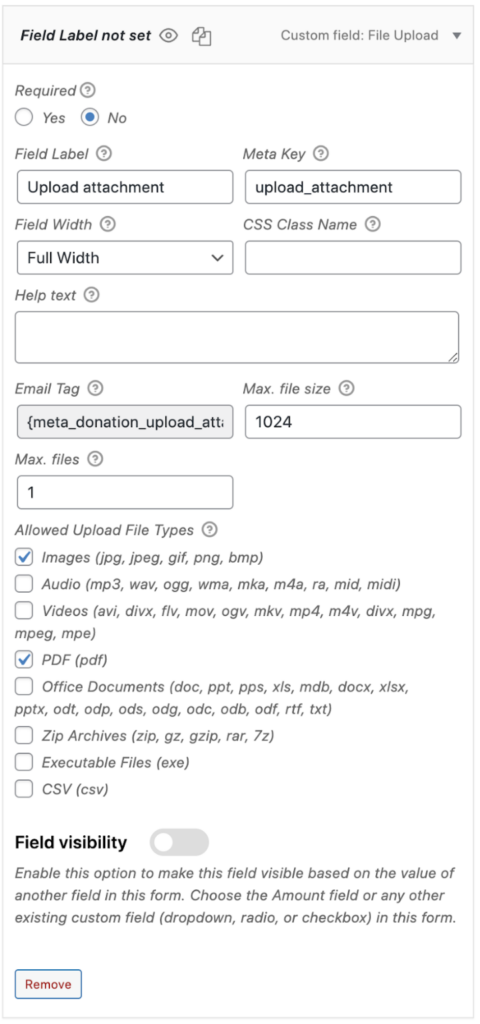
The File Upload block gives donors the ability to upload files on the form. Check the boxes next to the file types you would like to allow to enable additional file types. The file will be uploaded to the Media Library. You can access it there, or in the Custom Fields section of the donation details.
Bear in mind, if you allow a large number of files (or large file sizes) to be uploaded you will need to take into account the storage of those files and any bandwidth requirements.
Hidden Field

The Hidden field block can be used to store information that should not be visible to the donor but can be processed and stored when the donor makes a donation.
HTML

The HTML block is for those who know a bit of code. This field allows you to output HTML markup such as text, images, lists, tables, and inline styles (CSS).
Multi Select

The Multi Select block is a great way to provide donors a list of options to choose from. They can select one or multiple items. If the field is required, the donor is required to choose at least one option. You can choose between creating a dropdown list or a checkbox list.
Phone

Use the Phone block to add a phone field to your form.
Take note that you can make the field formatted “(###) ###-###” or unformatted “###-###-####” if you like. Utilize the placeholder text to give your donors direction when they are inputting their number.
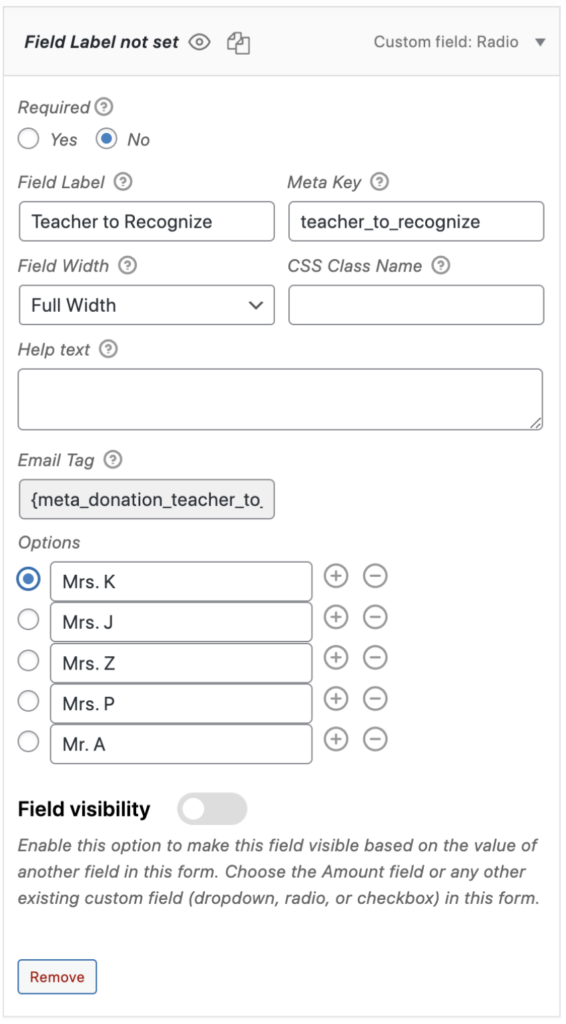
Radio

The Radio block allows you to create a set of radio input options that when presented on to the user will give them list of options to choose from. Only one radio may be selected at a time. You may choose which radio field is set by default by clicking the radio next to that item in the admin panel.
Textarea

The Textarea block adds a textarea field to your donation forms. Typically, textareas are used to collect large amounts of textual information such as comments or messages.
URL

The URL block is handy for accepting website addresses in a form field. It will only validate against valid domain names.
Additional Options
Display Settings

All custom field blocks have a couple of display settings.
Display in Admin will display the field name and value in the donation details page in the backend.
Display in Receipt will display the field name and value in the donation receipt displayed on the frontend after a successful donation.
Conditional Logic

The “Conditional Logic” option allows you to only display a custom field block based on the value of another field on the form.
Advanced

Some custom field blocks allow you to assign a default value.
The meta key will be the meta key name stored in the database. This is created automatically based on the custom field label. You can edit it if needed.
The email tag is automatically created based on the meta key. It’s useful to output the custom field value in the GiveWP emails.
By default, all custom field values are stored in the donation record but sometimes you might want to save some of those fields to the donor record instead. Enable the “Save to Donor Record” to do that.
The Form Field Manager Fields for Options Based Forms
The following fields are included within FFM by default. Click on a field to jump to that field:
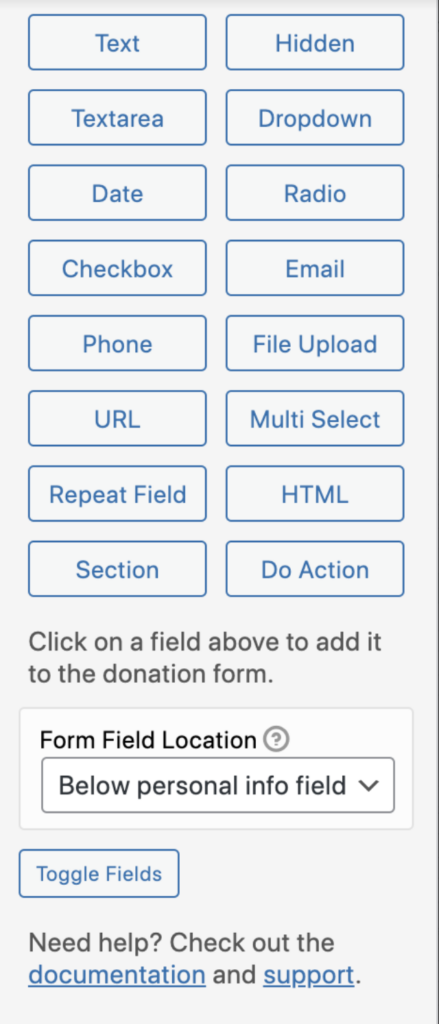
- Text
- Hidden
- Textarea
- Dropdown
- Date
- Radio
- Checkbox
- Phone
- File Upload
- URL
- Multi Select
- Repeat Field
- HTML
- Section
- Do Action
Each form field can be added to the fieldset and then drag-and-dropped into a particular order. Now, let’s review each field more in depth:
Text Field
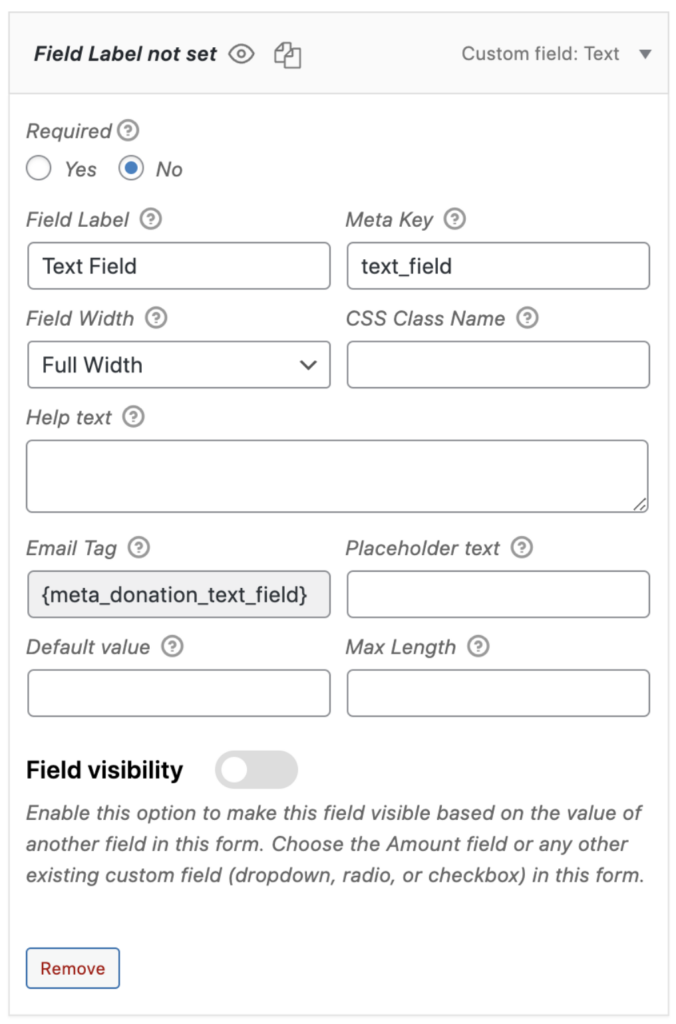
The text field is a simple form field type that adds a plain text input to your form. This can be used for many reasons and is typically the most common field you see used within forms.
Hidden Field
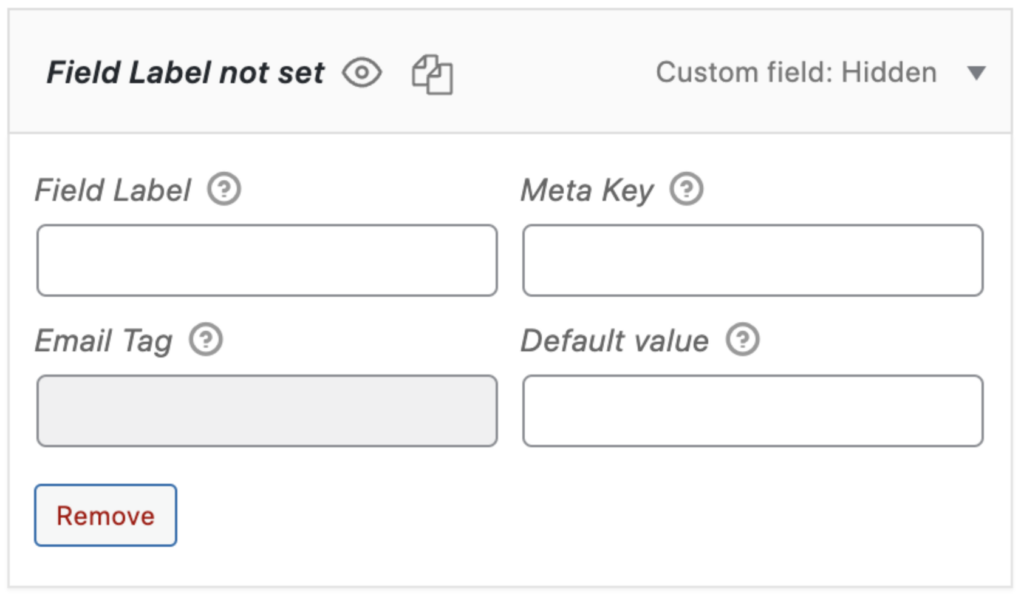
The Hidden field can be used to store information that should be not visible to the donor but can be processed and stored when the donor makes a donation
Textarea Field
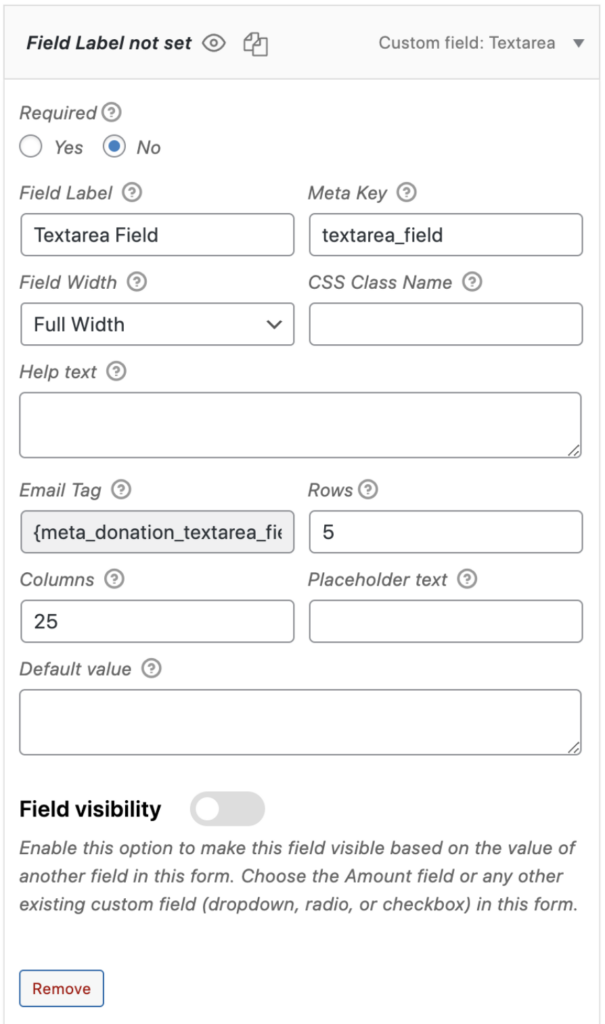
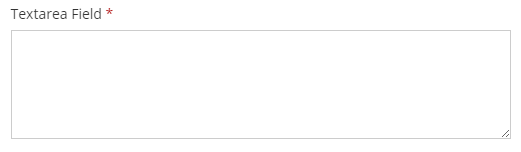
The text field is a simple form field type that adds a textarea field to your donation forms. Typically, textareas are used to collect large amounts of textual information such as comments or messages.
You can control the size of the normal textarea using the “Size” and “Columns” values within the admin options. Please note that this does not affect the rich text editors and your theme may have overridden this setting with CSS.
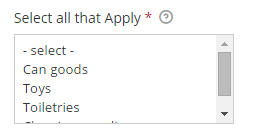
Dropdown Field
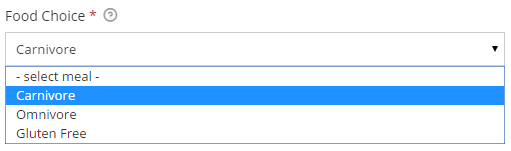
The dropdown field is typically used to present a menu of pre-chosen options to the donor. For instance, in the screenshots above you can see we are using the select field to present the user with meal choices. The dropdown field is also commonly referred to as a “select” field.
Donors can only select one option from the select field. To allow the user to select multiple options please refer to the Multi Select or Multi Check fields.
Date Field
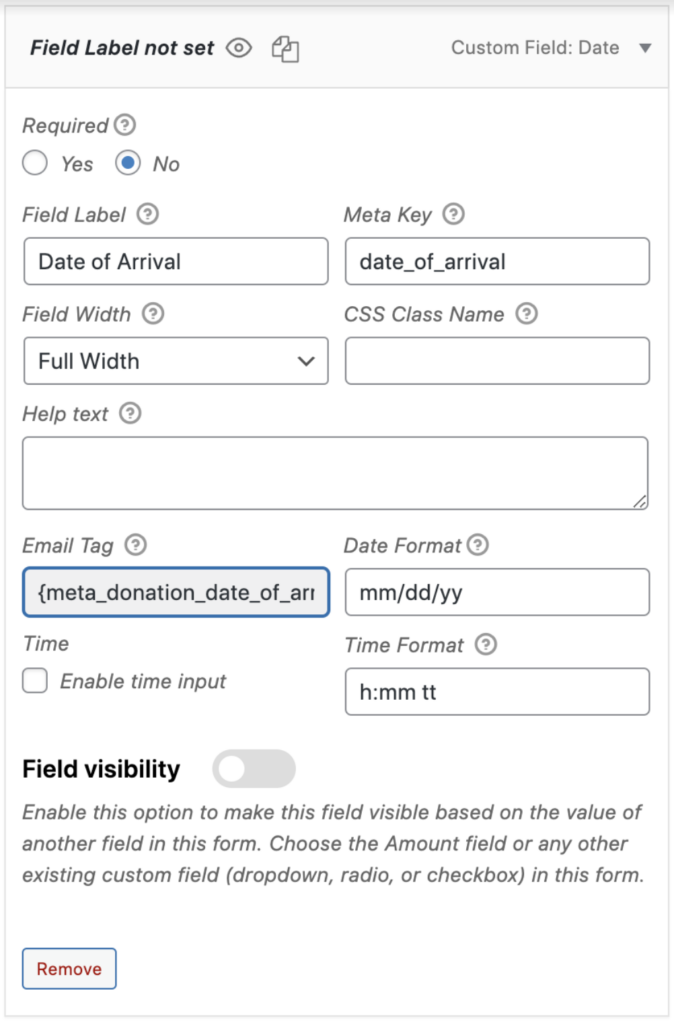
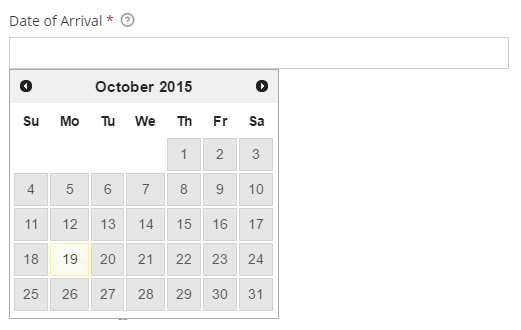
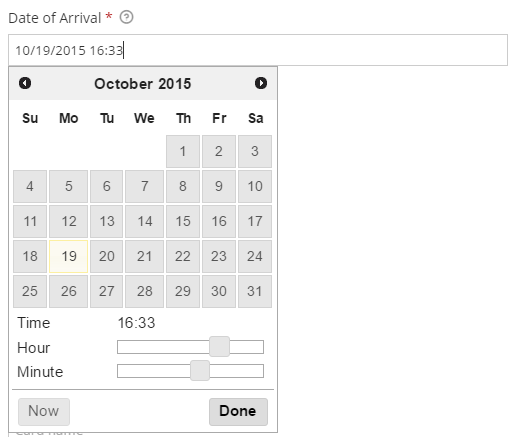
The date field is a powerful field for capturing dates and times for various reasons. The calendar outputs a Gregorian calendar that utilizes the jQuery UI. Above, we have given an example of “Arrival date”, but this can be used for multitudes of other scenarios.
Date Formatting
For a full list of the possible formats, see the formatDate function.
Powerful Time Picker
The time picker checkbox adds time picker functionality to the date field. This allows the donor to attach a time to to the specific date.
Radio Field
The Radio Field allows you to create a set of radio input options that when presented on to the user will give them list of options to choose from. Only one radio may be selected at a time. You may choose which radio field is set by default by clicking the radio next to that item in the admin panel.
Checkbox Field
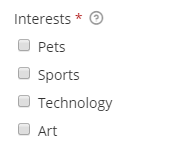
The checkbox field is useful for creating a multiple choice list of options for donors to complete. When you require this field they have to choose at least one selection. If you want to limit the user to only one selection, consider using a select or radio list.
Email Field

The Email field is helpful for collecting more than just the donor’s email address. This field will only accept a valid email address.
Phone Field


If you would like to give your donors a place to put their phone numbers, use a Phone Field.
Take note that you can make the field formatted “(###) ###-###” or unformatted “###-###-####” if you like. Utilize the placeholder text to give your donors direction when they are inputting their number.
File Upload Field
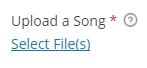
Perhaps you want your users to provide you with a PDF, CSV, Word Doc, or heck… maybe even an MP3 of them singing. That’s all possible with the File Upload Field.
Restrict Uploads by File Type
Disclaimer: Allowing users to upload certain file types like executables (exes) and zip files can lead to potential security issues on your website. Proceed with caution when allowing uploads for these file types.
By default, the File Upload Field is set to only allow images and PDF file uploads. Check the boxes next to the file types you would like to allow to enable additional file types. Allowed file types are:
- Images (jpg, jpeg, gif, png, bmp)
- Audio (mp3, wav, ogg, wma, mka, m4a, ra, mid, midi)
- Videos (avi, divx, flv, mov, ogv, mkv, mp4, m4v, divx, mpg, mpeg, mpe)
- PDF (pdf)
- Office Documents (doc, ppt, pps, xls, mdb, docx, xlsx, pptx, odt, odp, ods, odg, odc, odb, odf, rtf, txt)
- Zip Archives (zip, gz, gzip, rar, 7z)
- Executable Files (exe)
- CSV (csv)
Allow More than One File Upload
Another cool feature of this field is the ability to set the number of files you allow to be uploaded at a time. By default, this is set to one but you can adjust this to any number. Bear in mind, if you allow a large number of files (or large file sizes) to be uploaded you will need to take into account the storage of those files and any bandwidth requirements.
URL Field
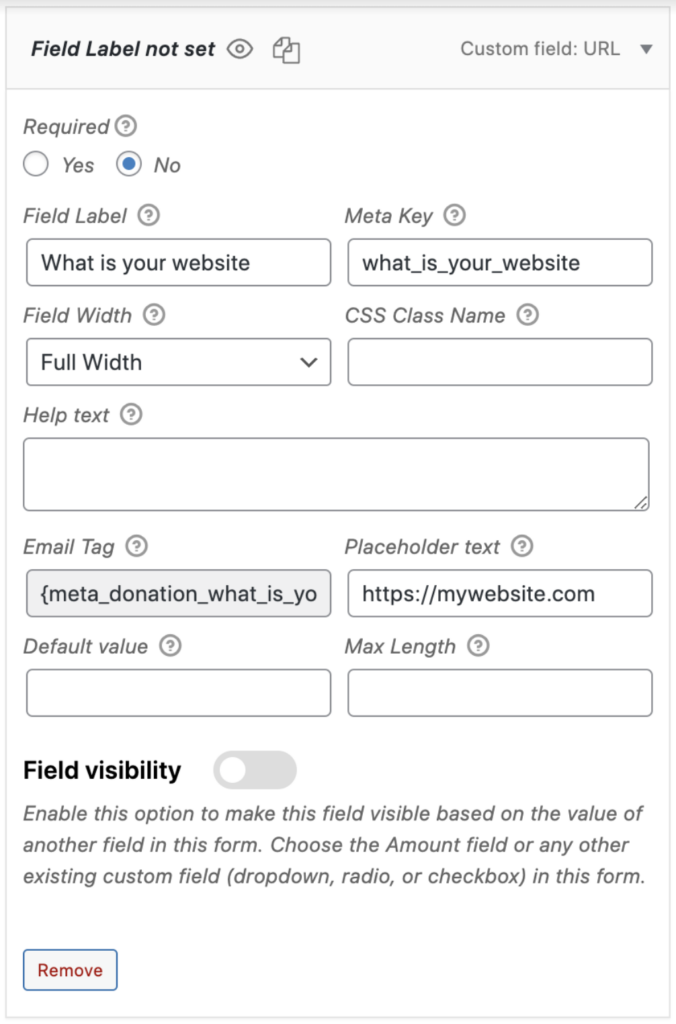

The URL Field is handy for accepting website addresses in a form field. It will only validate against valid domain names. So, if you’re looking to ask for a website address use this bad boy. It’s probably a good idea to leave it invalid unless it’s absolutely required the user provide a website address in order to donate. Most folks don’t have websites, sadly…
Multiselect Field

The Multi Select fields is a great way to provide donors a list of options to choose from. They can select one or multiple items. If the field is required, the donor is required to choose at least one option. There are no limits on the number of options you create.
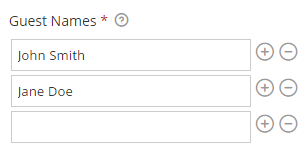
Repeater Field

The Repeater Field allows your donors to enter an unlimited number of entries for a field. In the example above, we have utilized the repeater field to ask for “Guest Names”. This field is handy for requesting information from donors when you don’t know the exact number of entries required. For instance, one donor could have more guests than another. Below you will see a more advanced configuration which uses the “multi-column” feature of the Repeater Field:
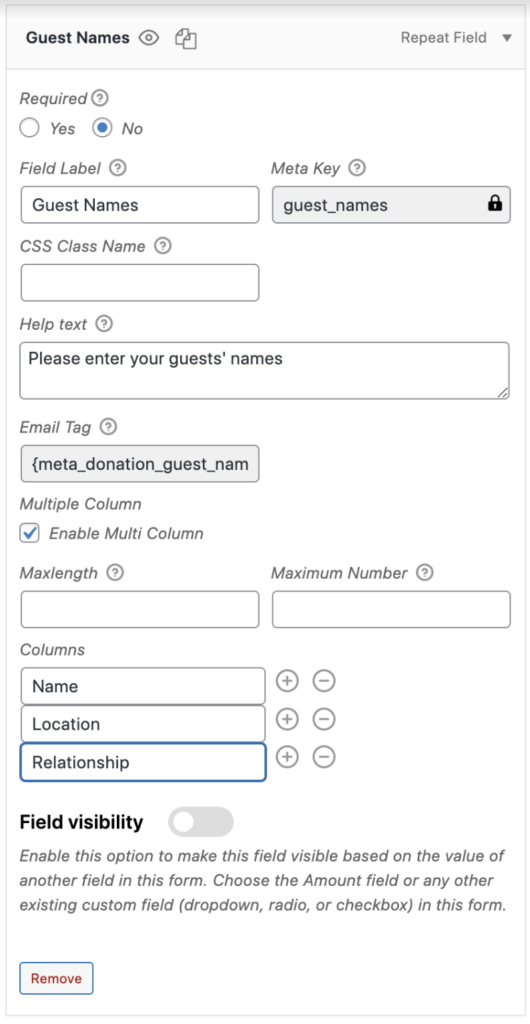
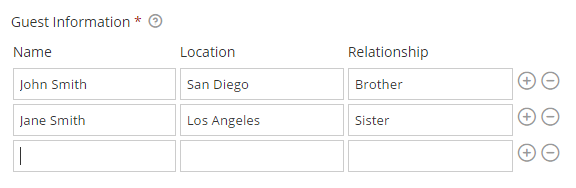
When the Multi-column option is enabled you can add an unlimited number columns to collect donor data. Piggybacking off the example above, you’ll see we expanded the “Guest Information” repeat field to now ask for more than just a guest’s name. You see we’re collecting additional information such as location, and relationship. If we wanted to, we could add even more columns if we wanted to collect additional information.
HTML Field
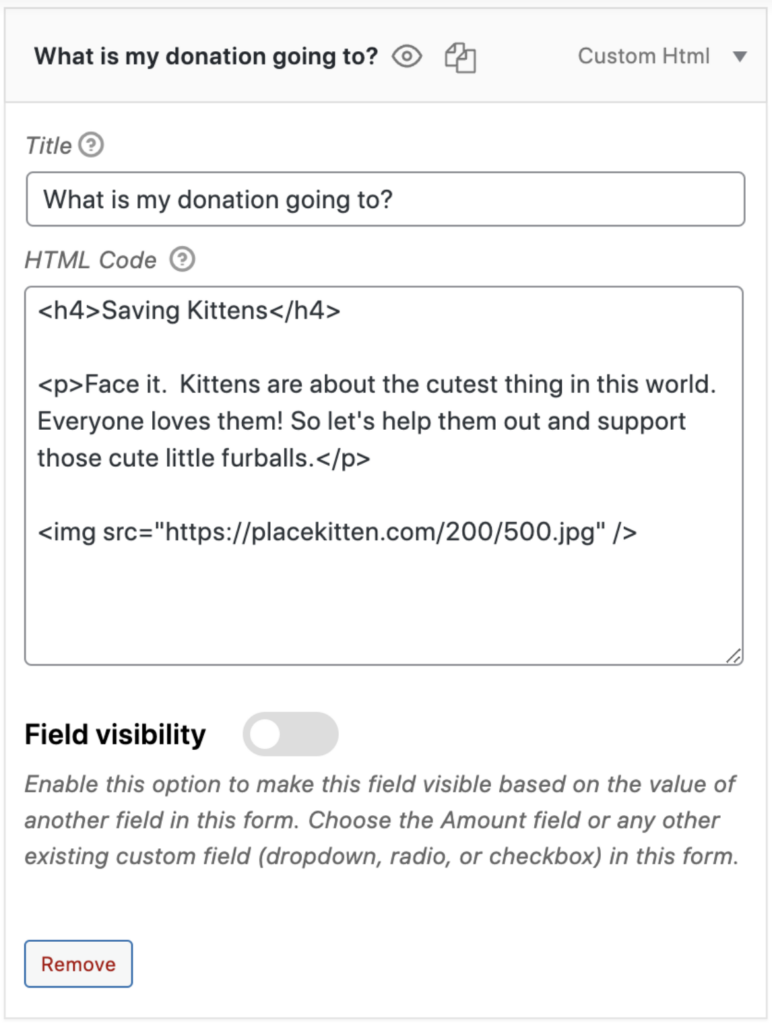

The HTML field is for those who know a bit of code. This field allows you to output any type of HTML/CSS markup such as text, images, lists, tables, and inline styles (CSS) and JavaScript. It’s also great for adding a quick message like we have done in the example above. In this example, we have a form accepting donations for our local cat shelter. To tell people their donations go straight to these cute little creatures we’ve added an HTML field with an adorable picture to our form using the HTML field. Note: the title field element is only for admin field reference and will not be output on the frontend.
Section Field
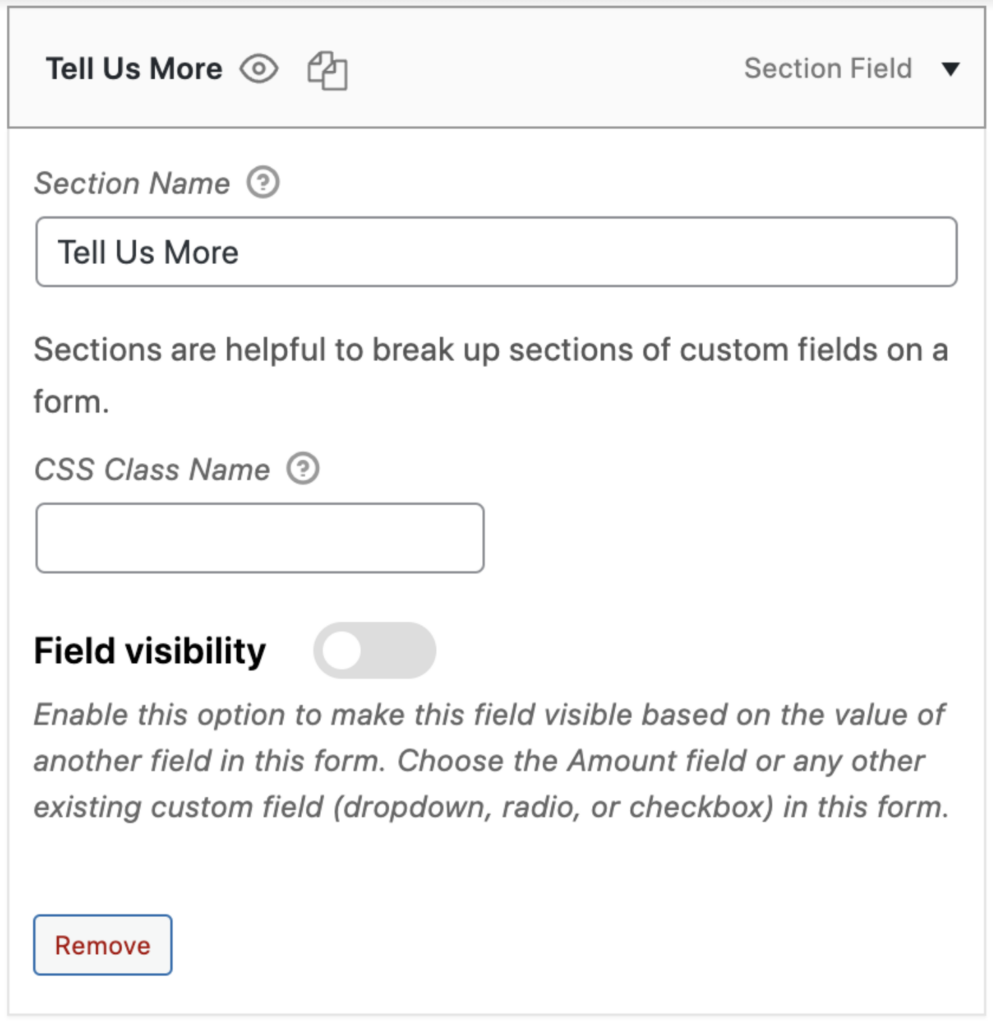
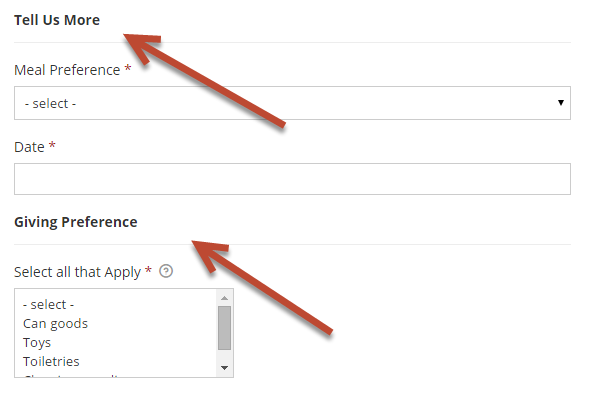
The section field is used to break up your various form fields. The field outputs a heading that matches the markup of GiveWP’s Core. The styles will adopt the same as the native GiveWP donation form. If you have many fields, it can be easier for donors to understand and complete the donation form if they are broken up into various sections.
Do Action Field
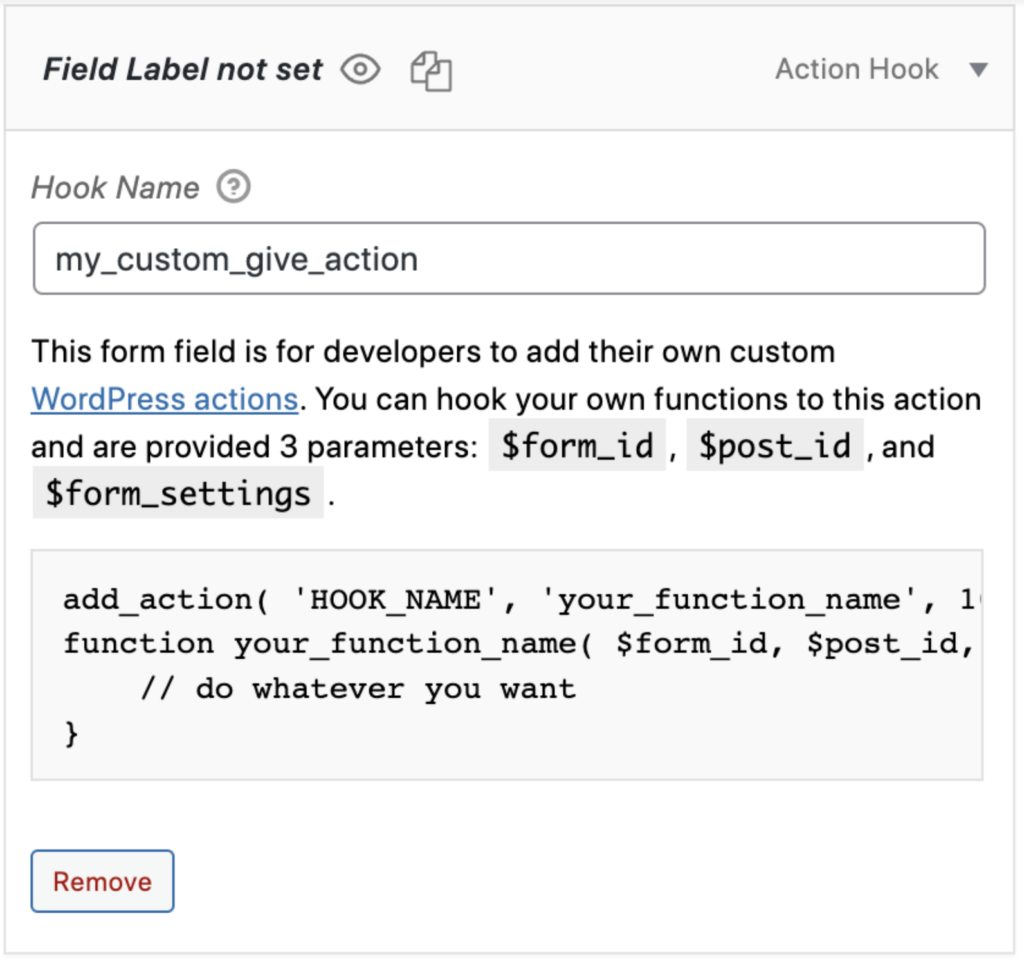
The Do Action field is for developers to add their own custom WordPress actions to Give donation forms. You can hook your own functions to this action and are provided 3 parameters: $form_id, $post_id, and $form_settings. This field can really be helpful for developers looking to take GiveWP above and beyond.


