PayPal Donations
PayPal Donations is the easiest way to accept credit cards, debit cards, and donations via a PayPal account. It comes included in the free GiveWP plugin, and is the recommended PayPal method for integrating with GiveWP.
Benefits of using PayPal Donations over PayPal Standard:
- If you’re new to GiveWP or already using PayPal Standard, it would be good to consider using PayPal Donations as it uses PayPal’s new API for the future. PayPal is deprecating the PayPal Standard gateway.
- There are no additional fees for PayPal Donations, even for credit card donations. You don’t need to switch to a specific account type, all PayPal account types are compatible with PayPal Donations.
- Unlike the PayPal Standard gateway, the PayPal Donations gateway does not take users off your site. It will take PayPal and credit card payments directly on the form, making it a more user-friendly option that helps lead to more conversions in donations. The current PayPal Standard gateway, on the other hand, continues to redirect users away from your GiveWP form.
Connecting your PayPal account
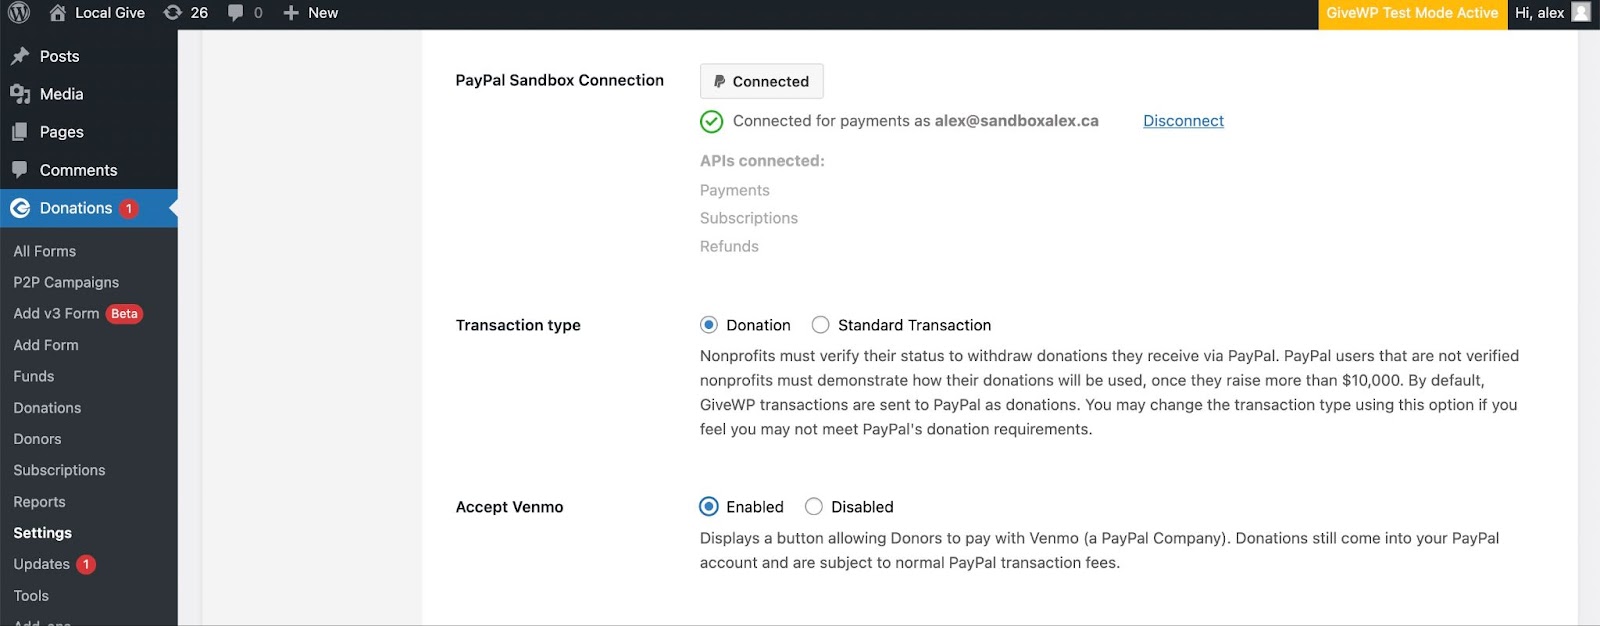
GiveWP allows you to connect PayPal Donations to PayPal for LIVE transaction processing and to the PayPal Sandbox for testing purposes. Both are found by navigating to GiveWP > Settings > Payment Gateways > PayPal on the PayPal Donations tab.
Note: To test your website with the PayPal Sandbox, see the full instructions below for Connecting and Testing with a Sandbox Account.
Connect to PayPal for LIVE Transactions

First select your country from the Account Country dropdown.
Next, to connect to Paypal Donations for live donations click the “Connect with PayPal” button. That opens a modal window to connect to PayPal. Enter your PayPal credentials, and that interface will walk you through either connecting your existing PayPal business account, or creating a new one.
Standard Card Processing vs. Advanced Card Processing
When connecting to PayPal Donations, users can choose between Standard card processing and Advanced credit card processing at GiveWP > Settings > Payment Gateways > PayPal.

Standard Card Processing
Standard Card Processing is available for every PayPal account holder, and will be the default if you choose not to apply for Advanced Card Processing, or if your application is not approved. With Standard Card Processing, your donation forms will display one or more “Smart Buttons,” depending on which PayPal-branded checkout methods are available for your PayPal account and the site visitor. A donor who clicks one of these “Smart Buttons” will be directed to a PayPal website or app (including Venmo, where available) to complete the payment process.
Advanced Card Processing
Advanced Card Processing, if approved by PayPal, allows you the option of having your donors enter their credit card information directly into credit card fields (known as “hosted fields”) on your donation forms. It also provides additional protections against fraud & chargebacks.
PayPal requires you to apply for Advanced Card Processing, and it is not available in all countries. PayPal’s decision to approve applications for Advanced Card Processing involves a wide variety of factors, and you may be required to provide additional information or communicate directly with PayPal regarding your application before approval.
Payment Field Type
PayPal provides two options for how the payment fields are displayed on your donation forms: “Auto” and “Smart Buttons Only”.
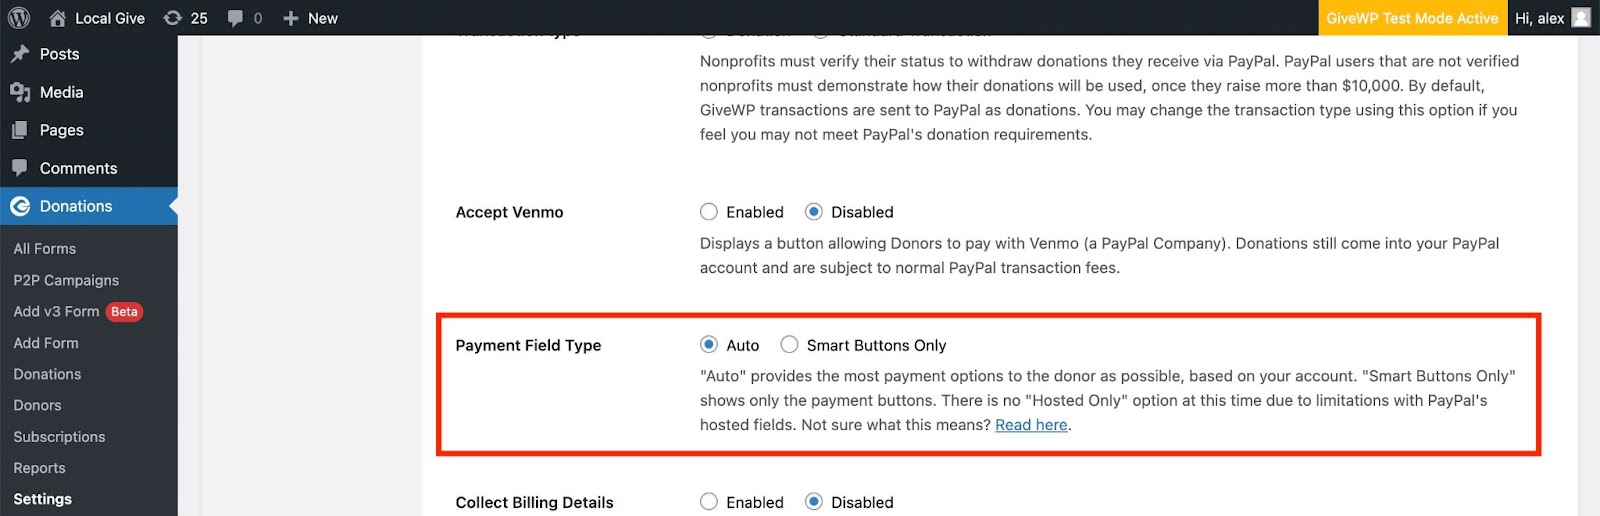
When “Auto” is selected, if your account supports Advanced Card Processing, credit card fields (also known as “hosted fields” because they are hosted on your site) are displayed in addition to the smart buttons. If your account doesn’t qualify, only the smart buttons will display. “Auto” gives you the option to set it and forget it, and will show all available options. PayPal support will be able to tell you if your account qualifies for the credit card fields
When “Smart Buttons Only” is selected, only the smart buttons are displayed on your donation forms, even if your account qualifies for hosted fields.
Disconnecting a PayPal Account
When disconnecting your PayPal account you will be prompted as to whether or not you would like to continue to receive events. The reason for this prompt is because Recurring Donations are linked to a specific PayPal account connection, meaning that when you reconnect again this is considered a new connection in the eyes of PayPal — even if reconnecting the same account. If events are not permitted to continue, then subsequent automatic donations (renewals) from previous connections will not show up in GiveWP. So by allowing previous connection events to come through, renewals will continue to show up even after reconnecting.
When should I allow events to continue?
The most common case to allow events to continue is when you plan on reconnecting with the same account. You may also choose to do so if switching accounts but you own both and so want the old account renewals to continue to come through.
When should I discontinue events?
If you are switching from one PayPal account to another and want to completely break off from the previous account, then do not allow events to continue.
Is it possible to later prevent events from coming through?
This is more complicated. To do this you would need to have access to the previously disconnected PayPal account. Once logged in, you would need to find the REST App associated with GiveWP and delete it. If you’re not sure how to do this we recommend contacting PayPal support for assistance.
Why does this work this way? Seems strange.
It is strange. Recurring Donations (subscriptions) in PayPal are associated with the REST App created in your account at the time of connection instead of the PayPal account itself. And every time you connect your account a new REST App is created — there is no way to connect to an existing app. This is unfortunate, which is why we built this workaround. We have an ongoing discussion with PayPal to improve this behavior on their end. Should it be resolved we will happily remove this documentation.
PayPal Donations and Venmo
Venmo payments are offered through the PayPal payment gateway, and are enabled by default. From the same settings page where you configure your PayPal Donations account, scroll down and select the button to enable Venmo once you’ve connected GiveWP to PayPal.
With Venmo donations, your donors can give with their connected payment method or their Venmo account balance. This makes the mobile giving process even easier than before.
Connecting and Testing with a Sandbox Account
Important: Do not connect with the PayPal Sandbox using the same email address associated with your PayPal Account.
The first step is to create an account on the PayPal Developer portal. Without creating a developer account and a sandbox profile you won’t be able to test PayPal Donations while in Test Mode. Connecting to the sandbox with a live account (and vice versa) will cause an error and PayPal Donations won’t work.
Visit the PayPal Developer Portal and log in using your live account (in the top right corner). As soon as you log in, navigate to the Sandbox test accounts page, and create a test account to use with the PayPal Sandbox.
- Click to create an account
- Since you are going to test a business account, select Business (Merchant Account) and then select your country and click “Create Account”.
Scroll down to the section with all of your created accounts. These are the accounts that you will be able to use to test your site. If you followed the steps above, you should have at least one business account ready to be used. - Under the “Manage accounts” section, click on the three dots and click on “View/edit account”:
In the pop-up window, the most important data that you’ll need is the Email ID and the Password (you can keep the System Generated Password or opt to change it). - With these credentials, go back to your site and enable Test Mode under GiveWP > Settings > Payment Gateways.
- Next, connect PayPal Donations using the credentials you just created for the sandbox account. To do this, navigate to GiveWP > Settings > Payment Gateways > PayPal.
Be sure you have selected your country from the Account Country dropdown, then click “Connect with PayPal Sandbox” and follow the instructions. When prompted, be sure to log in with the Email ID and the password you received from the Sandbox test account you created and not the email address associated with your LIVE PayPal account.
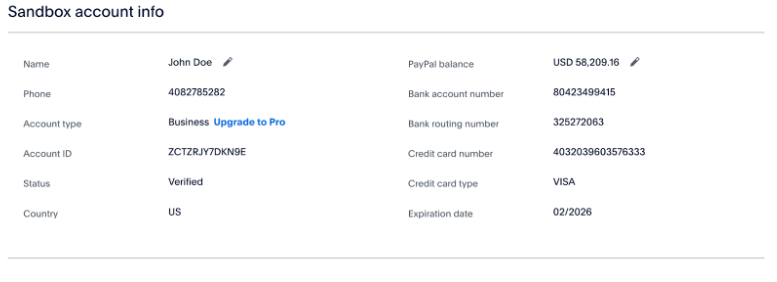
PayPal provides some test card numbers that you can use to test your donation forms here: https://developer.paypal.com/tools/sandbox/card-testing/. You can also create additional sandbox accounts for testing purposes. - Create a buyer account. Follow steps 1 and 2 from above to create another account that you can use to make test donations.
- Under the “Manage accounts” section, click on the three dots and click on “View/edit account”.
- You can use the email and system-generated password to make a donation using the test PayPal balance or you can use the bank account or credit card information found in the “Sandbox account info” section:


Donor Experience using PayPal Donations
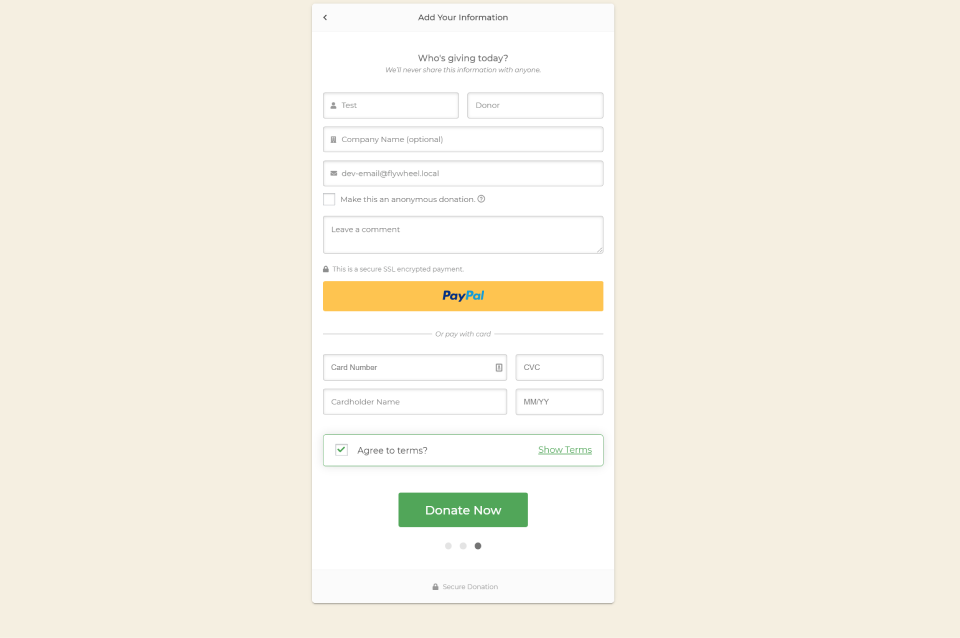
The experience donors have with your forms and the PayPal Donations interface depends on the type of account that is connected.
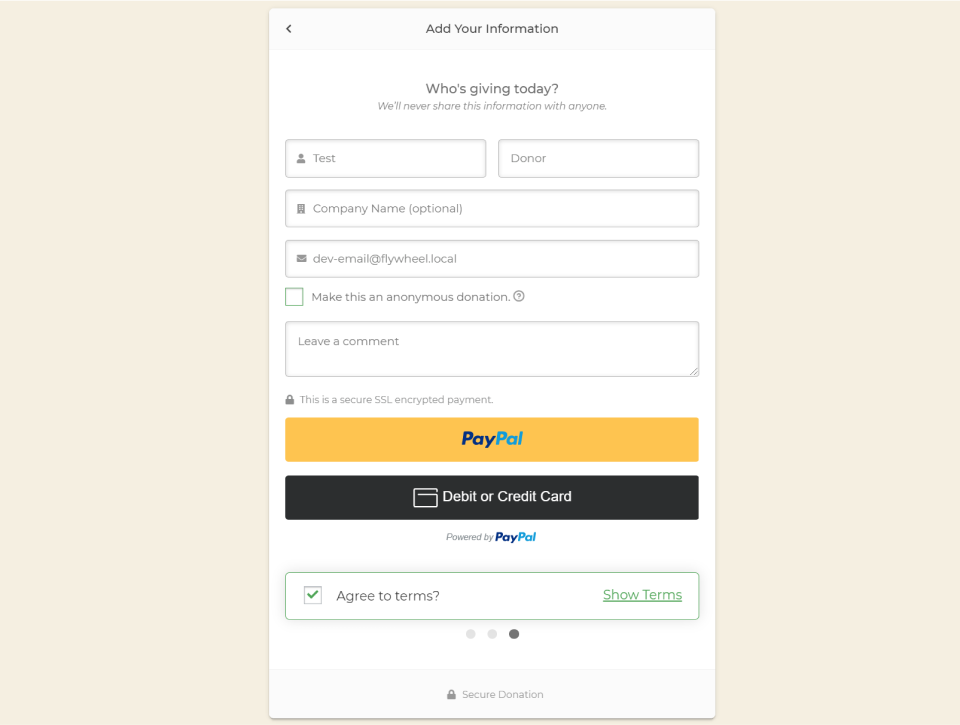
For accounts that have enabled the ability to have hosted fields, donors see the fields directly on the form:
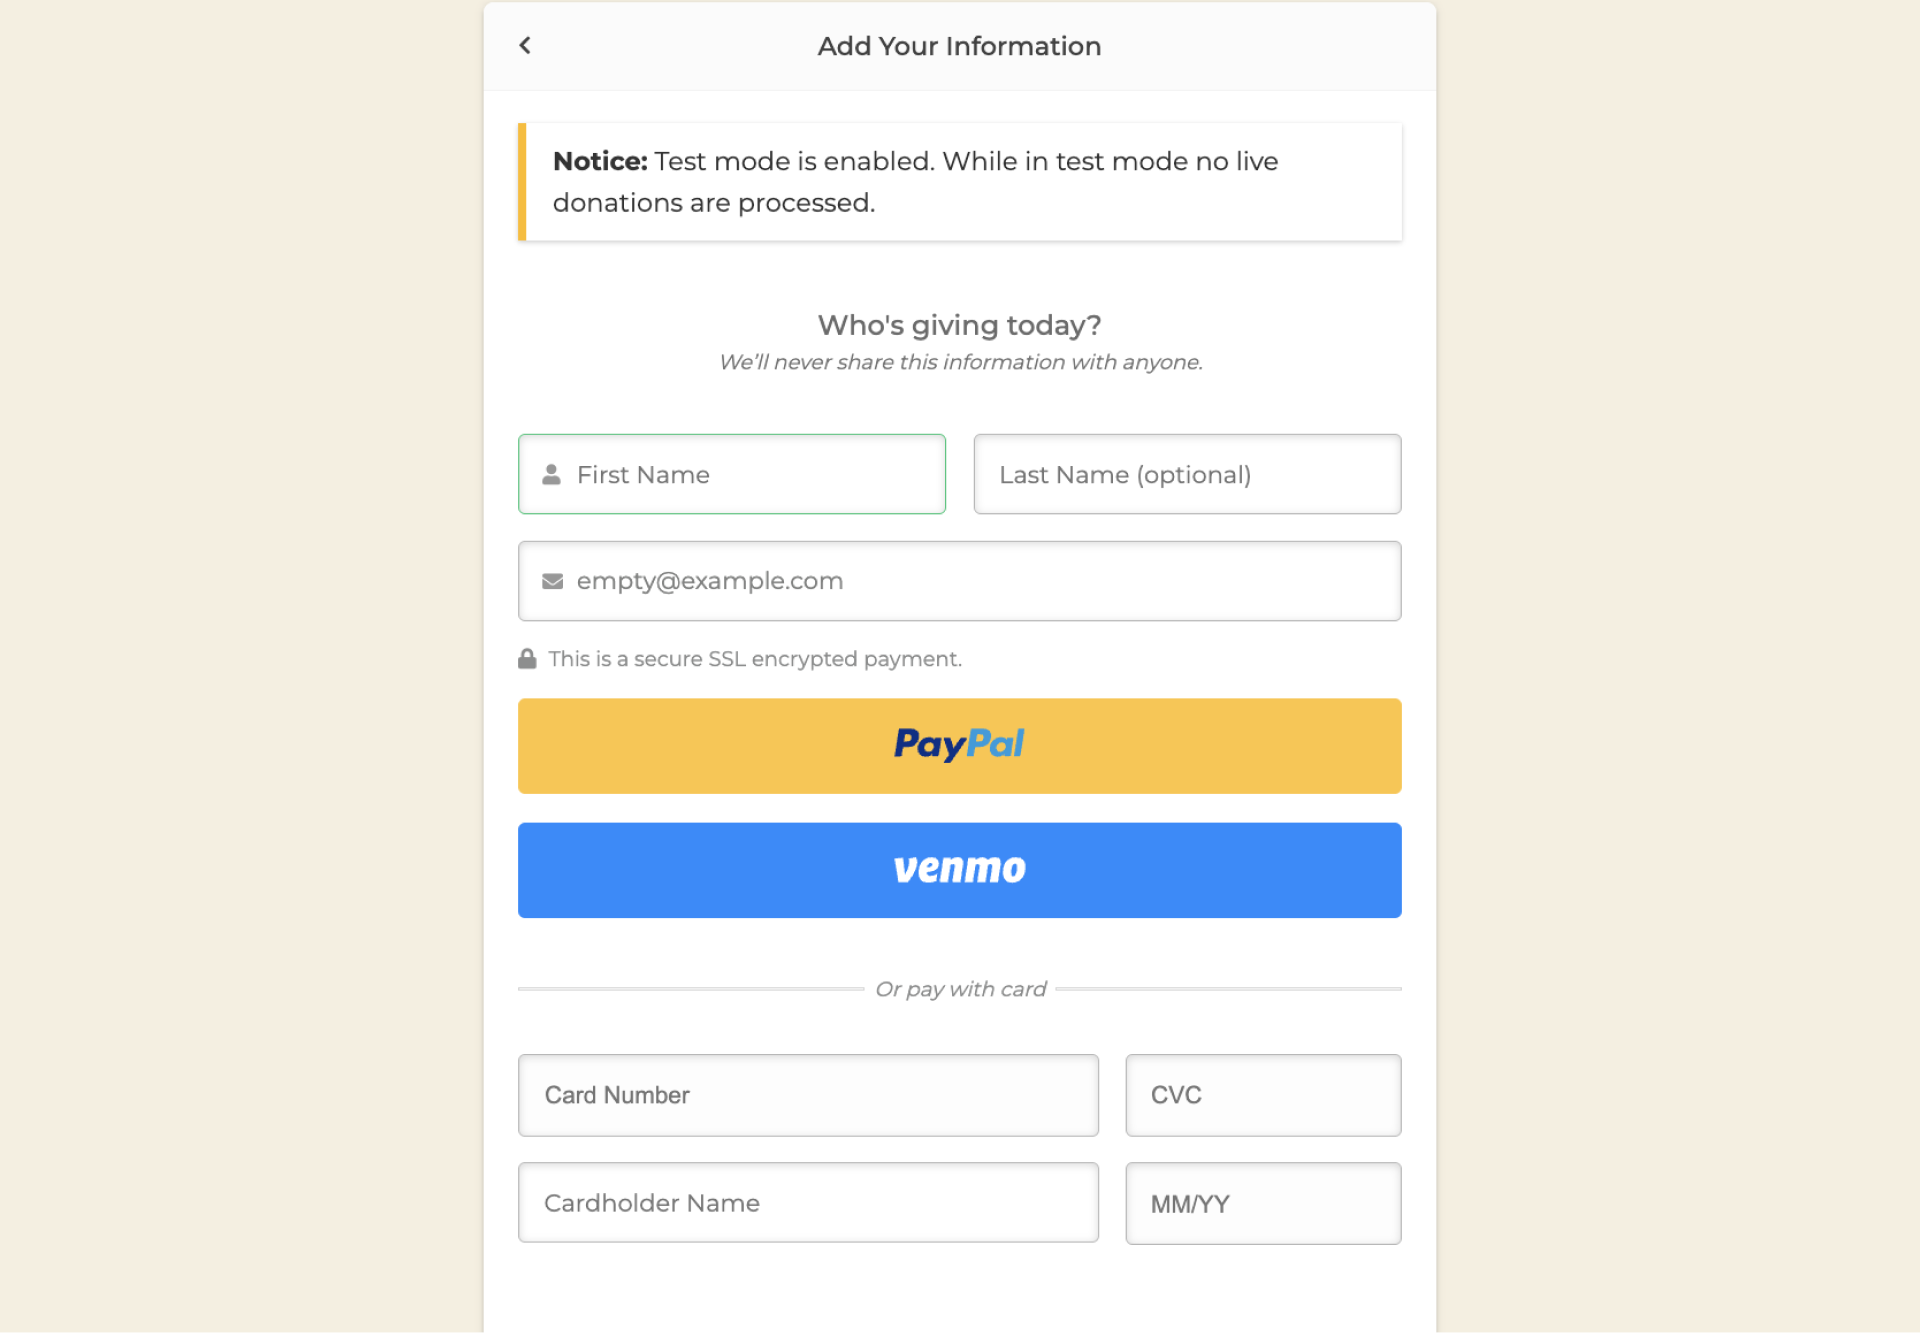
For other accounts, donors will instead see two buttons, one for PayPal accounts and the other for entering Credit card information:
For accounts with Venmo enabled, donors will see separate buttons, one for PayPal accounts and one for paying with Venmo.
Refunds with PayPal Donations
You can refund a PayPal Donations gift directly from your PayPal dashboard. Follow the steps below to process a refund:
Process the Refund From your PayPal Account
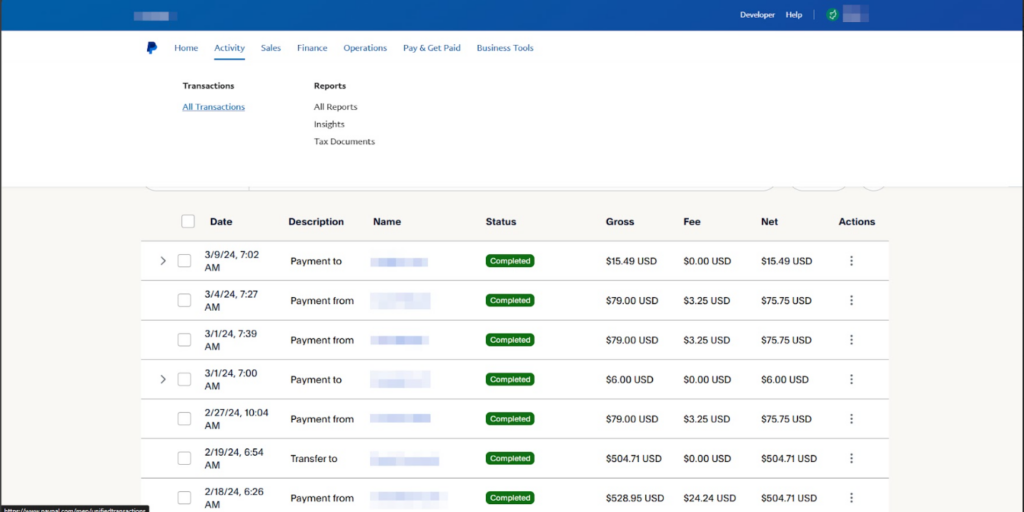
Log in to your PayPal account and go to the “Activity > All Transactions” menu.
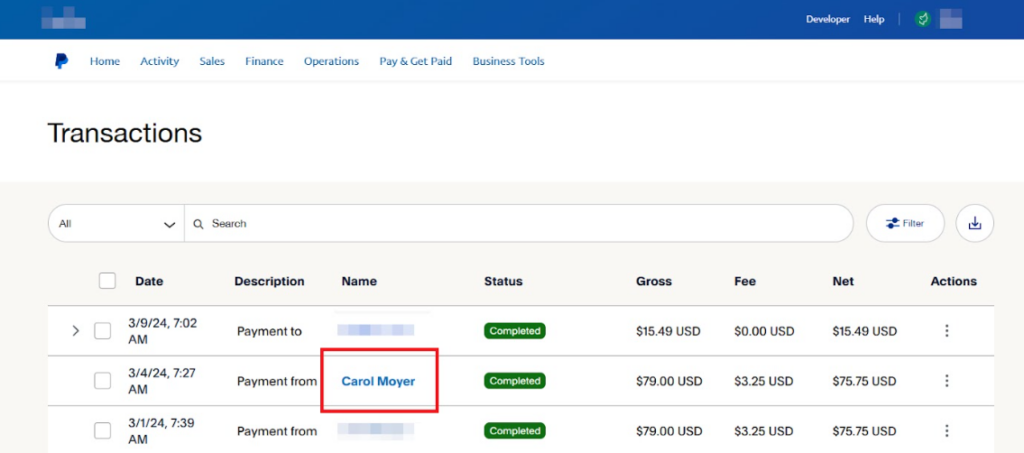
Select the donation you want to refund by clicking on the name of the donor
Click on the “Issue a refund” button.

Enter the amount you wish to refund in the “Total Refund Amount” field, and click the “Issue Refund” button.
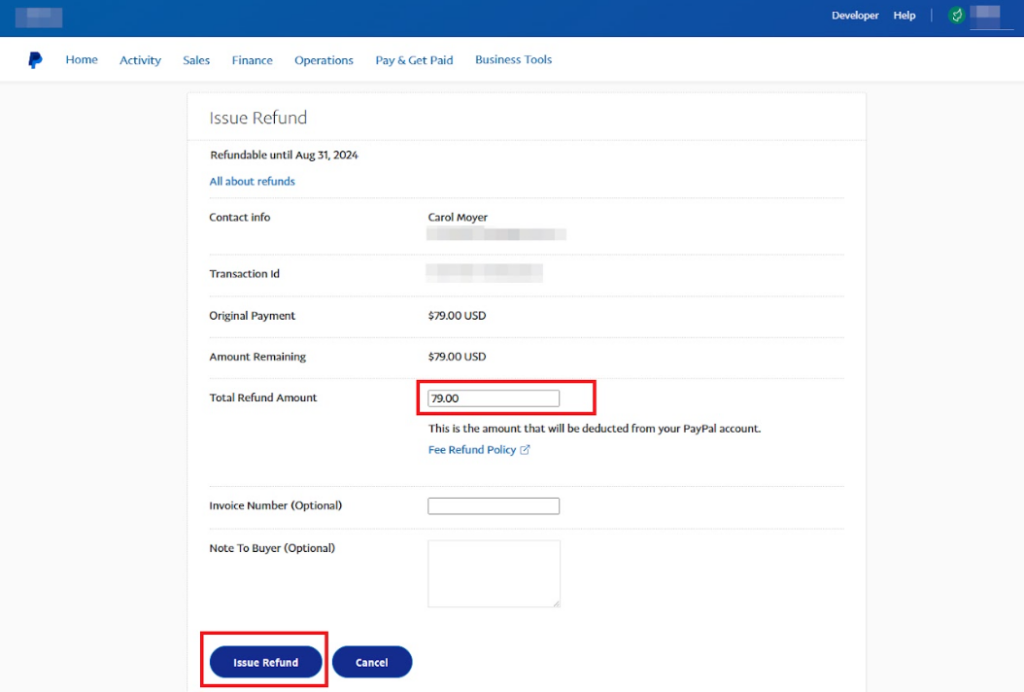
Note: You can issue a full or partial refund within 180 days of the original payment date. Once you’ve sent a refund, you can’t cancel it.
Updating the Status of the Donation in GiveWP
Once refunded, you’ll need to update the status of the donation from within your GiveWP dashboard.
To do this, you’ll start by logging in to the WordPress dashboard for your website and navigating to the GiveWP > Donations page
Locate the donation you would like to refund and click on the Edit link.
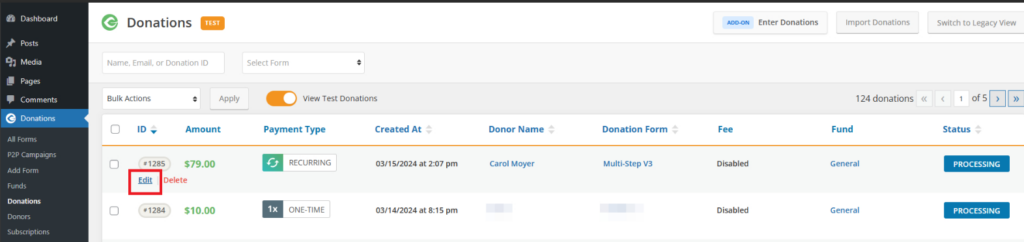
In the “Update Donation” section, select “Refunded” from the “Status:” dropdown menu. Click on the “Save Donation” button as shown in the image below.

Contacting PayPal
In some cases, connecting PayPal Donations takes a little extra help. If you have questions or concerns about PayPal account-specific issues, you can call 888-350-2387 to connect with PayPal and they will help you with your account.
Contacting GiveWP
If you have more questions about PayPal and you have a plan with GiveWP, you have access to Priority Support. Make sure you log in to your account, and then fill out the contact form as completely as possible.
FAQ
There are times where donations will be sent in a currency that isn’t in the default currency in your PayPal account. When receiving these funds, PayPal needs to know how to handle the funds from a different currency. The options for that are:
- Accept the payments & convert to your default currency (charges apply for currency conversion)
- Deny the payments
- Accept the payments & create a new holding balance for that currency
If these settings are not configured. Payments will show in your PayPal account as Unclaimed, which in turn will cause the donation status within GiveWP to be marked as “Pending”.
If there are Unclaimed payments in your PayPal Account, before choosing the preferences above, those can be approved individually and will set the donation status within GiveWP as “Complete”.
No, there are no additional fees for PayPal Donations, even for Credit Card donations on the site.
Generally speaking, all PayPal accounts are compatible with GiveWP’s PayPal Donations integration. As long as Business accounts are an option in your country (this is the case for most countries where PayPal is an option), simply click the “Connect to PayPal” button, log in, and you’re all set!
Yes, PayPal Donations are fully compatible with the Recurring Donations add-on.
For Recurring Donations, at the time of this writing, only accounts in the US and Australia can use the hosted fields option for recurring forms.
Other countries will work, but with the yellow and blue pre-populated PayPal Smart Buttons only. This happens automatically, without the need for you to do anything!
PayPal accounts that are connected to the PayPal Commerce Platform (and have the permissions set to display card fields directly on the page) are the accounts that will display the fields directly on the page.
All other types of accounts instead have the button that opens in a modal to accept cards. This is based on support for PPCP on a per-country basis, and is controlled by PayPal.
Within the settings at GiveWP > Settings > Payment Gateways > PayPal > PayPal Donations, select the appropriate transaction type.
To remove the credit card fields and display only the yellow PayPal button:
– Navigate to Donations > Settings > Payment Gateways.
– Click PayPal.
– Scroll down and disable the setting Accept Credit Card (Smart Buttons Only).
– Save changes.
This setting hides the credit card fields and shows only the PayPal Checkout option.
Important: This option only applies if Smart Buttons are enabled in your PayPal settings.


