Revamp Your Transactional Emails to Impress
Don’t let your emails get lost in SPAM filters or go unnoticed. Give’s email settings can help you impress your nonprofit team and donors with personalized transactional emails. Since the beginning, Give has had a few tools for customizing your donation email experience, but it’s gotten even better. As of Give 2.0 we’ve baked in…

Don’t let your emails get lost in SPAM filters or go unnoticed. Give’s email settings can help you impress your nonprofit team and donors with personalized transactional emails.
Since the beginning, Give has had a few tools for customizing your donation email experience, but it’s gotten even better. As of Give 2.0 we’ve baked in an intuitive interface for you to manage donation receipt emails as well as the other transactional emails that Give sends to selected admins. This tutorial will serve as a tour of the new email interface—highlighting Give’s new email settings features. By the end, we’ll unleash you to create transactional emails that wow your donors, board members, and team. First, take a look at the new email settings interface.
What’s a Transactional Email?
Transactional emails are emails that happen as a result of a transaction. They are governed differently than marketing or promotional emails because the emails are always triggered as a result of an action taken by the recipient (in our case, the donor).
Any definition you see online of the distinction between transactional and promotional emails is fuzzy at best. This is because the legal distinction varies widely based on the laws of individual countries.
For the purposes of Give and this tutorial, we’re including any email triggered by Give under the banner of “transactional emails.” These include:
- The Donation Receipt
- The New Donation notification
- The New User notification
- An email triggered by a premium add-on (like a recurring renewal email or a mailed e-card from our tributes add-on, for example)
While some of those emails might not fit a more broad definition of “transactional,” we’re lumping them into the discussion here.
How to Configure Your Transactional Emails in Give
With the advent of Give 2.0, we’ve added a totally revamped section to the Give settings devoted to all of the emails sent by the Give plugin. In this video, I’ll walk you through all of the various options. If you’d rather read, I’ll cover all of them in the paragraphs following the video.
At a Glance: Configuring All Emails
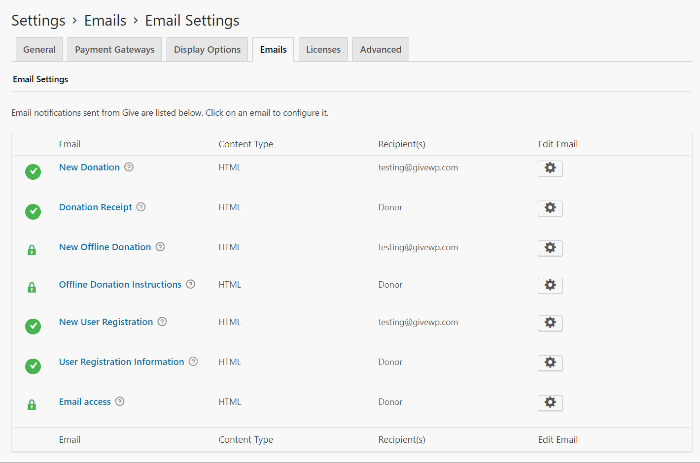
The first step to configure your email settings in Give is to navigate to the “Email” tab of your Give “Settings.” Here you can see all of the emails that your Give installation sends.
The page above gives you an overview of the various emails sent by Give and the ability to enable or disable them using the icons on the far left of the table. Hovering over each email in the list displays more options.
In addition to the standard emails sent by Give, any emails generated by premium add-ons (such as Recurring Donations or Tributes) will also show up in this list.
Note that you can disable some of the emails from this screen, but not all of them. Certain emails perform functions that are tied to features of Give, such as the Offline Donations Gateway or Email Access, and are therefore disabled and enabled based on the appropriate settings for each of those features.
Digging In: Configuring Each Email
To configure a specific email, select it by clicking its title in the list, clicking the gear icon in the list, or by clicking “Edit” after hovering over the title.
The “Enabled | Disabled” toggle for the notification at the top of the page performs the same function as the green checkbox column on the email settings main screen. This setting only appears on donations that can be globally disabled.
Next, you can configure the email subject and content using the provided fields. Keep in mind that in the quest to defeat SPAM email messages, many email service providers will red flag sensational-sounding emails or other tip-offs that the content is SPAM. To get around that, avoid starting out with the salutation “Dear ____” or using clever language in either the email subject or content.
Think of all the “You’ve won a prize!!” emails currently languishing in your SPAM folder. Your goal is to avoid this email turning into one of those emails.
One way you can help to distinguish your emails from SPAM is to include email template tags in both the subject and body. The email “New Donation from Reginald Smith for $45” is more likely to get past SPAM filters than the 13th straight “You’ve got a new donation!!” email.
Below the available template tags, you’ll see the option to send the email in HTML (the default) or plaintext. If you are experiencing deliverability issues with a specific email, try sending it in plaintext instead of HTML.
On emails where the recipient is configurable, set the recipient of the emails in the last section before the options for previewing the email. To add multiple emails, click the “Add Recipient” button. This powerful feature allows you to send donation-specific emails to designated recipients, such as a bookkeeper or accountant.
Some emails (notably the Donation Receipt and the Offline Donation Instructions) are designed for the donor and will automatically go to only the email provided at the time of donation.
Preparing to Send: Previewing and Testing
Once you’ve configured all the emails to your exact specifications, there are just two steps between you and Give-related-email bliss: previewing and testing.
To preview each individual email, Give includes a unique feature of allowing you to see the emails populated with donation-specific content. To access the preview functionality, click the “Preview” option from either the individual email’s settings page or the main email settings page when hovering over the title.
Clicking the “Preview” option will open a new browser tab with the content of the selected email in the main section of the browser. Above that is a select field which allows you to select a specific donation email to preview.
Once you’ve confirmed that the content loads correctly for donations on the site, the final step in the process is to send a test email.
Nothing can fully replicate the actual experience of reading the email in email software. To view a real email, use the “Send Test Email” button, which displays beside the “Preview” option on both the individual email settings screen as well as the main email settings page.
For emails where the recipients are configurable, the test emails go to the emails you’ve assigned in the settings. For emails where that setting is not configurable, the test emails go to the main WordPress admin email for the site. The main admin email is configured in Settings > General in the main WordPress settings.
Go Configure Your Transactional Emails
In addition to all of the settings we’ve covered in this article, Give emails are also configurable on a per-form basis for each individual form. Click on the “Emails” tab of the form edit screen for those settings.
With this level of control over your transactional emails, you’re set up to wow your donors, impress the board or administrators, and take your online donations to the next level. We’d love to see and showcase how you customize your emails.
Join our growing Facebook Community and connect with other Give users on a mission to fully fund their causes. We’ll see you there!
About the Author
Ben Meredith
Ben Meredith is our Head of Support at GiveWP. He’s also the founder of The WP Steward and the author of the popular Better Click To Tweet Plugin.