Salesforce
The GiveWP Salesforce add-on allows you to connect your GiveWP-powered donation platform to Salesforce. You’ll need to have an account with the Nonprofit Success Pack (NPSP) to use the add-on. This article walks you through connecting and troubleshooting the GiveWP Salesforce add-on.
Getting started
Before you get going with the GiveWP Salesforce add-on, you’ll need a Salesforce Nonprofit Success Pack account, the GiveWP platform, and a plan that includes the Salesforce add-on.
Salseforce is a GiveWP add-on which must be downloaded, installed, and activated. Read here for instructions on downloading, installing, and activating GiveWP add-ons.
Connecting to Salesforce
Once you’ve installed and activated the GiveWP Salesforce add-on, navigate to the Salesforce tab of the settings at Donations > Settings > Salesforce and click the blue button to connect to Salesforce:
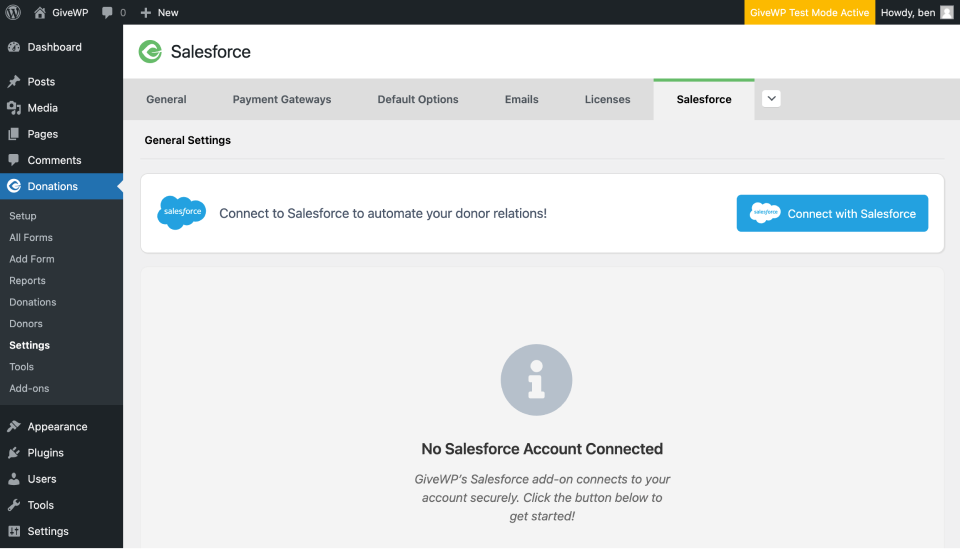
That will take you away to your Salesforce account to connect. Once connected, you’re delivered back to the settings page, displaying a message that you are connected.
Ensure that the only setting on that tab is enabled, and that’s it! Donation data is now being sent to Salesforce!
Sending Data to Salesforce
With the add-on active and connected to Salesforce, you’re all set.
Any time a donation is created on the GiveWP side, it is sent to salesforce as an “Opportunity.” If the donor exists as a contact on the Salesforce side, this donation is added to their record. If a donor does not exist, a new contact is added.
The Data sent to Salesforce by default includes the following:
- Donation ID
- Donor Name
- Donor Email
- Donation Amount
- Recurring Donation frequency
The unique identifier is the email address, so if several people with the same name donate, they’ll be matched by email, or a new contact created for each individual email.
Want to send custom data to Salesforce? The data is easily extendable by a developer familiar with WordPress filters and Salesforce data structure.
Information Sharing Between GiveWP and Salesforce
The Salesforce add-on connects to the NonProfit Success Pack (NPSP) integration in Salesforce. That integration adds two different types of opportunities to Salesforce: Donation and Recurring Donation. GiveWP’s integration creates Donation Opportunities and Recurring Donations Opportunities on the Salesforce side. The tables below show the information shared by GiveWP to Salesforce, and how that information is mapped once received by Salesforce.
The data sent to Salesforce is mapped as follows:
| GiveWP Data | Maps to Salesforce as |
| Donation | Type |
| Donation donation ID number | Name |
| Donation amount | Amount |
| Donation completed date | CloseDate |
| Form Title | Stage |
If the Recurring Donations add-on is used, GiveWP sends additional information:
| GiveWP Data | Maps to Salesforce as |
| Donation ID | npe03__Recurring_Donation__c |
| “Donation donation ID (Recurring Installment) | Name |
Donation statuses are mapped as follows:
| Donation Status | Salesforce Opportunity Status |
| Pending | Pledged |
| Completed | Closed Won |
| Refunded | Closed Lost |
| Failed | Closed Lost |
| Cancelled | Closed Lost |
| Abandoned | Closed Lost |
| Preapproval | Pledged |
| Processing | Pledged |
| Revoked | Pledged |
| Subscription | Closed Won |
Enabling Advanced Logging
Built into the GiveWP Salesforce add-on is the ability to enable additional logging. By default, only errors are logged at Donations > Tools > Logs. Successful transmissions of Data to Salesforce don’t add log events. If you’d like to enable more advanced logging that logs everything (helpful for debugging!), you can enable debug logging.
To enable logging of everything to the GiveWP logs, your site needs to have the WP_DEBUG_LOG constant set to “true.” This is a WordPress-wide setting used by developers to debug issues in their code. There are some plugins for enabling WP_DEBUG_LOG in your site, like WP Debugging, but keep in mind that DEBUG mode is generally a bad idea for folks who are not at least moderately familiar with what they are doing. It’s never recommended to be used on a production site for more than troubleshooting purposes, and you should disable the display of errors.
Add this code snippet to your wp-config.php file to enable debugging in a way that does not affect the live site:
// Turn debugging on
define('WP_DEBUG', true);

// Tell WordPress to log everything to /wp-content/debug.log
define('WP_DEBUG_LOG', true);

// Turn off the display of error messages on your site
define('WP_DEBUG_DISPLAY', false);

// Hide general PHP errors
@ini_set('display_errors', 0);
Once you’ve enabled WP_DEBUG_LOG, the logs for all Salesforce data are added to the GiveWP logs at Donations > Tools > Logs.


