The Complete Checklist to Update Your WordPress Fundraising Site
Use this checklist to update your WordPress-powered fundraising website and avoid critical issues that might ultimately cause you to lose donors.

You’d think that WordPress updates are fairly simple. You log into your website, check notifications for pending updates, hit the ‘Update’ buttons, and you are done.
But this is often not the case. With a botched update, you could end up with a malfunctioning website, vulnerable donor data, or even a crashed website that could put a brake on your fundraising efforts.
WordPress updates are not all that simple.
We know that one of the biggest reasons WordPress is the most popular website building platform is the availability of plugins and themes. There’s no shortage of plugins and themes to choose from – free, premium, or freemium, there’s something for everyone. But this comes with its own challenges.
Websites are built around a particular version of the WordPress core and plugins or themes. When a new version of the plugin or theme is released, you’d expect the software to behave just like the previous version. That’s not always the case though. With WordPress version changes, you may find that the newer versions are incompatible with your website. This can sometimes even break your site.
It’s not all bad news though. With the right techniques and steps, updating your WordPress website can go smoothly every time. Here are some steps you can take to make sure your website updates never cause your site to go down or malfunction. .
Steps to Take to Update Your WordPress Fundraising Site
Here are seven steps to take before updating your WordPress websites –
- Take a complete website backup
- Make a list of the most important URLs
- Review your installed plugins & themes
- Find out what’s new in the update
- Test all updates on a staging site
- Turn caching off
- Scan for malware
1. Take a Complete Website Backup
When you take a backup of your website, you are ensuring that you have a copy of your website stored away safely. This backup is your safety net. While updating your themes, plugins, and WordPress version, if your website breaks, then you can quickly restore your site back to normal.
While you can choose to back up a website manually, it can be a ton of hard work. Luckily, there are backup plugins that do the job for you – without the additional hassle and effort.
However, picking the right one can be quite tricky. A backup is only as good as your ability to restore it. You’d be surprised to learn that some backup plugins don’t offer an easy way to restore backups.
If you don’t already have a backup strategy in place, we highly recommend investing in a backup plugin. Each website is unique and so are its needs.
Check out this list of the best WordPress backup plugins that will help you pick one that’s right for your fundraising website.
2. Make a List of the Most Important URLs
We suggest you make a list of the most important pages for your website to check after you update. You can even take screenshots of the pages to compare how the website looks before and after the update.
The homepage often creates the biggest impression on visitors. For fundraising websites, the ‘About’ pages, the ‘Impact’ pages, and of course, the ‘Donate’ pages are critical.
After running an update, check those pages to ensure that they are working without any hiccups.
3. Review Your Installed Plugins & Themes
Review installed plugins and themes to do two things – look out for themes and plugins that are abandoned or whose licence needs to be renewed. This requires two steps.
Step 1: List all your plugins and themes
Make a list of the plugins. Do this every time you want to update your website. Eventually, you’ll notice that there are plugins and themes that are either a) not being used anymore, or b) not receiving any updates. The latter indicates that those plugins or themes are no longer being maintained.
Themes and plugins that are not being maintained will eventually develop vulnerabilities, leaving your websites at risk. Remove the themes and plugins that are abandoned by their developers to avoid website vulnerabilities. You can find alternatives to the theme or plugin in places like AlternativeTo.
You can double-check this by visiting their official websites, social media accounts, or the plugin/theme marketplace.
While some plugin and theme developers notify users about updates through blog posts and social media, others do so through emails. For instance, GretaThemes, notifies users about an update via email. The email contains a download link for the new version of the theme.
Step 2: Check if you need a premium license
Many WordPress plugins and themes have recently shifted towards a yearly subscription model wherein you subscribe for annual payments to continue receiving updates beyond your first year. WordPress forums and social media groups are abuzz with accounts where users were unaware of the yearly subscription model. These users were either surprised by a repeating charge on their card the next year or disappointed when things failed to update if their payments failed to go through.
If you have premium plugins or themes installed on your website, review your subscription. Log in to your account and check your subscription to avoid last-minute surprises.
4. Find Out What’s New in the Update
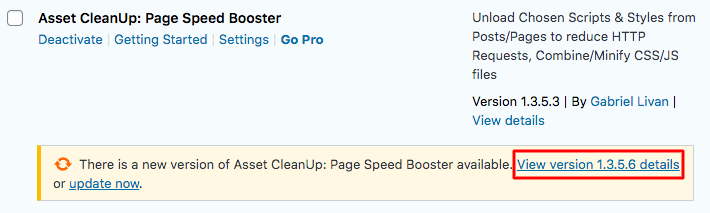
Viewing the details of new updates lets you know what to expect. That way, you get a better idea of what might break and what to watch for after the update..
Check the details of the plugin by visiting the Installed Plugins page on your website dashboard and click on “View version details.” To check what’s new in the theme, visit Appearance > Themes and select “View version details.”
5. Test All Updates on a Staging Site
Earlier, we discussed how a website is built around the version of plugins/themes or the WordPress core available at the time. Developers try to ensure that they release updates that are compatible with other plugins/themes and the WordPress core. However, compatibility issues may still arise.
Yet, if you don’t run updates, vulnerable plugins and themes could compromise your website’s security. Hackers exploit known vulnerabilities in plugins and themes to inflict damage to your site and carry out spurious activities.
Nonprofits are especially vulnerable to these attacks. Besides the obvious data loss, a security breach on your site would mean a huge blow to your credibility and reputation.
What can be done in this situation? Don’t worry, you can troubleshoot like a support engineer – all by yourself! All you have to do here is use a staging site.
A staging site is an exact replica of your website which can be used for testing and experimenting. By testing your updates beforehand, you can avoid troubleshooting a broken site due to an update.
To create a staging site, you can:
- Check with your hosting provider to see if they offer staging options.
- Use a plugin like WP Stagecoach to create a staging site.
- Create a Local Development Environment using Local by Flywheel, Desktop Server etc.
Note: If you are using a backup plugin like BlogVault, you can build staging sites free of cost.
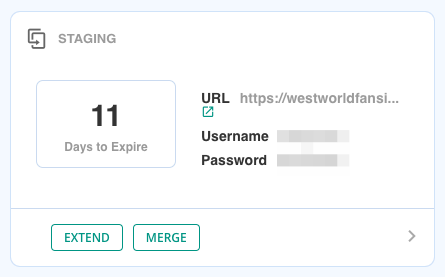
Ensure that you have the option to merge changes with the live site so you don’t have to repeat the entire update process for the live site. While testing your updates, make sure to check all the URLs you listed in step 2 to see if they’re working as desired.
6. Turn Caching Off
Many websites have caching plugins installed to improve the website speed. When a visitor visits your website, the caching plugin saves the page or the post s/he is visiting. This makes the pages load much faster when the visitor comes to the same page again.
But when you update your website, instead of reflecting any change caused by the updates, the cache plugin will load stale content. So, before you update, make sure to turn your caching plugin off. You can activate it again after you have updated your website.
If you have any problems, check this documentation on common WordPress caching issues.
7. Scan for malware
After you’re done updating your site, scan for malware to check if the update has introduced any malware or vulnerabilities. It’s possible that a plugin/theme update has a vulnerability that exposes your website to hackers and malicious attacks.
Security plugins like MalCare provide malware scanning and instant malware removal so you can act without losing any time. For a free malware scan for your site, you can use MalCare Protect from the the WordPress Repository or Sucuri Sitecheck.
Don’t Wait to Update
WordPress updates are a great way to secure your fundraising website while offering your donors and visitors the best possible experience. Updates can seem daunting, but with the right know-how and safety measures in place, they go smoothly.
With website backups, Don’t wait, be prepared!
Sign up for the GiveWP newsletter to get more fundraising website tips and updates.
About the Author
Akshat Choudhary
Akshat Choudhary is the Founder of BlogVault and MalCare and writer at AssignYourWriter.co.uk