How to Troubleshoot Your Website like a WordPress Support Engineer
This doc covers how you can troubleshoot your WordPress website like a WordPress Support Technician. These tools can help you not only get better at understanding your website, but also provide more actionable information to our GiveWP support technicians. This information helps us resolve your issue more quickly and efficiently.
One thing we might love even more than helping our customers is teaching them how to troubleshoot a website for themselves. When it comes to WordPress technical support, our team is dedicated and focused on supporting GiveWP and all our add-ons. Nevertheless, you can often solve most website problems with a few simple DIY support steps.
I really really enjoy making people’s websites work better.
Recently I read a journal entry from 2011 that said “I just want a job with flexibility, doing what I love.”
Mission Accomplished.
— Ben Meredith (@benUNC) May 31, 2019
Our support team takes a few essential steps for every ticket, every time. If you know these steps, you will level up your understanding of your own website and solve problems on your own more often.
It’s also important to follow these steps before you contact any theme or plugin support team. Armed with this information, you’ll get the most helpful response from a support technician.
Common WordPress Problems with Straightforward Fixes
Before going through the steps to troubleshoot a website, it’s helpful to get a higher level look at some typical ways that WordPress websites can go down. Knowing how they crash helps you prevent it in the first place. Here are some common simple issues that can affect your website.
Caching
Boiled down to its fundamental level, caching is the storing of data from one visit to the next. Caching’s purpose is to save server resources to be able to load pages faster. Think of it like taking a snapshot of the site at one particular moment in time, and then delivering that snapshot to all subsequent visitors instead of taking a new photo.
While this allows the site to load significantly faster, it can also cause issues. If customer-specific information is in the snapshot, that info has to be excluded from the cache. For example, if a visit relies on specific data input from the user like entering a comment, submitting a form, or making a payment, that data must be handled differently than a standard snapshot.
Caching can also play tricks on a site admin making code or content changes. It will keep the previously saved version, causing you to think your changes are not “taking” because the site is still delivering the cached resources.
If you use a caching solution on your website, flush the cache before you do anything else. How you do this depends on the caching solution in place. Some hosts use their own caching solution on top of or in place of plugins. If that’s the case, you may need help from the host to temporarily disable caching.
Plugin Conflicts
The power of WordPress is its robust ecosystem of third-party plugins you can install to run on your website. You can find anything from donation platforms, like GiveWP, to little dashboard pet widgets. The common refrain you’ll hear from developers and power-users is “there’s a plugin for that!”
However, this same variety of plugins also allows plugin conflicts to occur. This means that one plugin’s code is conflicting with the code of another, causing an error. The plugins are telling your website to do two things it cannot do at once. It’s like a traffic officer telling cars to both stop and go at the same time.
The key to understanding why plugins conflict with one another is an understanding of the economy of plugins. There are dozens of thousands of “official” plugins in the WordPress Plugin directory, as well as countless others hosted elsewhere. Those thousands of plugins were created by thousands of developers. So, they have not all been tested with one another.
Testing every combination would take hundreds of years. Plus, conflict testing takes resources and time, which many plugin shops are short on. A site with just ten plugins from ten different sources has a near-zero chance that those ten developers have tested their plugin with all nine of the others. The only exception might be if all ten of those plugins have millions of active installs.
While many plugins work just fine alongside one another, when problems arise it’s best to first look at disabling your plugins to isolate the issue. Disable one at a time until you find the one that caused the conflict. There is even a plugin to help you with this process, which we’ll talk about later on.
Theme Conflicts
The theme ecosystem is just as diverse as the world of plugins. They too come with thousands of ways you can break your site. The most common mistake is using themes that have not been tested alongside certain plugins (or the most recent versions of certain plugins).
Themes are especially tricky and deserve a separate highlight from plugins for at least two reasons:
First, you can’t just “switch the theme” to test things as easily as deactivating and reactivating a plugin. Usually themes dramatically affect the front end of the site that visitors see.
Second, it’s relatively easy to pick a bad theme. Some theme creators hide poor-quality code behind fancy animations or a ton of features. It’s easy to get wowed by the “bells and whistles” of animations, scrolling effects, or overstuffed dashboards full of options.
How to select a good theme: Always ask a trusted developer to weigh in on your theme selection before spending money or time investing in a theme. Here’s a short list of things that should be included in the conversation:
- What types of things you want to be able to do yourself on the site.
- What things you are willing to pay others to do on the site.
- What the most important factors weighing into theme selection are
- Speed/performance?
- Ability to customize yourself?
- Large community of developers to help when things go wrong?
Those types of considerations are important, and a trusted developer should teach you about the trade-offs involved with theme selection. Make an informed decision.
If you don’t have access to a trusted developer, reach out to us on Twitter. We’re happy to connect you with someone who can listen to your needs and make recommendations.
JavaScript Conflicts:
WordPress has a massive ecosystem around it with tens of thousands of theme and plugin developers, users, and third-party services designed to fill various needs.
Many of this myriad of third-party developers use JavaScript, a programming language that allows you to implement complex features in the browser. The problem here is that depending on how JavaScript was used, your site might face incompatibility issues where one developer’s script does not play nicely with another developer’s script. JavasScript conflicts can cause everything from minor annoyance to total site failure. In the case of GiveWP, JavasScript conflicts can prevent donations.
To help you troubleshoot JavaScript conflicts, the WordPress community created a complete tutorial on how to use your browser to diagnose JavaScript errors. You can read it here.
JavaScript Conflicts with Cloudflare Rocket Loader
Rocket Loader is a feature provided by Cloudflare that can help with page load times on your site. Rocket loader accomplishes this by loading things like text, fonts, and images first and then loads your site’s JavaScript after. This feature can cause conflict with JavaScript on your site and is not a requirement to run basic Cloudflare functionality.
If your site is having JavaScript conflicts with GiveWP, you’ll want to disable Rocket Loader to see if it’s the root issue.
To disable Rocket Loader, open up your Cloudflare dashboard and navigate to Speed > Optimization > Scroll down to “Rocket Loader”, and toggle the feature to OFF.
PHP Versions
The primary code language of WordPress is PHP. Like WordPress, PHP itself is updated constantly by the development community to be faster, more secure, and better able to handle the changes in the web world.
If your site is running an old version of PHP, it increases the risk of compromising your website or for theme and plugin conflicts to occur. All it takes is one plugin author neglecting to add support for your older version of PHP and your site can be taken all the way out.
WordPress (since version 5.2) includes a site health tool that shows what version of PHP your server is running. Check this to make sure you’re always on the recommended version. If not, contact your website host to find out how to update your PHP version.
What To Do When Your Website is All The Way Down
Sometimes, code errors are “all the way” errors. You visit your site, only to find it completely down. In previous versions of WordPress, you’d be greeted by the “whitescreen of death” where the site simply doesn’t display anything.
As of WordPress version 5.2 there is a new Recovery Mode that does two things.
- Recovery Mode displays a message to visitors of the site that it’s experiencing technical difficulties.
- Recovery Mode emails the site administrator email with details of the outage.
Included in that email is a special link to give site admins a way to access the site with the code that created an error (in a plugin or theme), temporarily deactivated.
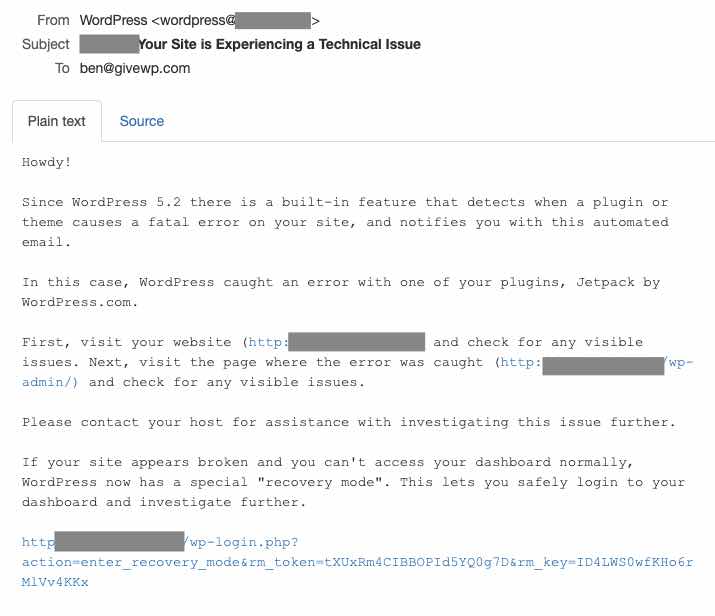
This feature allows you to disable the offending code and bring your site back to life. It’s also a fantastic way to send the actual error code to the developer of that plugin or theme so that they can address the issues. For more on Fatal error Recovery, see the announcement article from the WordPress core team.
Recovery mode will help you to troubleshoot on your own when your website goes down. Keep in mind, it only helps when the site is “all the way down.” What do you do for other issues that are still critical enough to break key components of the site?
How to Troubleshoot Your Website When Something is Broken
Sometimes you will experience a critical issue that conflicts with things like eCommerce or third-party integrations. If your site accepts donations or purchases these issues are just as problematic as the site being all the way down.
In plugin support for GiveWP and WP Business Reviews, we most often see issues where there’s a theme or plugin conflict that is difficult to reproduce. These are the kinds of conflicts that aren’t severe enough to bring your website into recovery mode but prevent the most important functionality of your site: your income.
When your website is broken, but not completely down, these steps will help resolve the problem as quickly and painlessly as possible. But we don’t want to just restore the functionality. We also want to make sure that while we are restoring the site, we also minimize problems or downtime on the front end for visitors.
STEP 1: Identify the Problem on Your Live Site
In their book The Pragmatic Programmer, Andrew Hunt and David Thomas tell a story that introduced the concept of “Rubber Duck Debugging.” This method of debugging software code is our first stop when we are identifying the problem. It goes like this:
Programmers have a physical rubber duck (or other inanimate object. I prefer my WordCamp 2016 Plush Wapuu) and when they encounter trouble or bugs in their code they explain it, out loud, line by line, to the duck.
This engages a different part of our brain. Explaining an activity uses different “mental space” than doing the activity alone.
It works the same way as asking someone in crisis, “What would you tell a friend in this situation?” to pull them outside of themselves long enough to see the problem.
And it doesn’t just work for code-related things.
Let’s take an issue we see on the GiveWP support desk as an example. Here’s the issue: When submitting a donation, the icon just spins and then the page reloads.
The way you would rubber duck that issue is to have the following dialogue with your rubber duck:
When I try to submit a donation, the icon spins, and the page reloads. In order to resolve this, I have to isolate the problem. Does it happen on an individual form page, or only when the form is embedded in another page?
(Checks… it’s happening everywhere.)
Does it only happen when the form is displayed as a modal using button or in modal display mode? Or does it happen on every type of form display?
(Checks… it’s only on modal.)
Does it happen on every payment gateway, or just this one?
(Temporarily activates and checks the Test Gateway… it’s all gateways.)
Often, one of the questions you ask your rubber duck will trigger a chain of events that leads you to being able to isolate the problem.
Note: If you can’t isolate it and replicate a problem, you can’t fix it.
You can “rubber duck” all steps of the process, not just the beginning.
Diagnostic Plugins
A common saying in WordPress is “have you tried deactivating all plugins?” While that certainly is a quick and easy way to isolate conflicts with plugins, it can result in a jarring experience for your site visitors.
We never recommend deactivating things on a live site (unless the site is “all the way down” as above)
Instead, we recommend the Health Check Plugin which is a diagnostic plugin that allows you to troubleshoot on the live site without taking down the site for your visitors.
It gives you the experience of “vanilla WordPress” (to use their terminology) so that plugin or theme conflicts are ruled out quickly. The best part is that the “vanilla” experience is limited to browsers where you are logged in. Visitors and other logged-in users will still see and interact with the site as normal. The goal is to replicate the issue by reactivating plugins until it appears through process of elimination. We mentioned this in the plugin conflicts section earlier.
Browser Developer Tools
Modern browsers also have useful methods for tracking down errors on the site to troubleshoot a website while it’s live. A lot of them include a Developer JavaScript console tool that displays error information while it’s happening.
Learn how to open the developer’s console in your browser.
We’ll use Chrome for the purposes of this tutorial, but other browsers have similar tools.
Once you have the developer console open, reload the page and attempt the same action that you tried before. (The one that was broken.) Make a note of any error messages. Those are usually helpful for you or technical support reps to isolate the issue.
As you might remember, if we can’t isolate and replicate the problem, we can’t fix it!
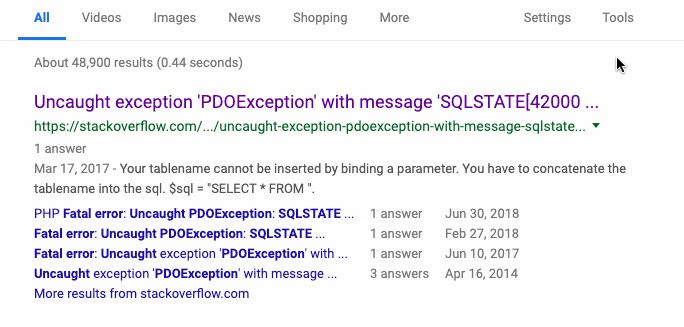
Searching an Error Message
Once you get an error message, you can search for it on your search engine of choice. Before you copy/paste the entire thing make sure to remove all site-specific text from it.
For example, you might see an error message like this on your site:
Fatal error: Call to undefined function fancy_widget_thingie() in /var/www/public_html/wp-content/themes/yourTheme/controller.php on line 243
To search for this error message, enter everything up to the /var/www/… portion of the message. The search engine will then find only the most relevant entries. Removing the site specific information helps eliminate confusion for the search engine by not including additional data that isn’t the same on everyone’s site.
Next, we have to restrict the time frame on the results. There’s perhaps nothing worse than the feeling of clicking a result only to find that it is 11 years old and completely irrelevant now. Restrict the time frame using the tools at the top of the search engine page.
Restricting a search to the last year is a much better way to find actionable advice on the error message. Technology changes frequently, so the date of your resources are relevant.
If the steps above don’t isolate the issue on the live site, the fastest way to isolate the issue next is to move the site to a live staging or local development environment.
STEP 2: Duplicate the Problem Site in a New Environment
Using a separate environment from your live site is a great way to fix a website without downtime or any awkward user interactions. The two types of environment that we’ll cover are:
- A Staging Environment
- A Local Development Environment.
What is a Staging Site?
A staging site is a cloned version of your live site. It’s a separate server environment that provides flexibility and peace of mind when dealing with a variety of things that could go wrong with your live site. It also allows for building, developing, and testing a site without affecting the content your users see when visiting your live site. It should mimic the server environment on your live site as much as possible.
What are the benefits of having a Staging Site?
Staging sites allow remote access for users who have login credentials. For example, theme or plugin support technicians can be given temporary credentials to login and assist with troubleshooting within the staging environment. This removes the risk of troubleshooting on a live site where testing could interfere with functionality, display, or access of the live site.
There are often times where a new theme or plugin breaks a site and/or introduces new bugs. A staging site allows for testing new updates in a test environment first to make sure things are running smoothly before running updates on the live site. This also applies for major WordPress updates, a long with applying any updates your web host releases that could affect your live site in unforeseen ways.
How to Set Up a Staging Site
Some hosts provide live staging environments at the click of a button. If yours doesn’t, we use and recommend WP Stagecoach as a way to quickly create a staging site with a duplicate of your live site.
Things to Consider After Setting Up a Staging Site
When you use a staging site, you also need to prevent your staging site from sending emails to users or other administrators. Depending on your settings and how your mail server is configured, moving it to a staging site won’t disable emails. This could get very confusing for the recipient.
To prevent emails sending from a staging site, first disable any SMTP or Transactional email plugins that you are using. Next, install and activate the Email Cop plugin. This prevents any emails from being sent. Note that Email Cop won’t work if there are other mail plugins (Mailgun, SMTP plugins, SendGrid, etc) active on the site.)
Local Environments
In addition to live staging environments, it’s often very helpful to have a local copy of the site to aid in debugging. “Local” in this context means a site whose files and database live on your specific computer, instead of a remote server. No one can access them unless they are looking at your computer.
There are many options to choose from when it comes to local development environments. We have experience with the following tools:
There are many benefits of debugging on a local environment. File changes and uploads don’t have to travel over an FTP or SSH connection, so changes are tested much faster. Also, in the event that a troubleshooting step brings the site all the way down, you are the only one affected.
The biggest hurdle to bringing a site to a local environment is exporting it from your live website and importing it into the local environment. This can be a daunting and complicated task, but to make it as easy and intuitive as possible we recommend using either the free Duplicator plugin or All-in-One WP Migration. These tools are both provide reliable support whenever you come across problems.
STEP 3: Troubleshooting in Your Testing environment.
Once the site is migrated to live staging or local, you can troubleshoot more aggressively to replicate and isolate the issue. Here are some tools to add to make that process easier:
The Plugin Detective
The Plugin Detective is a diagnostic plugin that allows you to troubleshoot plugin conflicts much more quickly than manually deactivating them and testing one at a time.
This is a similar plugin to the Health Check plugin which we recommend for live sites, with two key distinctions:
- Health Check simulates deactivating all plugins, while Plugin Detective actually does deactivate them. That is why we only recommend Plugin Detective on staging or local environments. Related: because Plugin Detective is actually deactivating plugins, it is more accurate at finding plugin-specific conflicts.
- Health Check can also check for theme conflicts. Plugin Detective is specifically checking plugins.
WP Rollback
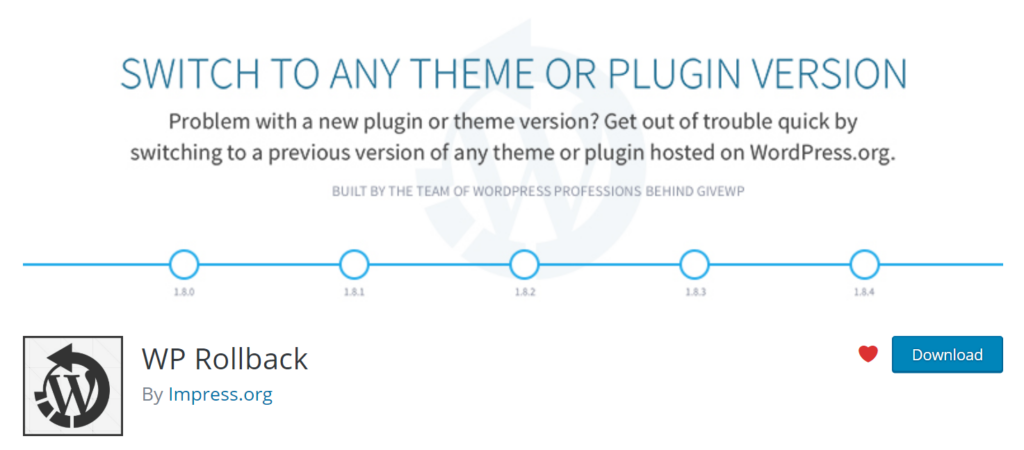
If you trace a problem in your site down to a plugin that you installed from the official plugin directory, you can further isolate the issue with the WP Rollback plugin. It allows you to roll back to any version of the plugin available on the WordPress directory, in just a few clicks.
Rolling back the conflicting plugin allows you to find with version the issue was introduced in the plugin. Your next step is to report the issue to the developer so you can use this as a temporary fix to your website until they release a new version.
Once the issue within the updated version of the plugin is fixed, you can update to the one that won’t break your website. Most plugin shops with plugins on the official WordPress directory are able to fix the conflicts and issues relatively quickly and release an update.
STEP 4: Report the Problem to The Plugin/Theme Author
Your goal through all of the previous steps is to gather data as well as isolate and replicate the problem. Once you’ve isolated it and replicated it, you’re very close to getting the problem resolved. Along the way, you may have even already solved it. Usually the steps above reveal a simple fix before getting to this stage.
If you have yet to identify an issue you can solve yourself, the final step is to make it easy for development teams to replicate.
Gather the relevant information
WordPress 5.2 and later has an easy built-in method to copy and paste full system info. This is the information you need to include with your messages to theme and plugin developers. Navigate to Tools > Site Health > Info and find the button to copy your site info and paste in a ticket to the developers.
If they can’t replicate it, they can’t fix it. Support teams need a matching server environment, active theme, and other active plugins at a minimum. In addition to system info, any information about the web host including what plan you are on (if applicable) is also helpful.
Use the Rubber Duck
Use the same rubber duck method (only the duck is the developer this time!) you can report to the developer the following:
- What you were doing.
- What outcome you expected.
- What happened instead.
- What steps you’ve taken to isolate and replicate the problem.
- Specific steps to replicate the problem in a new environment.
- Specific error messages you encountered.
- Your system information.
The more detail the better at this step. Tell the developer both the “what” and the “why” of each step. “I deactivated ________ and re-tried to see if it was causing a console error” is better than “I tested to see what was causing the problem.”
Define Urgency
The more urgent an issue is, the more detail should go into the support ticket. It feels counterintuitive to take time to write out a message when an issue is urgently bringing down your website. But lacking detail is like marking a package URGENT and placing it in the mailbox without an address, “IT’S BROKEN.” It will just require more back-and-forth between you and the developer.
If you have a workaround that makes it less urgent (like using WP Rollback), note that in the interaction as well. When the technician visits the page in question and sees it functional after you said it wasn’t, it gets confusing. The more urgent an issue is, the more on-ramp you need to give the developer to be able to replicate and isolate the issue.
How to Prevent Your WordPress Website from Breaking
The only thing better than isolating, replicating, and resolving an issue on your website is it never breaking in the first place.The best way to prevent this is to create a website management workflow that is built to prevent errors. This starts with testing all code that goes on the live site on either a local install or a live staging site first.
Why is it your responsibility to test all theme and plugin updates before installing them?
The power and promise of WordPress is that it is open source. You get to own your own code and be your own gatekeeper. It also means that tons of people develop the wide variety of pieces you can install on your website. You get to choose what you use.
That freedom means it’s your sole responsibility to prevent something from breaking on your website. How can you do that? With a professional and reliable website update workflow.
Website Management Best Practices
It is critical that you have a workflow that does three things:
- Guard the data in the database on the live site.
- Test changes in a safe environment (not the live site).
- Never send emails or other notifications from the test environment.
Guard the database of the live site
Any time you click “update” on a theme, a plugin, or WordPress itself, you must be 100% confident that you can get the site back to the condition it was in before you clicked “update.”
With the knowledge that users, visitors, and administrators can all modify the database (comments, adding pages, submitting ecommerce orders or donations, etc.) you have to make sure that you have a method of restoring database backups. There are many options for backup solutions in WordPress, but make sure that whichever you choose you are able to restore the site from the backup.
Before you do anything, create a backup and download that backup to your computer or to a cloud service. A best practice is to have a backup system that regularly backs up the site to a remote storage (like Google Drive or Dropbox) as well.
If you are making significant changes to the site on a staging or local environment, you may want to first put the site in “maintenance mode.” This means that changes to the live site are stopped while updates are performed on the duplicated site. If you make changes on both the live site as well as a staging site simultaneously, things can get very convoluted when it comes time to merge changes back to live.
The live database even more important to guard in cases where the site visitor can do things like make purchases or a donation or other critical data.
This example workflow shows how bad things can happen during updates:
- Pull database from live to local.
- Update plugin on local.
- Plugin requires database update on local to add a new table.
- During this process, 4 comments happen on a blog post, 1 person donates money, and 3 donors update their contact information.
- Tests pass on the local site.
- Local is pushed to live.
- 4 new comments, donation information, and donor data updated while working on updates is lost.
You can’t just push the local database back to the live site or those comments, donation, and donor contact info will be lost. You’re now updating your new site with an old database.
Test Changes on Staging Without Losing Data
On a site that has eCommerce or donation functionality, in order to not lose any data, it’s a best practice to never push database changes from local/staging to live.
Instead:
- Test all the updates and changes on a staging site.
- Put the live site in “maintenance mode” using a plugin.
- Make the updates to plugins/themes/etc.
- Confirm everything works as intended
- Disable “maintenance mode”
Always test changes on the local or staging site first, but then make the actual change on the live site, while it is in maintenance mode.
Note: Reminder: Don’t forget to disable the ability to send emails on your staging site.
Congratulations, You’ve Leveled Up Your WordPress Troubleshooting Skills
In the world of WordPress, there is always something new to learn. The key to troubleshooting website issues is to keep in mind that these things are not magic. Even conflicts that appear to happen for no reason always have a logical explanation.
Is there a voice in your head that spouts lies like, “You are not technical, you’re not a coder” as a way to keep you from learning new things? The tools in this article are a virtual muzzle for those unhelpful words. Nobody’s asking you to code anything, but with these new tools in your toolbelt, you’re now able to debug problems that arise on your site.
Do you want to learn more? Let us know in the comments what specific ways you want to dive deeper.


