How to Use the New Give Donation Form Grid
Give 2.1 introduced the Form Grid and it’s a game changer. Now you can direct your visitors to one page that has all of your donation campaigns in a beautiful grid format. Over the years, many users have requested the ability to display all donation forms on one page, but the way it was done…
Give 2.1 introduced the Form Grid and it’s a game changer. Now you can direct your visitors to one page that has all of your donation campaigns in a beautiful grid format.
Over the years, many users have requested the ability to display all donation forms on one page, but the way it was done was complicated. In response, we wrote several documentation articles and tutorials all about how you can use your theme’s Archive page to do that.
Unfortunately, many themes don’t style their Archive pages well at all for this purpose. Customizing them really takes some advanced PHP and/or CSS skills. For many users, this just isn’t a viable option.
For example, even a very popular and well-coded theme like WooCommerce’s “Storefront” theme just outputs really large images with titles on its Archive page. See our starting example and how user UN-friendly it is:
So rather than deal with that kind of situation, we thought we’d give you a simple shortcode to display a grid of forms. While this shortcode will be extremely easy and useful for you to use, it was a real technical challenge for our team to make the Form Grid shortcode work well on a wide variety of themes. But, we feel like we really hit it out of the park.
Introducing the Give Form Grid
Give version 2.1 was released in early May, and it is full of some great features. One of those is a new shortcode that allows you to output a grid of all of your donation forms with many different display options.
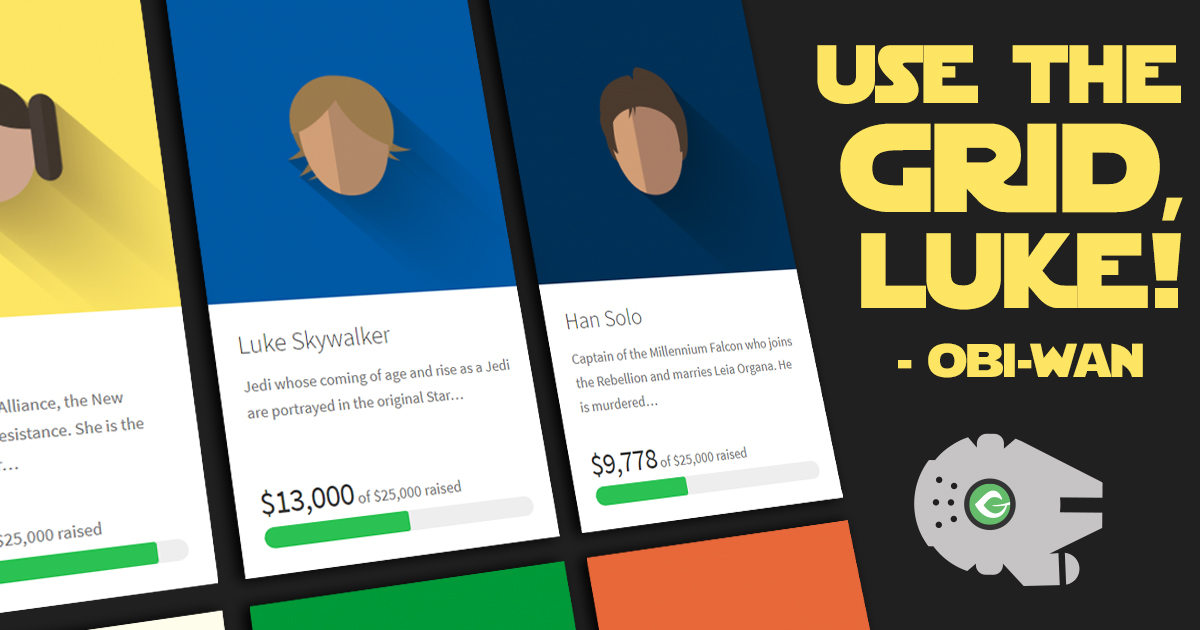
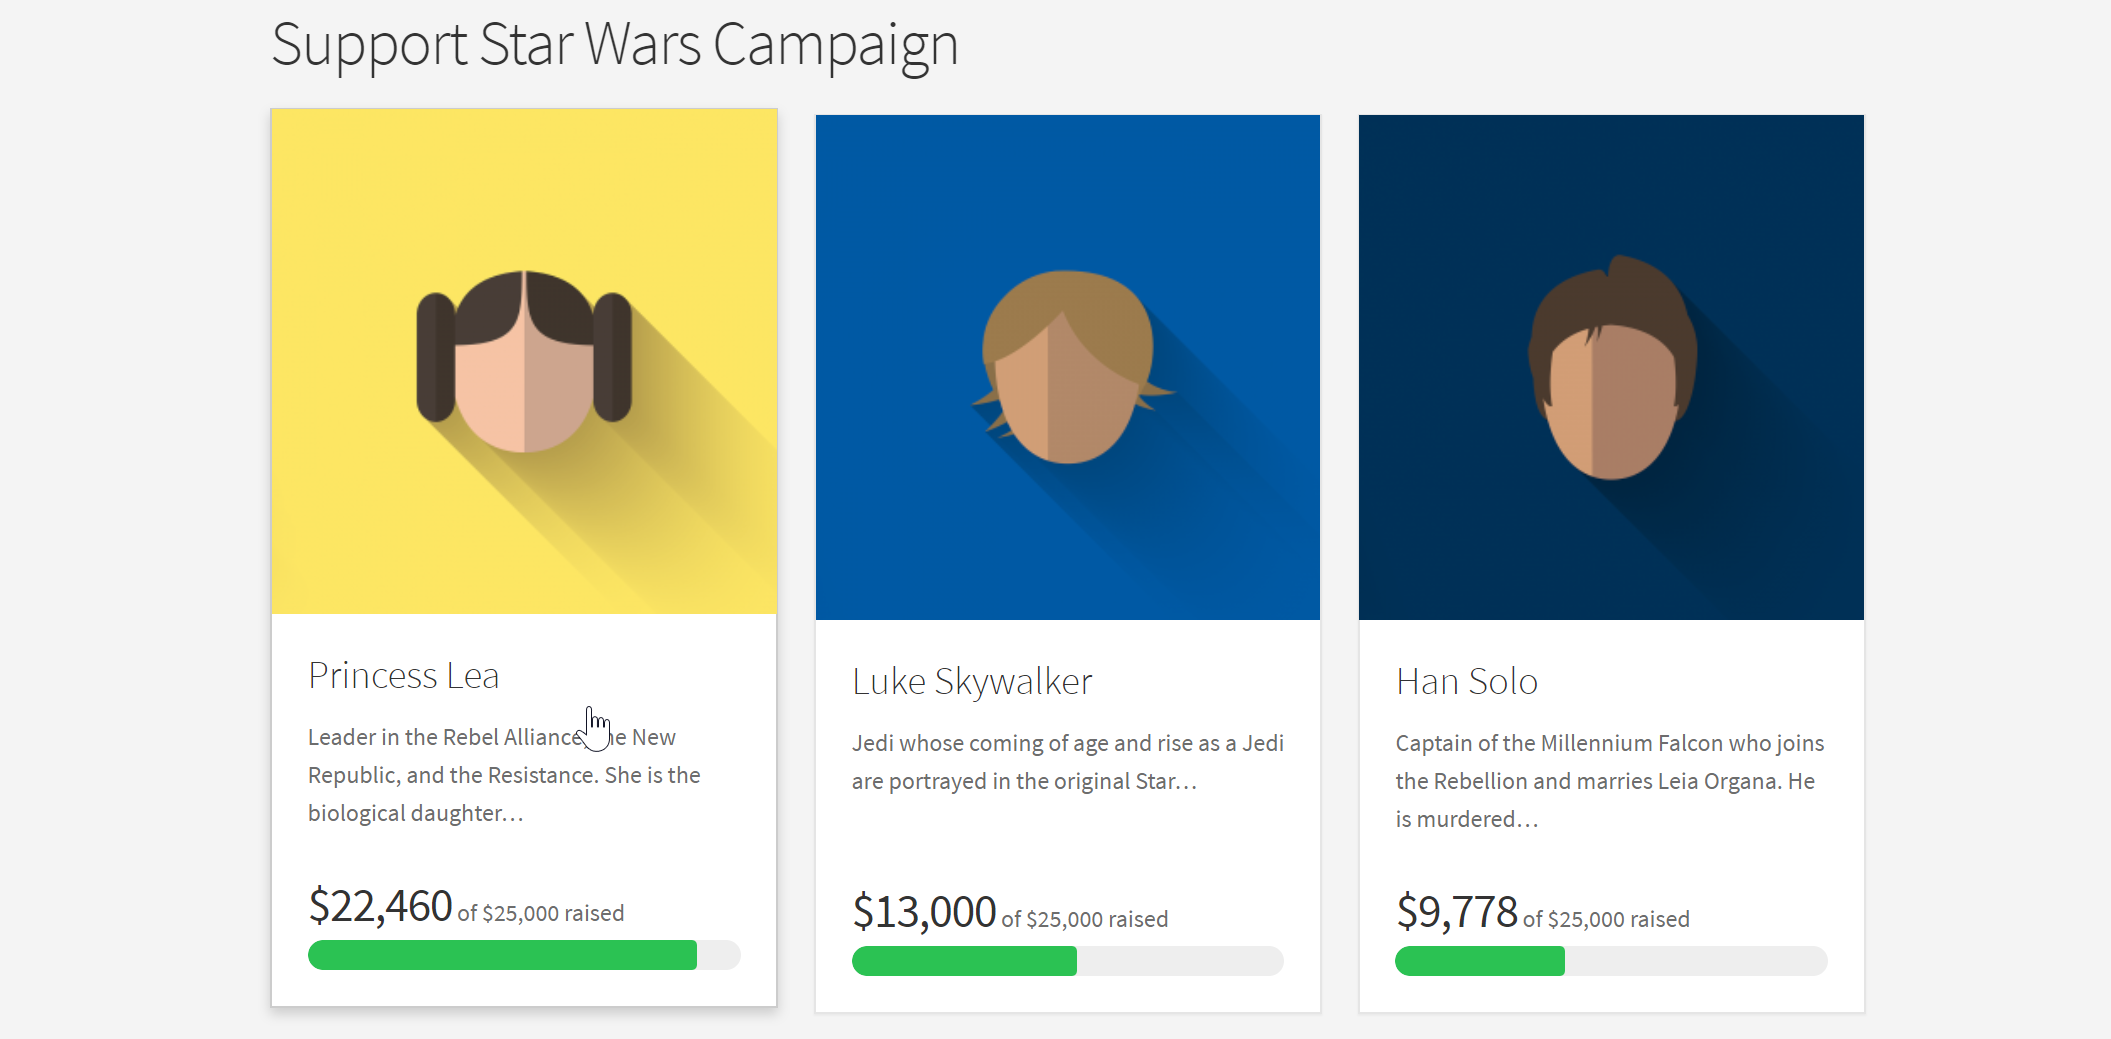
Instead of that long page of images you see above, the Give Form Grid can give you this with just a couple clicks:
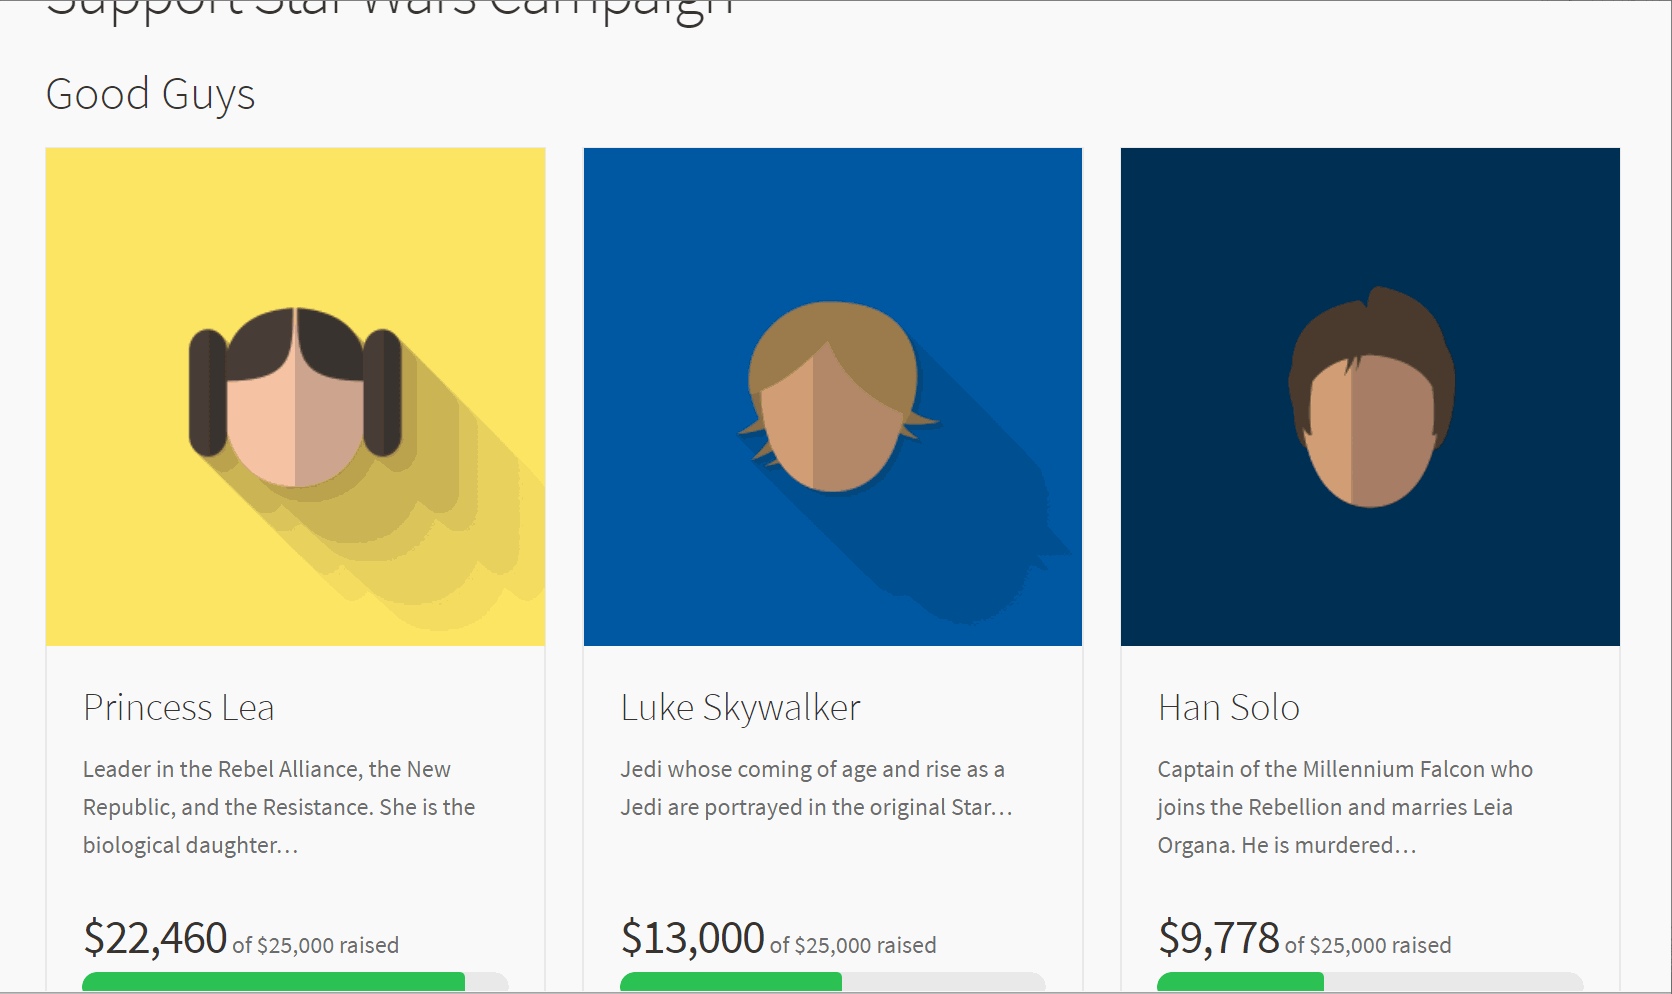
Isn’t that so much nicer? Of course, a grid should not only look nice, but it should do things for your donors as well. So you’ll see in the animation above that you can click on the grid “cards” to open the donation form right there. See our full documentation for all the options here.
Historically, grid layouts have been extremely challenging for a wide variety of reasons. It multiplies the complexity to create a grid that not only works as intended but doesn’t break under all the unpredictable stylesheets that thousands of WordPress environments will naturally have.
Without going into too much developer-lingo, this new layout is made possible by new CSS standards called Flexbox and CSS Grid together. If you like to geek-out on those kinds of details, the approach we took is almost identical to this excellent discussion by Mozilla Designer, Jen Simmons.
Who Needs a Form Grid?
Who actually needs this though? That’s best explained through some examples.
Example 1: Sponsor a Child
Let’s say you are an adoption or foster care advocacy organization. You have 50 children that you are raising funds for. Wouldn’t it be great to show all their faces on one page and allow people to donate to the specific child with just one click?
What if your children were grouped by region, or age, or nationality? You can use Give’s categories feature to display multiple grids based on category. More on that later.
Example 2: Items with a fixed goal
Let’s say you are running a campaign that allows donors to contribute to a certain item. Maybe it’s a runner in a race, a candidate for a position, or maybe even a city’s Dog Mayor. When one of these items meets its goal, you don’t necessarily want more donors choosing that item; you’d rather focus your donors’ attention on the rest of the items.
The Form Grid has the ability to only display forms that are still “open” and not “closed” due to reaching their goal.
Example 3: Hidden Forms
One downside of the Archive page is it’s not easy to exclude forms from it. Basically, every form you create is going to be displayed on the Archive page automatically by default and you can’t hide it while keeping it published.
Maybe you have some events or campaigns that you only want to send to a certain subset of your donor base. You don’t want that form to be easily found by browsing through your menu. The Form Grid can help you here, too.
Create a Give category called “Public” and every form that you want to have shown via your normal navigation will appear there. The ones that you want to have a secret URL for can be published without any category at all. If you go this route, make sure you go to “Donations > Settings > Display Options” and disable the Archive view completely as well.

Like What You’re Reading? Subscribe Here!
Newsletter Opt-in
Get Creative!
There are so many ways the Form Grid can be useful for you. Maybe your organization is an animal shelter and you are writing a post about dogs and cats. Create a 2-column grid with one form for Cats and one for Dogs and have a vote-off! These grids can be embedded anywhere on your website, so start thinking outside the box.
How Can I Use the Form Grid?
OK, now let’s jump into building your first Give Form Grid.
Step 1: Forms
You can’t have a grid without at least two forms. So if you’ve only got one, now’s the time to go create another.
Step 2: A Page or Post
The Form Grid is output into a page or post via a shortcode. Give has a special shortcode builder that makes this very easy to implement. Simply click the “Give Shortcodes” button and choose “Donation Form Grid” from the list.
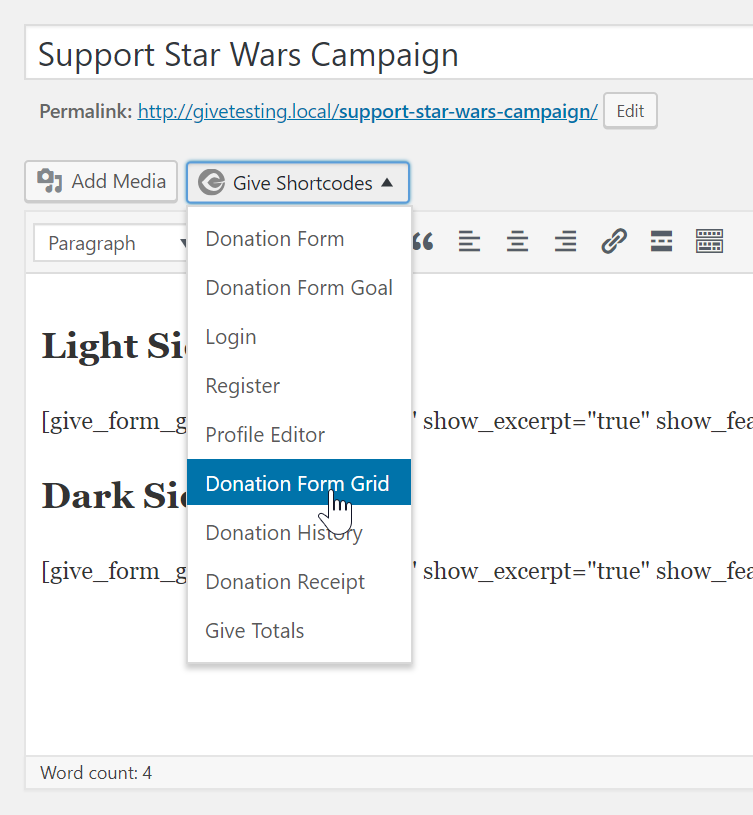
You’ll be presented with a modal popup where you can choose your display options. Let’s go into detail about some of these options.
- Form IDs — You can list whatever forms you want to list here. You don’t have to use categories or tags to display specific forms.
- Columns — Honestly, just choose “Best Fit.” While you can choose the exact number of columns you want and it’ll most likely turn out fine, “Best Fit” really is exactly that.
- Show Goal — Goals are visually exciting. If you’re not already using Goals on your forms, start today. They show donors that others are donating but there’s still a need.
- Show Excerpt — Excerpts give context to the purpose of the donation. They’re really effective in the Grid. Excerpts for Give Forms are just like excerpts for your posts and they’re found in the same place as well — the bottom of the form edit screen. If you don’t see them there, click on “Screen Options” at the top-right of your screen and enable them there.
- Show Featured Image — This really should be required. While the grid will technically work without a featured image, visually it’s far more attractive with a nice clear and clean featured image. Always make sure you include one.
- Display Style — This controls whether you want the forms to open directly on this page in a modal when you click on the form card or have the user be redirected to the single form page. There are use-cases for either, but the modal popup sure is convenient.
Once you’ve configured those options, click “Insert Shortcode” and you’re done! Your Form Grid should look awesome already. See the difference in our Star Wars demo grid here:
Step 3: Fine Tuning your Grid
There are a few things that could prevent your Form Grid from looking as awesome as you’d like. But getting there is fairly straightforward. Let’s address those issues.
The images are different sizes
The grid will automatically adjust the form cards to work with your image heights. However, if your featured images in your grid are all different sizes then you get some fairly unsymmetrical and possibly undesirable results.
We recommend formatting all your featured images with the exact same width/height. But when you’re in a pinch, we have two relatively easy fixes for this:
- Resize your images manually. That sounds super scary, but you can actually get pretty good results just using the tools available to you in WordPress to do this. This is a great tutorial on how to use the Media Library to resize your images.
- Use the
image_heightattribute. There are more shortcode attributes available than what you see in the shortcode builder. For example, you can add image_height=”100px” to your form grid shortcode to force the height of all your featured images to be 100px. Depending on the original sizes of your images this can work perfectly or you might get some that are not wide enough or are blurry. Generally though, starting with this option should get you most of the way there. See the full list of shortcode attributes here.
Excerpts don’t appear or are too long/short
The excerpt is output directly from your Give form excerpt. If the excerpt is empty, it’ll display the first 15 words of your form content if you have any. So for a clean, uniform appearance, we recommend adding a unique excerpt to each form designed to work with your Form Grid specifically.
If you don’t see the excerpt metabox on your Give Forms open up the “Screen Options” on the form edit screen and enable it there.

If you are outputting excerpts, they will be 15 words long by default. If you want to adjust that, you can use the hidden attribute excerpt_length to set the exact length you’d like.
Another nice trick with excerpts is that you can actually view all your Give form excerpts (if they have any) in one place. This is where the “Screen Options” comes in handy again. Enable “Excerpt View” there and you can see all your forms excerpts in your list of forms.
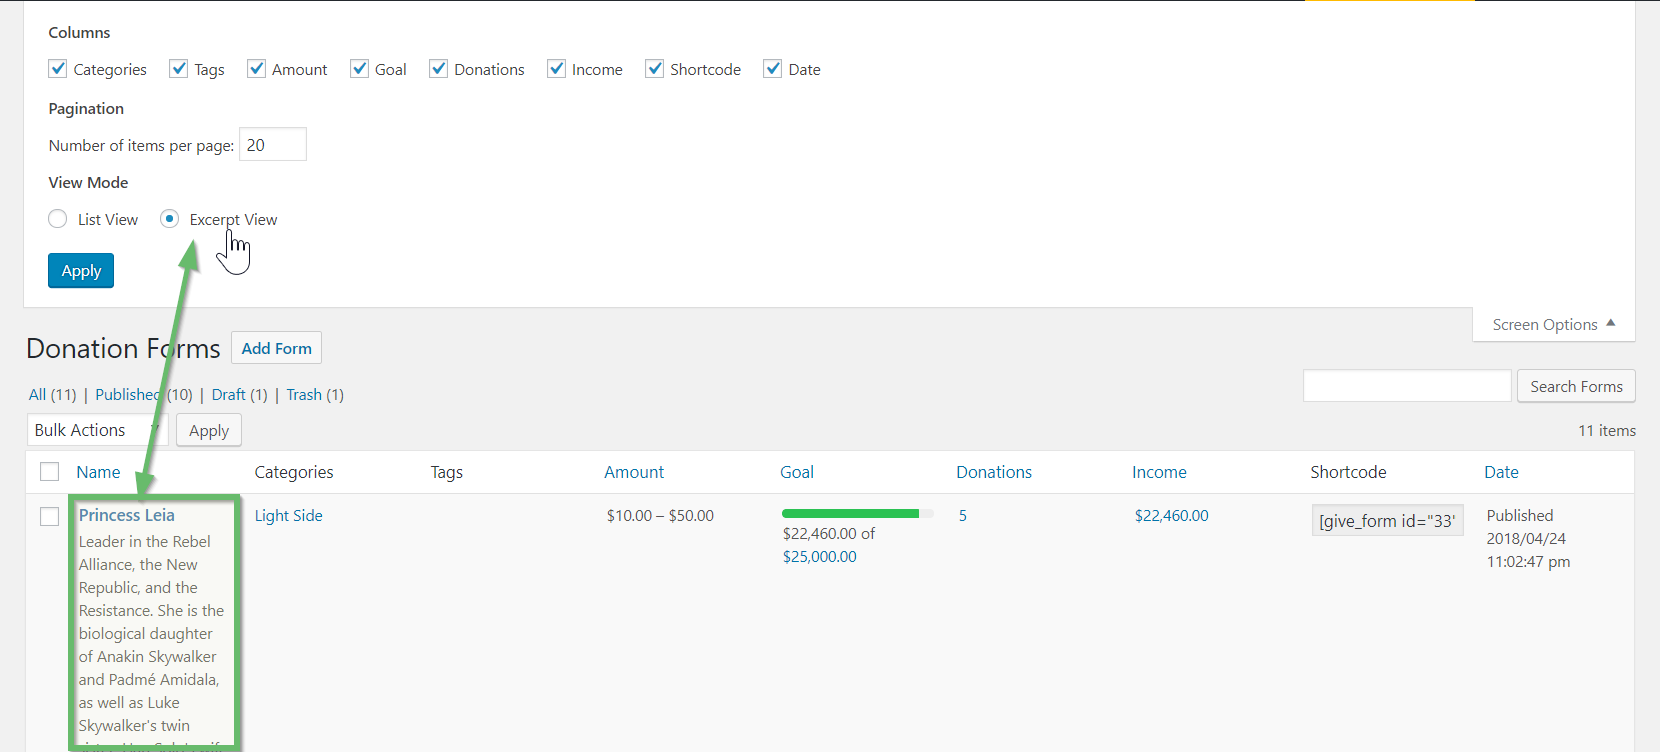
Another quick tip about the donation list: the free “Admin Columns” plugin is great for customizing this screen to add or remove any info you like. Want to see the featured image? Just add it via the settings.
I Want to Change the Order the Forms Appear in the Grid
By default, the grid displays your forms in order of publishing date from newest to oldest. Most of the time you’re probably not going to want that order. The easiest way to customize the order is with the free “Intuitive Custom Post Order” plugin. All you have to do is drag your forms into the order you want and it’s done. See it in action here:

If you want to use this plugin to order your Form Grid, note that you’ll need the following attributes in your shortcode: orderby="menu_order" and order="ASC". Here’s an example:
[[give_form_grid orderby="menu_order" order="ASC"]]
I Only Want to Show Forms within a Specific Category
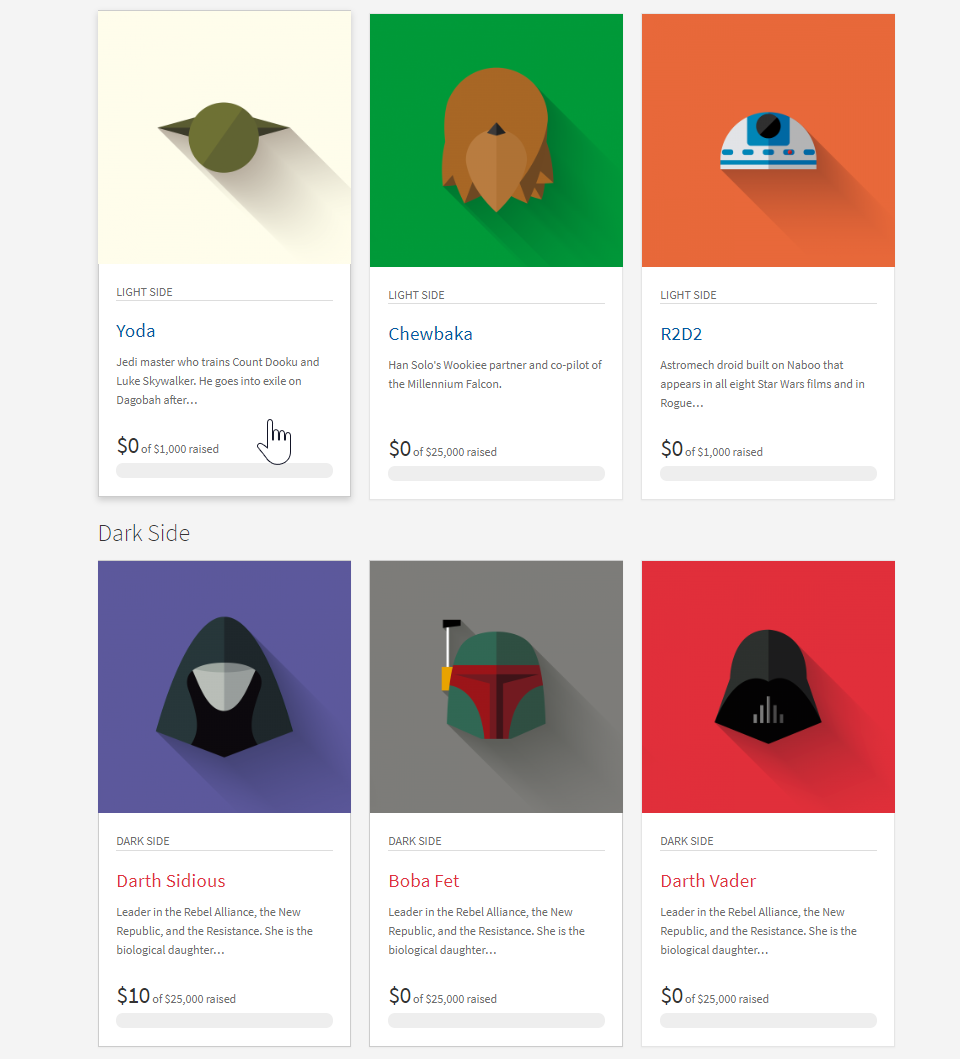
This is one of my favorite features. There’s a hidden shortcode attribute called “cats” (short for categories). Simply find the category IDs you want and put them in that attribute separated by commas. E.g. [[give_form_grid cats=”6,7,8”]]
In my demo, I created a “Light Side” and “Dark Side” category to output two Form Grids targeting those categories to separate light from dark (pun intended).
Amplify your fundraising with a GiveWP Plan
Customizing the Shortcode Output
At Give we build everything with both our end-users and developers in mind. So while the basic features will make most users very happy, developers who are comfortable with PHP can customize this even more.
Just like all of Give’s shortcodes, you can customize the markup of the Form Grid shortcode by putting its template file into your child theme files. See our docs on that here.
For example, what if we wanted to display the form category directly on the form cards? Simply grab the shortcode-form-grid.php file from within the Give plugin, put it in a sub-folder in your theme called “give,” and customize it.
Here’s a sample of how I did just that.
I also added the category slug to the card wrapper class so I could customize the form titles to reflect the color of their category.
Show and Tell Time
We’re excited about this new feature but even more excited to see it in action. Share with us your Form Grid examples in the comment section below.
The awesome Star Wars Icons you see in the images were designed and provided by Filipe de Carvalho.
About the Author
Matt Cromwell
Matt is co-Founder of GiveWP and now Senior Director of Customer Experience at StellarWP. He’s passionate about helping WordPress product owners level up their marketing and monetization strategies. He’s the founder and a co-host of WP Product Talk and Glam that Plugin. Matt was born and raised in California, but lives now with his wife and four children in Germany.