Authorize.Net Gateway
Authorize.Net is a well-respected, international Payment Gateway with a many features and benefits. Authorize.Net allows you to accept donations directly on your website easily and seamlessly.
Articles in this section:
 Configuring Authorize.Net eCheck
In order to accept payments with Authorize.Net using GiveWP you will need to have an active Authorize.Net account, the Authorize.Net GiveWP Add-on, and the Core GiveWP plugin installed and activated.
Note: See here for instructions on installing and activating GiveWP Add-ons.
After your Authorize.Net Add-on is activated, go to GiveWP > Settings and click on the Payment Gateways tab. There you will see the default Payment Gateways (PayPal Standard, Test Payment, and Offline Donations). You should also see Authorize.Net as an option as well. Click on that to enable Authorize.Net as your credit card Gateway for your website.
Note: You can only use one currency per Authorize.Net account. This is a limitation of Authorize.Net and means that the Currency Switcher add-on is incompatible with Authorize.Net.
If you would like to accept credit cards directly on your website with Authorize.Net you will need an SSL certificate.
Obtaining your Authorize.Net API Keys
Once you have activated the Add-on it’s time get your API Keys and configure GiveWP to integrate with your Authorize.Net account to accept donations.
NOTE: When you first sign-up for Authorize.net, they provide you with your Transaction Key. This item can be used immediately, but if you forget it or misplace it you will not be able to recover it easily and will instead have to delete it and generate new keys. That means that any system including GiveWP or other web apps connected to the account will all have to be updated to use the newly-generated key.
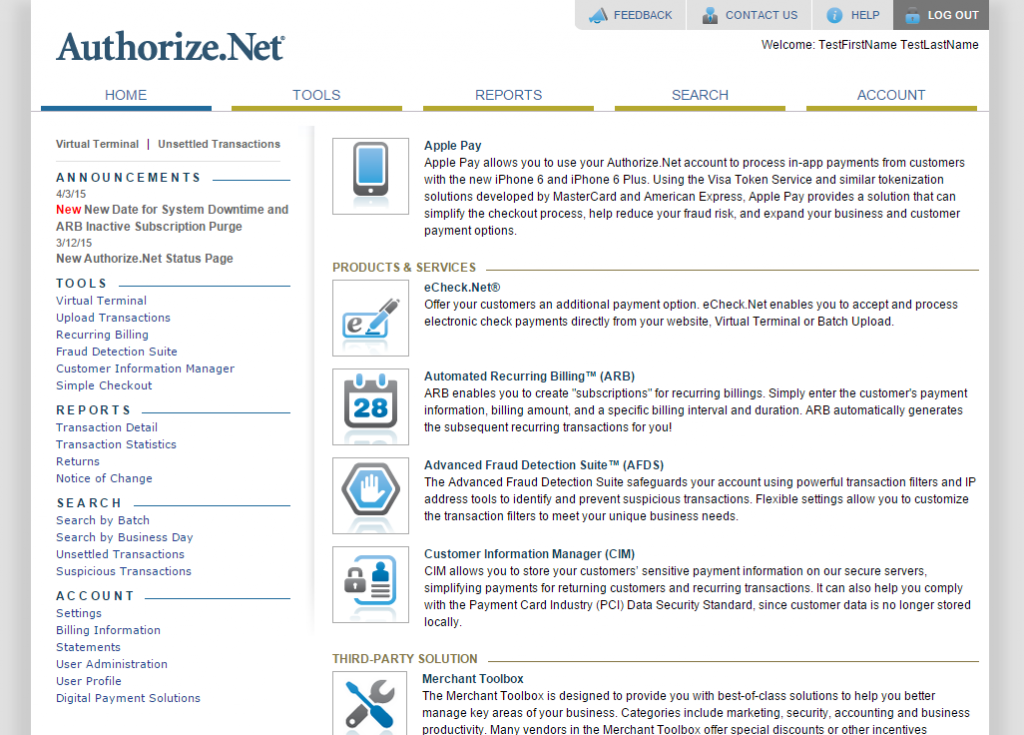
After logging into your Authorize.Net account, you’ll be presented with your Authorize.Net Dashboard like the image above. From here, look in the left-hand sidebar and scroll down to the Account section and click on the Settings item. In the Settings page, look in the Security Settings and click on the link titled API Login ID and Transaction Key.
To integrate with GiveWP, you need just two pieces of information:
- API Login ID
- Transaction Key
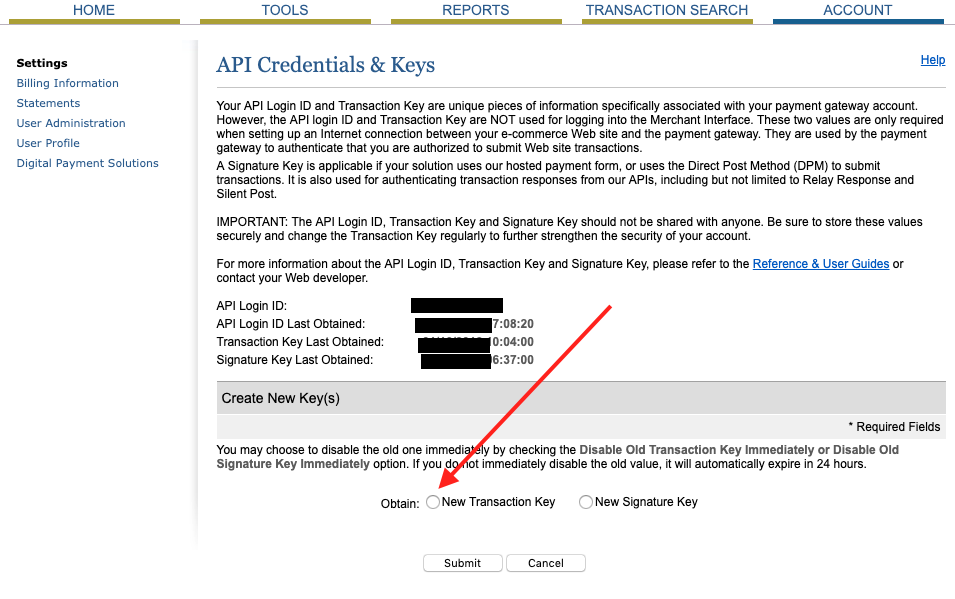
Both of these are available on this screen. The API Login ID is clearly labeled at the top of the page. But the Transaction Key is hidden. This is why it’s important to save that after you first sign-up for Authorize.Net.
If you do not know the Transaction key, the only option is to create a new one and disconnect the old one. You can disable the old one immediately, or choose the option to disable after 24 hours, to give yourself time to change it anywhere it is in use.
Copy Both the Transaction Key and the API Login ID to your WordPress site at GiveWP > Settings > Payment Gateways > Authorize.net
That’s all there is to it. Now when your donors come to your site, they’ll be able to use credit cards to donate to you directly in the currency of your country and not have to be redirected to another site.
Authorize.net and Recurring Donations
Authorize.net has a unique process for subscription donations. When a subscription is created, Authorize.net can take up to 24 hours to settle the first transaction. This creates an unacceptably long delay to get the donation receipt to the donor.
Previously, to compensate for this delay, GiveWP would create a one-time donation (where there’s no delay in confirming it went through) and then immediately create a subscription from that one-time donation, but delay the first payment by the recurrence (one month, for example) using a “trial period.”
It was an admittedly hacky workaround for a problem that ultimately is not GiveWP’s problem to solve, and it created weirdness between records at GiveWP and at the gateway (the start date of the subscription didn’t match, for one thing!)
The final straw that tore down the hacky workaround was that the new API (that is more secure) does not allow for creating a subscription from a one time donation in the way GiveWP was doing it, so the 2.0.0+ version of GiveWP instead of compensating for the oddity that is the Authorize.Net API adds in a notification that more accurately explains to the donor the status of the subscription.
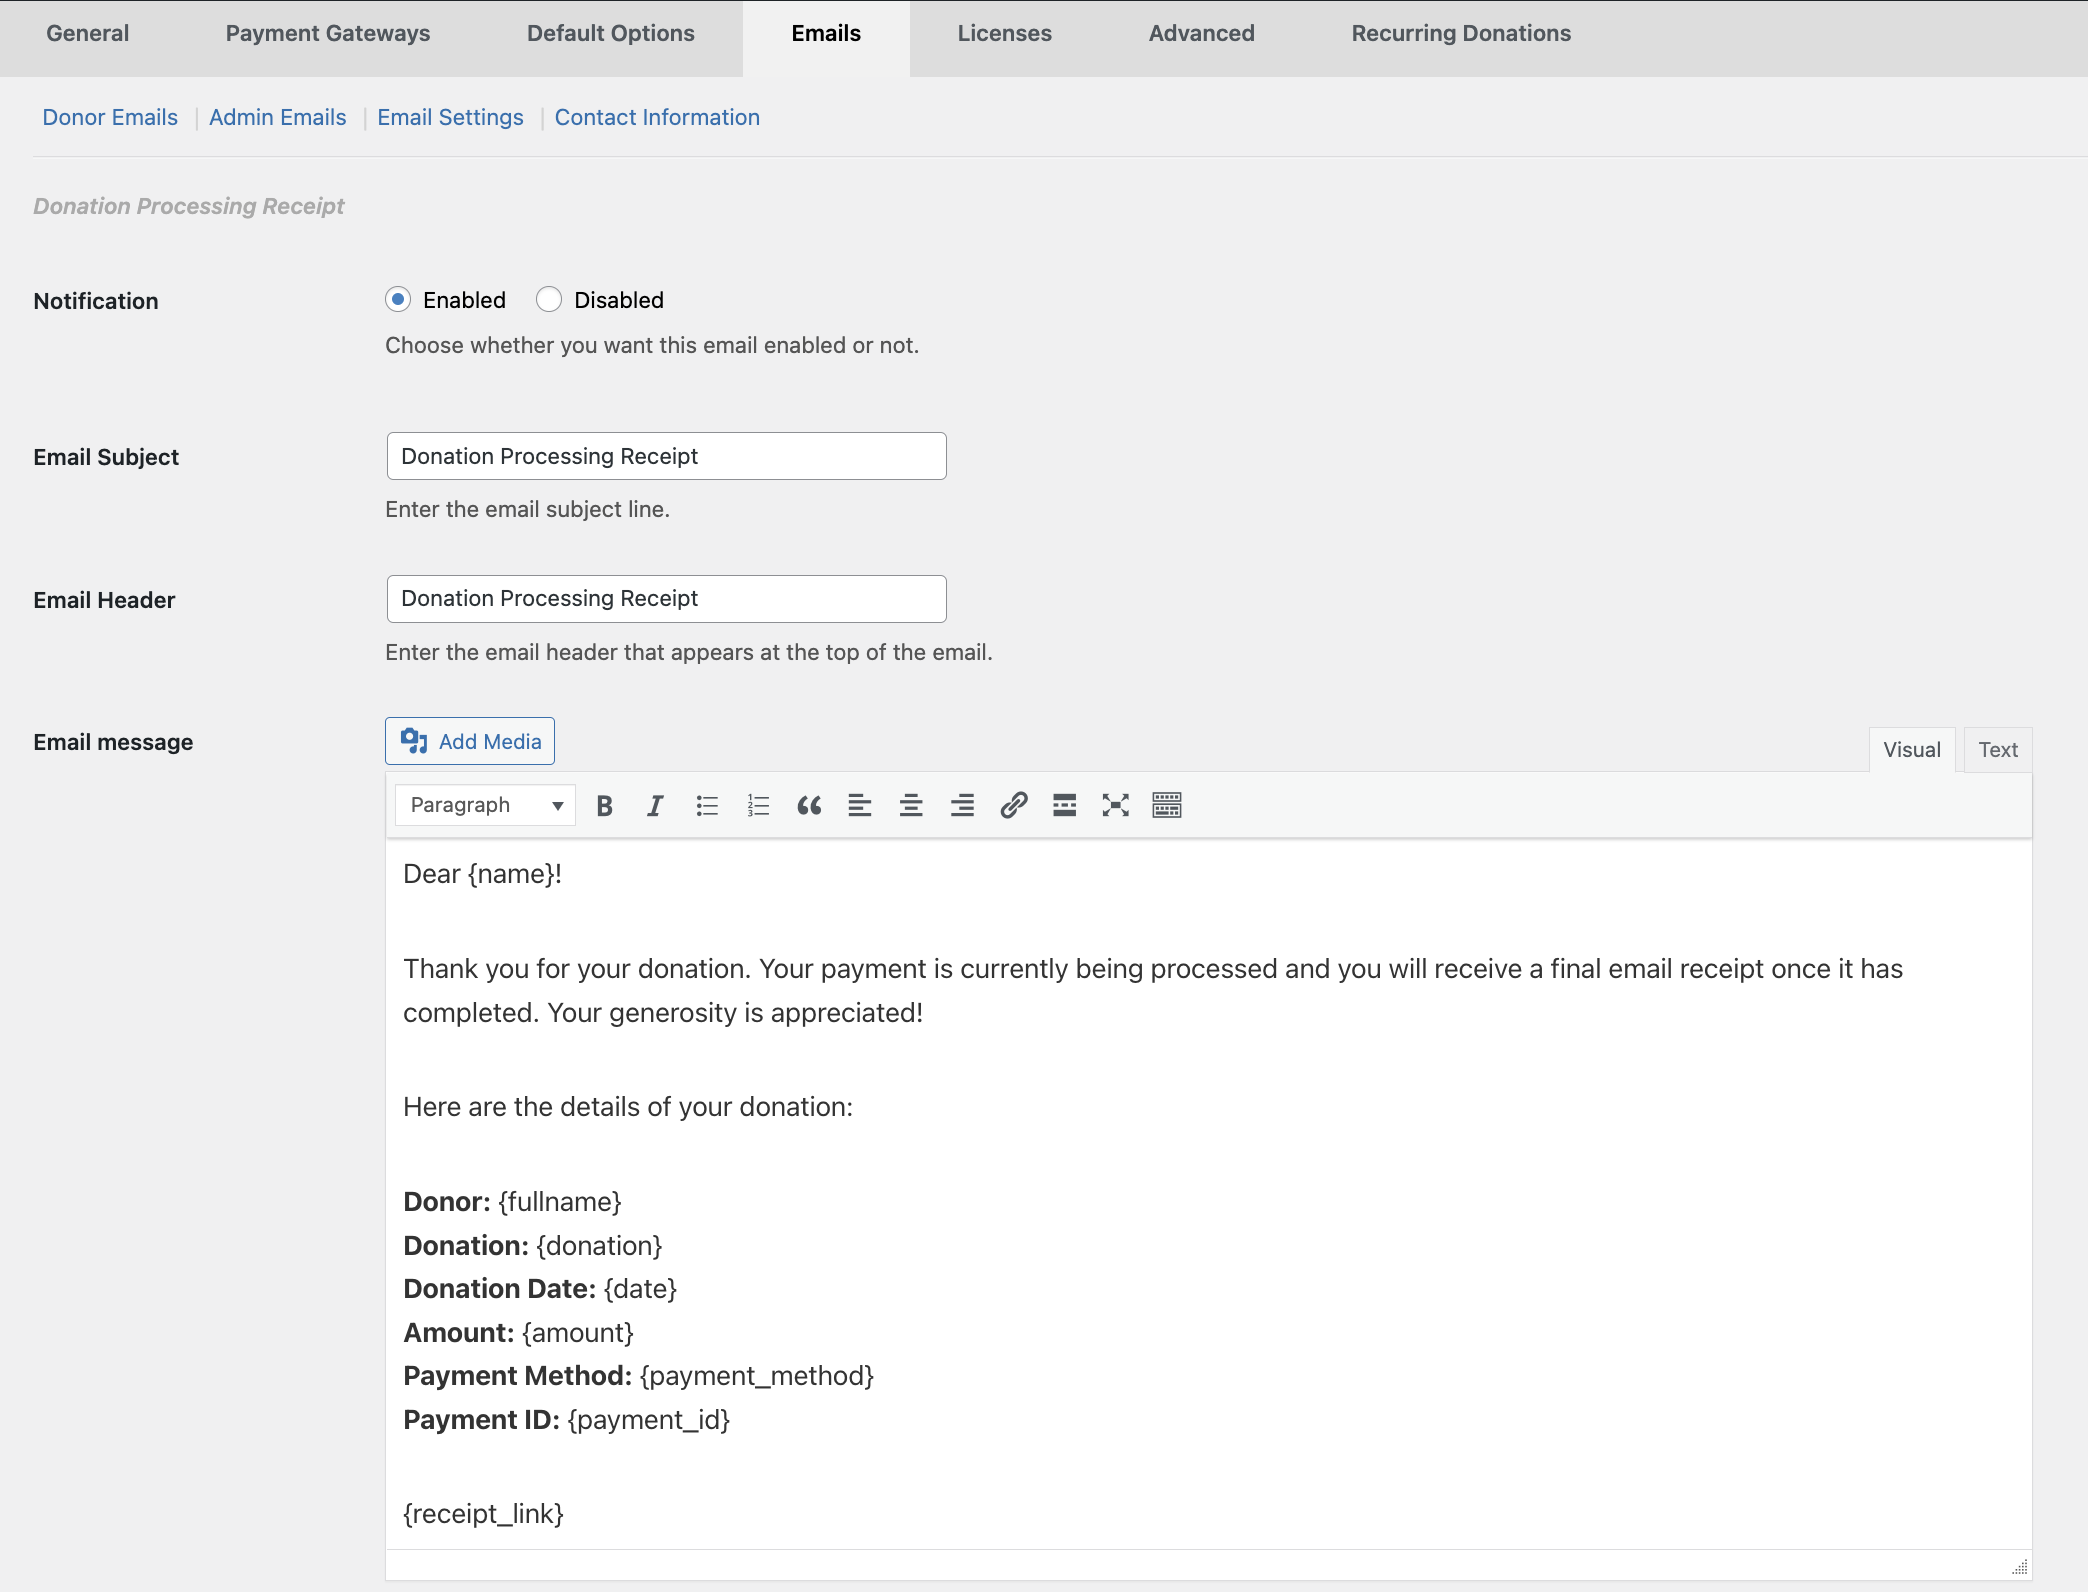
To help keep your donors up to date on the processing of their subscriptions, GiveWP sends donors a Donation Processing Receipt. This gives the donor confirmation that the subscription is processing, without a lengthy wait.
Authorize.net’s Donation Processing Receipt
Because of the unique way Authorize processes subscription donations, GiveWP includes a Donation Processing Receipt found at GiveWP > Emails that you can use to keep your donors up to date. This customizable receipt includes information about the subscription, as well as additional shortcode options that can be used to customize what you send. This email notifies your donor that their subscription is processing. Once complete, your donor will receive a Donation Receipt email.
GiveWP Authorize.Net Frequently Asked Questions
Authorize.Net is a powerful payment gateway with many payment processing options and configurations. We want to help you get setup with GiveWP and Authorize.Net as easily as possible. The following are a few common issues and their resolutions:
Yes. GiveWP can be used with the Recurring Donations and Authorize.net to accept subscription donations within your live merchant account.
To configure the integration, See the configuring Authorize.Net and Recurring Donations article.
The Payment Form module in Authorize.Net has a field that is checked as “required” but it isn’t being passed to the gateway, therefore it’s rejected.
To resolve this, log into your Authorize.Net account and click on the “Account” tab. Next, click on the “Payment Form” link within the Transaction Submission Settings section. On the Payment Form page click on “Form Fields”. Ensure no fields are checked as “required”. GiveWP handles required fields on the donation form side. It is not necessary for any of the fields to be required within Authorize.Net.
No. We migrated the GiveWP Authorize.Net add-on away from the MD5 approach quite a while ago because it was never a very secure or reliable method to capture events from the gateway.
That’s the simple answer. For full details, here is the response from our Head of Product:
MD5 Hash Deprecated Explanation
We no longer use any functionality of the MD5 Hash feature from Authorize.Net since we moved to using the Webhooks API. The MD5 Hash feature was used alongside with Silent Post to authenticate that results indeed were coming from Authnet’s API.
If you received an email from Authorize.Net mentioning they deprecated the MD5 Feature. Please upgrade to the latest version of the Authorize.Net gateway to ensure you’re using the Webhooks API rather than the Silent Post API.
This is related not to the Transaction keys that are copy/pasted into your GiveWP settings, but to the Signature key.
The webhook is a method of Authorize.Net communicating with your GiveWP site. This error message does not mean that your site is not accepting donations. It simply means that Authorize.Net is not able to communicate changes to donations from their side.
Here’s the steps to follow to get this sorted out:
- Log into the Merchant Interface at https://account.authorize.net.
- Click Account from the main toolbar.
- Click Settings in the main left-side menu.
- Click API Credentials & Keys. (It may make you validate with a one-time pin sent to your email address at this point)
- Select New Signature Key.
- To disable the old Signature Key, click the check box labeled Disable Old Signature Key Immediately.
Note: If the Disable Old Signature Key check box is not selected, the old Signature Key will automatically expire in 24 hours. (this should have no effect on your site, since there was not a Signature key previously) - Click Submit to continue. Your new Signature Key is displayed.
You should not need to actually copy the key anywhere in GiveWP’s side, just creating it will be enough.
Once the signature key is set up within Authorize.Net, you should be good to go.
No; that’s done for you automatically.
When connected within your WordPress site via the API Login ID and the Transaction Key, your webhook to Authorize.net is automatically set up and connected behind the scenes. You don’t have to worry about setting that up manually.


