Managing Subscriptions via Donor Dashboard
The Recurring Donations add-on gives donors a simple way to view and manage their active subscriptions directly from the Donor Dashboard. From this page, donors can update their payment method (depending on the payment gateway), adjust donation amounts, or cancel a subscription—right from their browser.
This guide explains how the donor-facing subscription tools work and what donors can expect to see on the Donor Dashboard.
How Donors Access Their Subscriptions
Donors can view and manage their recurring donations through the Donor Dashboard. This is the central place where they can check subscription history, update subscription amounts, or pause/cancel an active subscription.
Option 1: Log In with a Site Account
When a donor makes a donation, a WordPress user account is automatically created for them. They can log in to your site using that account to access their Donor Dashboard.
Note: Donors can reset their password if needed using your site’s standard WordPress login page.
Option 2: Email Access Link
GiveWP can also send a secure email login link, allowing donors to access their Donor Dashboard without remembering a password. The link verifies their identity and takes them directly to their donor profile.
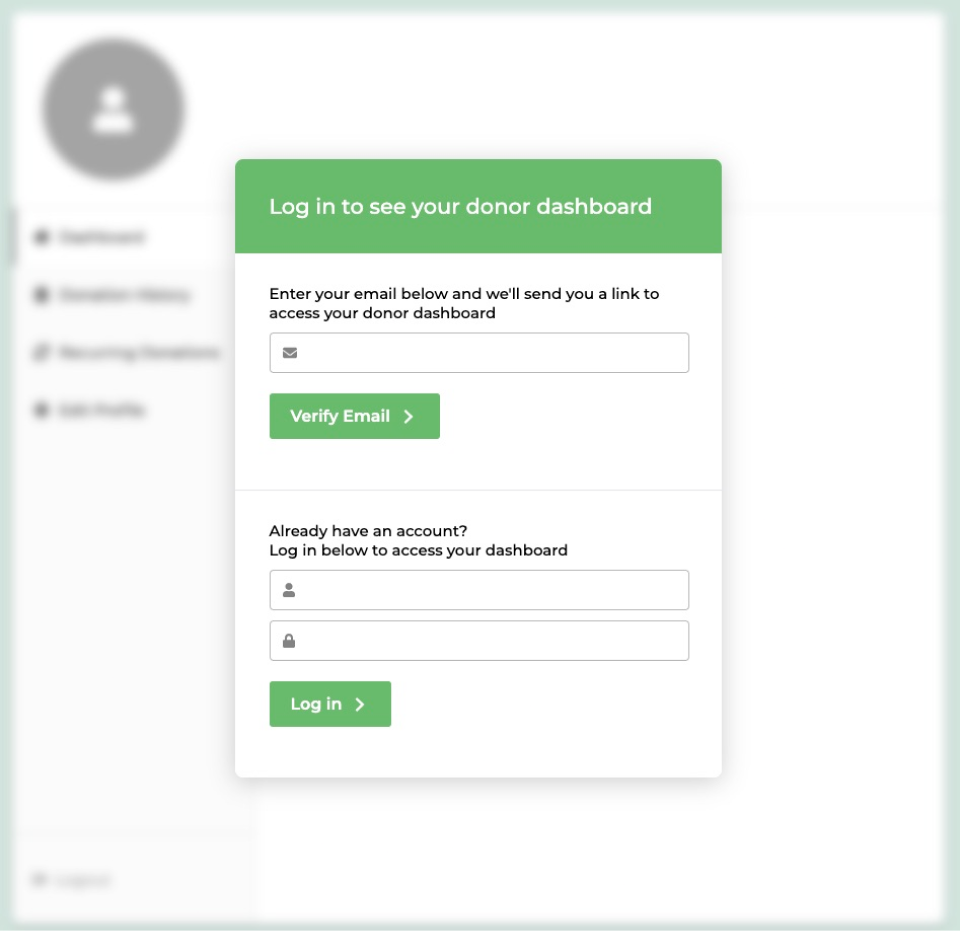
Note: You can find the Email Access setting under GiveWP > Settings > Access Control.
Viewing Subscriptions
When recurring donations are enabled, donors can access a full history of their subscriptions—both active and past—right from the Donor Dashboard.
The Recurring Donations add-on adds a new section to the dashboard labeled Recurring Donations. From here, donors can:
- View all of their active and completed subscriptions
- Click into individual subscriptions to see details
- Cancel an active subscription (depending on the gateway)
Note: This dashboard view gives donors transparency and control over their giving—no need to contact the site owner just to make a change.

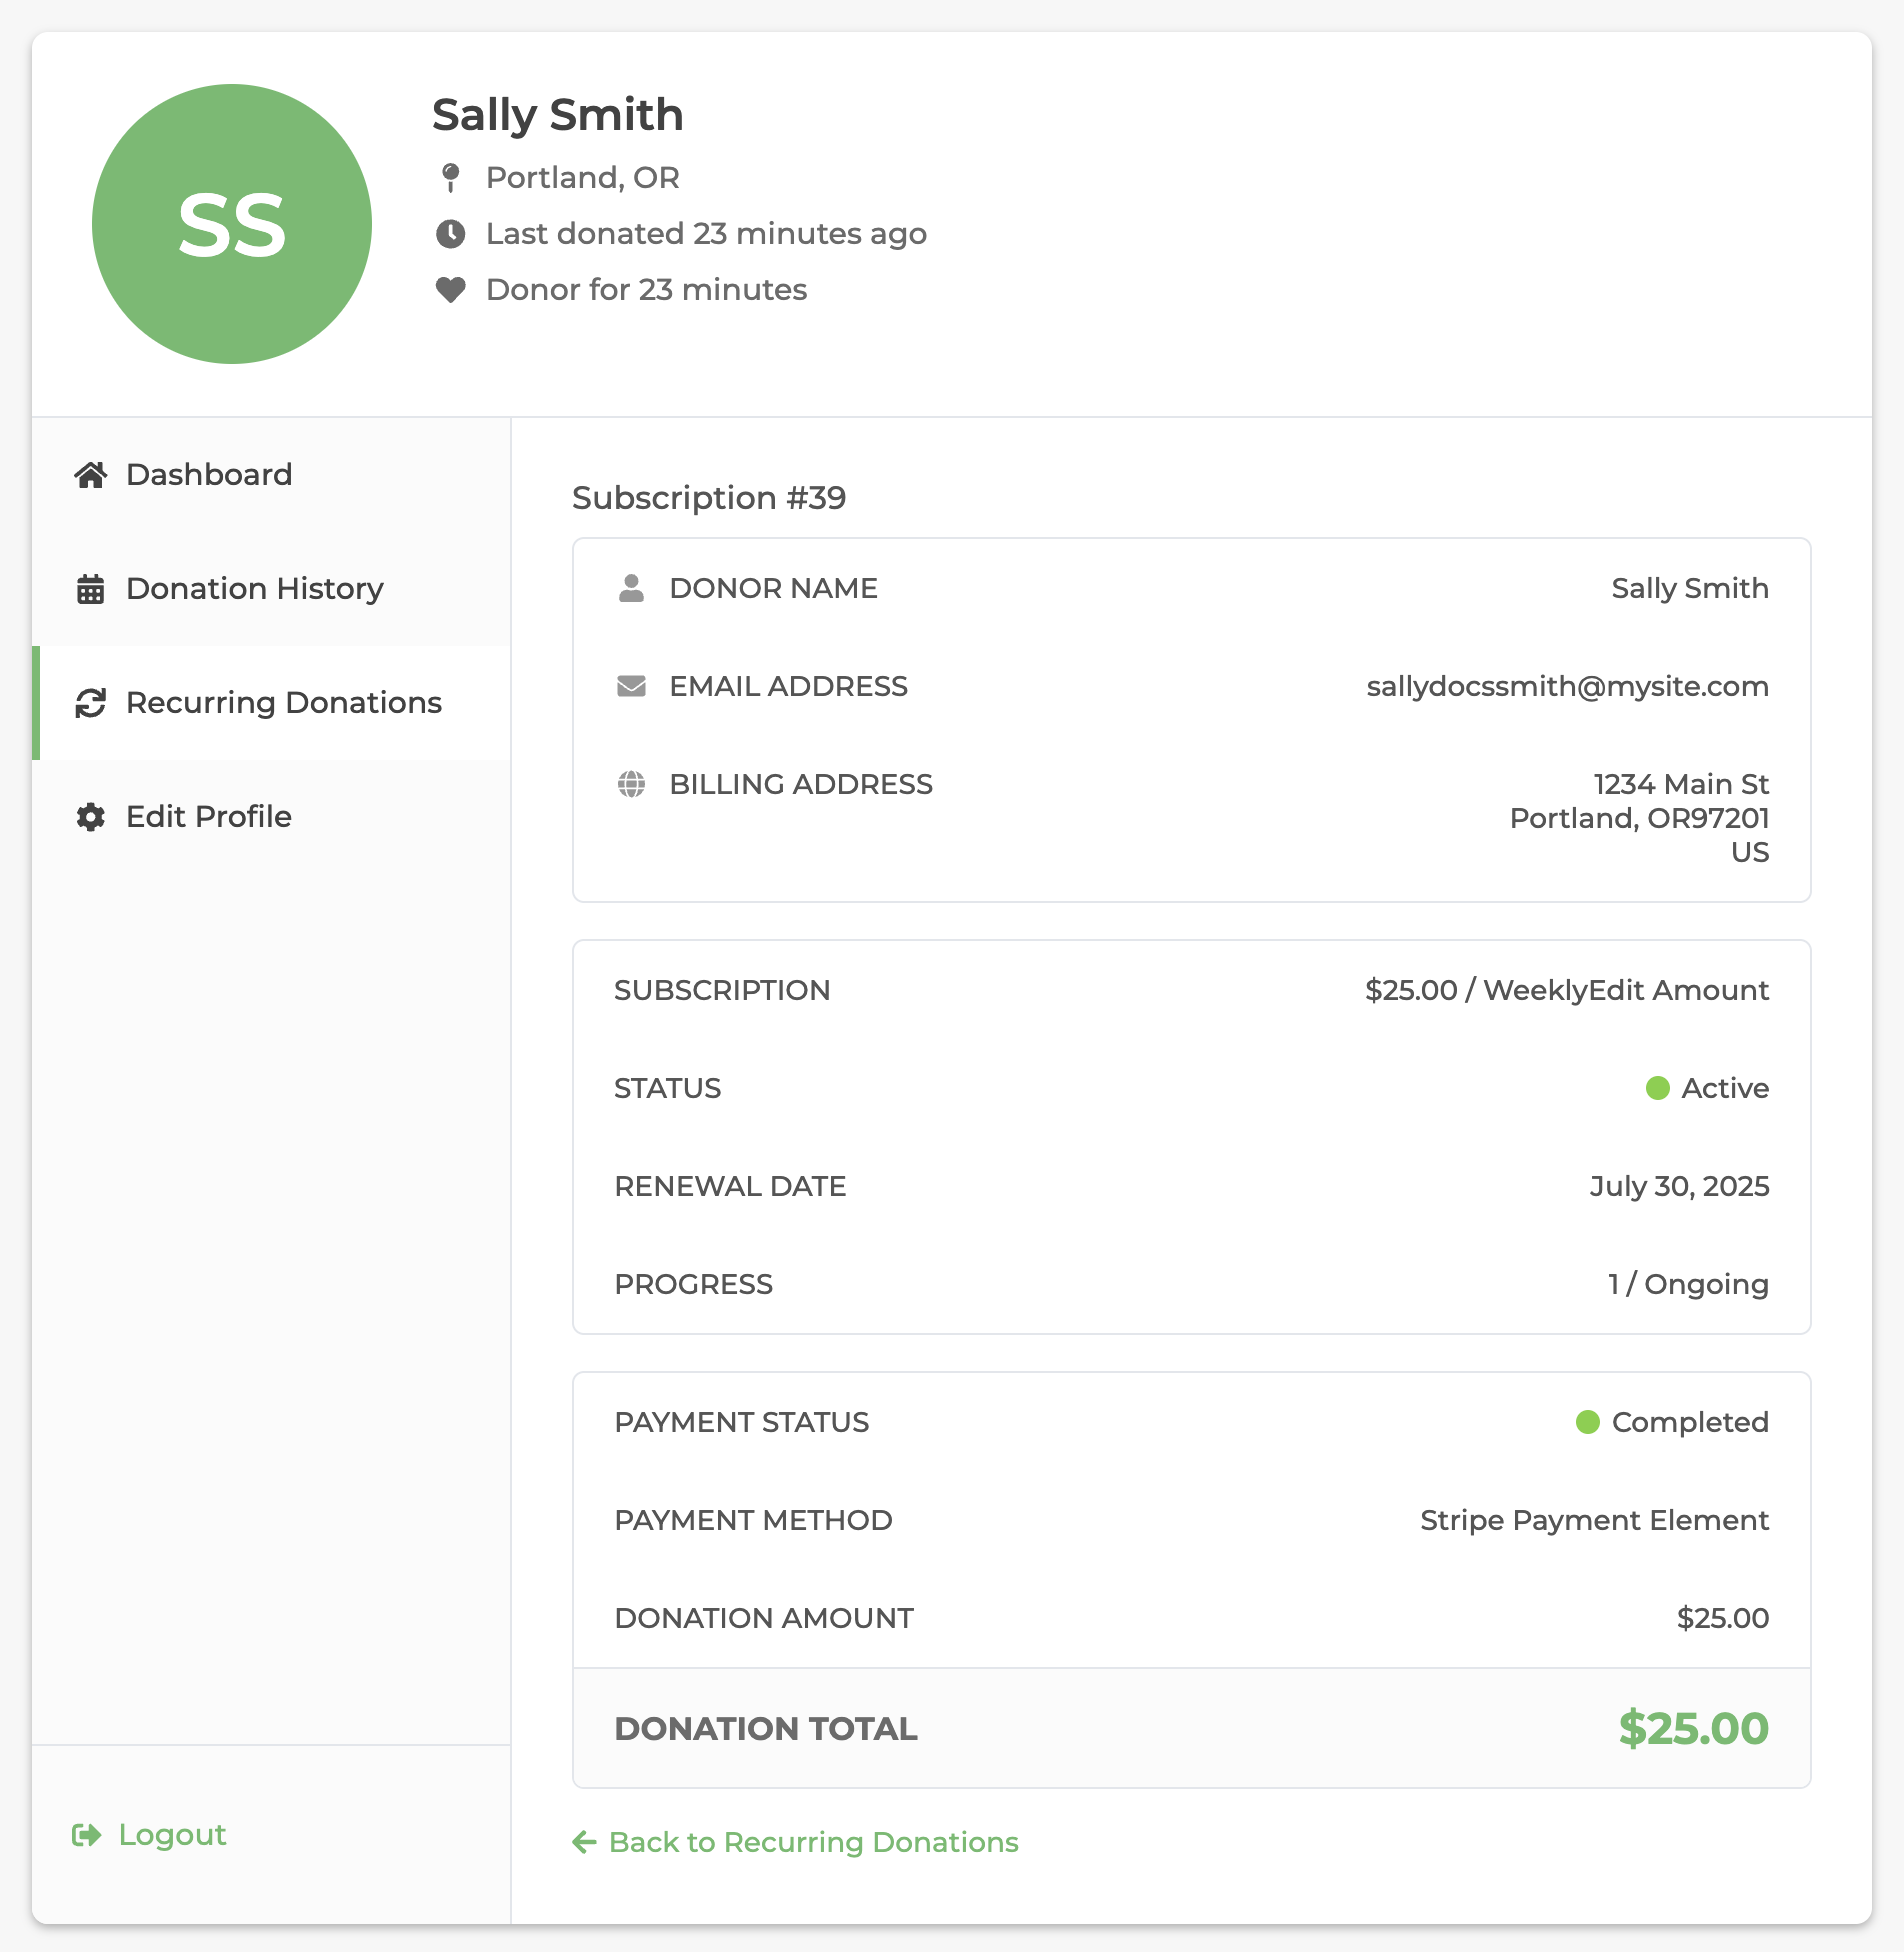
Viewing Subscription Details
When donors click View Subscription, they’ll see a detailed overview of their recurring donation. This page helps them confirm billing details and track progress at a glance.
Here’s what’s included:
- Donor Info
- Name, email address, and billing address
- Subscription Info
- Amount and frequency (e.g., $25.00 / Weekly)
- Status (e.g., Active or Completed)
- Next renewal date
- Progress (e.g., 1 / Ongoing)
- Payment Info
- Most recent payment status (e.g., Completed)
- Payment method used (e.g., Stripe Payment Element)
- Amount of the last renewal
- Total donated through this subscription so far
At the bottom of the screen, donors can click Back to Recurring Donations to return to the full subscription list.
Updating a Subscription with Manage Subscription
Clicking Manage Subscription opens a screen where donors can make changes to their recurring donation. The options available depend on the payment gateway, but when fully supported, donors can:
- Update the subscription amount
- Enter new payment card details
- Pause the subscription
- Cancel the subscription
- Save changes using the Update Subscription button
Note: Not all gateways support every option. For example, some gateways may allow only have the ability to update the subscription amount, and cancel a subscription.
Cancelling a Subscription
Donors can cancel a subscription from the Manage Subscription screen—if the payment gateway supports it.
To cancel:
- Click Cancel Subscription
- Confirm the action when prompted
This immediately stops future renewals and updates the subscription status.
Note: If the Admin Subscription Cancelled email is enabled under GiveWP > Settings > Emails – Admin Emails (tab), site admins will receive a notification when a donor cancels a subscription.
Managing Subscriptions with Option-Based Forms
Log In Option for User Accounts
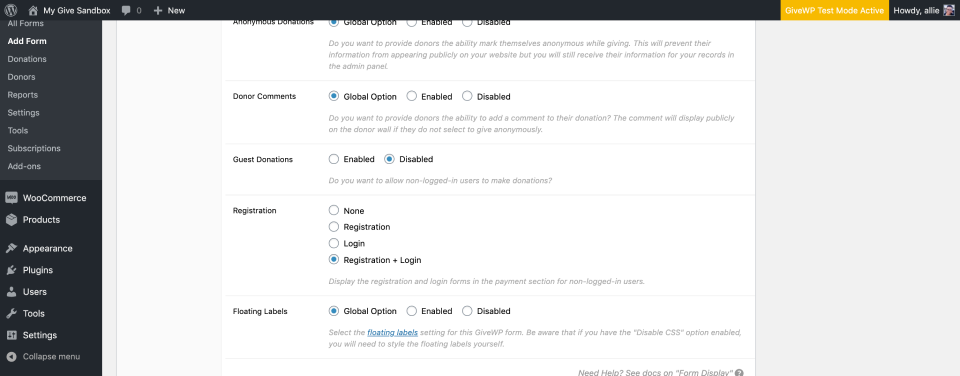
If you disable guest donations on the Form Display tab of the form edit screen, and enable the Registration and Login fields, that will force donors to create an account. This is a seamless background process that happens when they submit a donation.
Email Access Option for Guest Donations
To enable recurring donors to subscribe without logging in or creating an account, first navigate to GiveWP > Settings > General > Access Control and ensure that Email Access is enabled. That will also enable two more options for adding reCAPTCHA keys, which is recommended to prevent spam.
Note: For more details on how to configure your reCAPTCHA keys see the Access Control documentation page.
Then, on each individual form you create, in the Form Display tab, ensure that the option labeled Guest Donations is Enabled. That option should show up above the Registration option.
If you see the following , Notice: If you do not have email access enabled… in yellow above the Registration options you need to scroll to the top of the form settings and click Update. (or ensure that you saved the Access Control settings correctly in the first step) This refreshes the page, and you will then be able to see the Guest Donations option. Again, verify it is Enabled, and that the Registration option is set to None.
Updating the Manage Subscriptions Page Location
If you would like to change the location where your donors manage their subscriptions, you can do that by changing the General Settings.
To use the Donor Dashboard, make sure that the Override Legacy Donation Management Pages settings under GiveWP > Settings > General (tab) is marked enabled.
If you prefer to use the legacy management pages, make sure you click Override Legacy Donation Management Pages and save it, so you can update the Donation History and Subscriptions pages.


